This site uses cookies to maintain login information on FarmallCub.Com. Click the X in the banner upper right corner to close this notice. For more information on our privacy policy, visit this link:
Privacy Policy

NEW REGISTERED MEMBERS: Be sure to check your SPAM/JUNK folders for the activation email.

Engine Work - Update

The Cub Club -- Questions and answers to all of your Cub related issues.
Forum rules
Notice: For sale and wanted posts are not allowed in this forum. Please use our free classifieds or one of our site sponsors for your tractor and parts needs.
User avatar
Stanton
Cub Pro
Cub Pro
Posts: 7760
Joined: Mon Jun 22, 2009 6:56 am
Zip Code: 64070
Tractors Owned: 1942 Farmall AV, serial #87025
1947 Farmall Circle Cub, serial #2116
1948 Farmall Cub, serial #46066
Circle of Safety: Y
Location: Lone Jack, MO

Re: Engine Work - Update

Postby Stanton » Thu Aug 11, 2022 8:48 pm

Jim Becker wrote:
Stanton wrote:Got the starter installed.

Planning to push rather than pull?

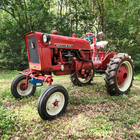
tst wrote:yes the switch is on backwards


Now that's funny! Thanks for pointing that out. Guess I could have lied and said I was planning to modify the starter rod to be like my AV or H with a foot "push" start... :lol:
Stanton
Image Circle of Safety

SPONSOR AD

Sponsor


Sponsor
 

User avatar
Dale Finch
10+ Years
10+ Years
Posts: 6676
Joined: Tue Apr 27, 2010 11:34 am
Zip Code: 27517
Tractors Owned: '51 Cub #140966 "Bruno" with Woods 59 mower
'55 Cub #187541 "Betty" with Fast Hitch
'55 Cub #190482 "Ben" with Woods 42 mower
'55 Cub #191739 "Bertha" with Woods 42 mower
'56 Cub #194370 "Boris" with Mott Flail mower
Circle of Safety: Y
Location: NC, Chapel Hill

Re: Engine Work - Update

Postby Dale Finch » Fri Aug 12, 2022 8:32 am

Jim Becker wrote:
Stanton wrote:Got the starter installed.

Planning to push rather than pull?

:lol:
Sorry for laughing, Stanton! I did the same thing on one with the shorter lever! I was glad no one was around to laugh at me!! :lol:
Dale Finch
Image
Circle of Safety

User avatar
Stanton
Cub Pro
Cub Pro
Posts: 7760
Joined: Mon Jun 22, 2009 6:56 am
Zip Code: 64070
Tractors Owned: 1942 Farmall AV, serial #87025
1947 Farmall Circle Cub, serial #2116
1948 Farmall Cub, serial #46066
Circle of Safety: Y
Location: Lone Jack, MO

Re: Engine Work - Update

Postby Stanton » Fri Aug 12, 2022 10:03 am

Dale Finch wrote:
Jim Becker wrote:
Stanton wrote:Got the starter installed.

Planning to push rather than pull?

:lol:
Sorry for laughing, Stanton! I did the same thing on one with the shorter lever! I was glad no one was around to laugh at me!! :lol:


Oh, don’t apologize, Dale. I’d rather laugh at myself—usually ends up that way.

Like I said, got the starter installed…
DF9A337A-2952-40C2-82AD-A4E90A818DAE.jpeg


:lol:
Stanton
Image Circle of Safety

User avatar
Stanton
Cub Pro
Cub Pro
Posts: 7760
Joined: Mon Jun 22, 2009 6:56 am
Zip Code: 64070
Tractors Owned: 1942 Farmall AV, serial #87025
1947 Farmall Circle Cub, serial #2116
1948 Farmall Cub, serial #46066
Circle of Safety: Y
Location: Lone Jack, MO

Re: Engine Work - Update

Postby Stanton » Wed Aug 17, 2022 4:04 pm

The radiator is next. Chased out cap screw holes.

0C0844B1-34B1-4799-8F43-FFA0FF94FA6D.jpeg


Ran Blue RTV sealant around each hole and a double line between each hole. Same for the top of the cork gasket.
4BC798EF-4E6B-4AD1-B9B1-58AAD6E6D104.jpeg

F46EB4B7-D26A-4A49-BE50-6BBB10537A65.jpeg

F2C73F47-D824-4B1C-8FDC-4734763EC135.jpeg


Lastly, got the radiator in place (I think it’s not on backwards :wink: ).
5C161704-5090-4AA0-B76F-4D4905F04E43.jpeg


Finger tightened the cap screws until the RTV began to ooze out, will wait 24 hours per manf recommendations then tighten them down.

The fan is also loosely in place…
Stanton
Image Circle of Safety

User avatar
PFord
Cub Star
Cub Star
Posts: 172
Joined: Sun Jun 19, 2022 12:14 pm
Zip Code: 32312
Tractors Owned: 1975 International Cub

Re: Engine Work - Update

Postby PFord » Wed Aug 17, 2022 4:33 pm

VERY nice!

Curious what you used for paint for the timing marks and pointer.

User avatar
Glen
10+ Years
10+ Years
Posts: 6138
Joined: Mon Mar 19, 2012 7:33 pm
Zip Code: 00000
Tractors Owned: 1956 Farmall Cub with Fast Hitch, F-11 plow, Disc, Cultivator, Cub-22 mower
Circle of Safety: Y
Location: Wa.

Re: Engine Work - Update

Postby Glen » Wed Aug 17, 2022 6:45 pm

Hi,
The Cub looks good in your pictures.

I suggest you paint the new governor spring if you can get at it with a spray can of red paint.
It will probably rust, it looks like bare metal.

Clemsonfor
501 Club
501 Club
Posts: 1118
Joined: Sun Nov 10, 2019 5:14 pm
Zip Code: 29848
Tractors Owned: Yanmar YM2000
Yanmar YM186 (non running)
1952 Farmall Cub
Circle of Safety: Y
Location: Greenwood County SC

Re: Engine Work - Update

Postby Clemsonfor » Sat Aug 20, 2022 9:05 pm

Stanton wrote:The radiator is next. Chased out cap screw holes.

0C0844B1-34B1-4799-8F43-FFA0FF94FA6D.jpeg

Ran Blue RTV sealant around each hole and a double line between each hole. Same for the top of the cork gasket.
4BC798EF-4E6B-4AD1-B9B1-58AAD6E6D104.jpeg
F46EB4B7-D26A-4A49-BE50-6BBB10537A65.jpeg
F2C73F47-D824-4B1C-8FDC-4734763EC135.jpeg

Lastly, got the radiator in place (I think it’s not on backwards :wink: ).
5C161704-5090-4AA0-B76F-4D4905F04E43.jpeg

Finger tightened the cap screws until the RTV began to ooze out, will wait 24 hours per manf recommendations then tighten them down.

The fan is also loosely in place…
Wow!! Someone who actually read the directions for RTV and actually does it per recommendations!! Really helps eliminate leaks when the stuff is used properly!

User avatar
Stanton
Cub Pro
Cub Pro
Posts: 7760
Joined: Mon Jun 22, 2009 6:56 am
Zip Code: 64070
Tractors Owned: 1942 Farmall AV, serial #87025
1947 Farmall Circle Cub, serial #2116
1948 Farmall Cub, serial #46066
Circle of Safety: Y
Location: Lone Jack, MO

Re: Engine Work - Update

Postby Stanton » Sun Aug 21, 2022 7:06 pm

PFord wrote:VERY nice!

Curious what you used for paint for the timing marks and pointer.


Ace Hardware brand Rust Stop School Bus Yellow Gloss. Had it on hand. Usually wears well.

Looks like I’ll need remove the governor spring and paint it. Some experts on here recommend that… :lol:
Stanton
Image Circle of Safety

Clemsonfor
501 Club
501 Club
Posts: 1118
Joined: Sun Nov 10, 2019 5:14 pm
Zip Code: 29848
Tractors Owned: Yanmar YM2000
Yanmar YM186 (non running)
1952 Farmall Cub
Circle of Safety: Y
Location: Greenwood County SC

Re: Engine Work - Update

Postby Clemsonfor » Sun Aug 21, 2022 8:08 pm

Stanton wrote:
PFord wrote:VERY nice!

Curious what you used for paint for the timing marks and pointer.


Ace Hardware brand Rust Stop School Bus Yellow Gloss. Had it on hand. Usually wears well.

Looks like I’ll need remove the governor spring and paint it. Some experts on here recommend that… :lol:

I'd leave it on there and hit it as best I could , but if it's easy to remove I guess one could pull it.

User avatar
Glen
10+ Years
10+ Years
Posts: 6138
Joined: Mon Mar 19, 2012 7:33 pm
Zip Code: 00000
Tractors Owned: 1956 Farmall Cub with Fast Hitch, F-11 plow, Disc, Cultivator, Cub-22 mower
Circle of Safety: Y
Location: Wa.

Re: Engine Work - Update

Postby Glen » Sun Aug 21, 2022 8:25 pm

Hi,
I'm not an expert, I meant just paint it where it is, if you can get at it, paint will run down the inside of it too, if you can get it there.
Where I live things rust, maybe they don't rust much where you are.

D Reid
Posts: 10
Joined: Wed Jun 29, 2022 9:34 pm
Zip Code: 70395
eBay ID: Sawdust701
Tractors Owned: 1977 IH Cub
Circle of Safety: Y
Location: Schriever, LA

Re: Engine Work - Update

Postby D Reid » Sun Aug 21, 2022 8:42 pm

Great Job Stanton! I appreciate you sharing your work. The narrative and pictures are probably as much work as the work on the tractor.
Thank you,
Dennis
Circle of Safety

User avatar
PFord
Cub Star
Cub Star
Posts: 172
Joined: Sun Jun 19, 2022 12:14 pm
Zip Code: 32312
Tractors Owned: 1975 International Cub

Re: Engine Work - Update

Postby PFord » Sun Aug 21, 2022 10:03 pm

Stanton wrote:
PFord wrote:VERY nice!

Curious what you used for paint for the timing marks and pointer.


Ace Hardware brand Rust Stop School Bus Yellow Gloss. Had it on hand. Usually wears well.


Thanks. It certainly stands out. My paint marker pen didn't quite do as well as I'd hoped.

User avatar
Stanton
Cub Pro
Cub Pro
Posts: 7760
Joined: Mon Jun 22, 2009 6:56 am
Zip Code: 64070
Tractors Owned: 1942 Farmall AV, serial #87025
1947 Farmall Circle Cub, serial #2116
1948 Farmall Cub, serial #46066
Circle of Safety: Y
Location: Lone Jack, MO

Re: Engine Work - Update

Postby Stanton » Mon Aug 22, 2022 2:44 pm

Clemsonfor wrote:I'd leave it on there and hit it as best I could , but if it's easy to remove I guess one could pull it.

Glen wrote:Hi,
I'm not an expert, I meant just paint it where it is, if you can get at it, paint will run down the inside of it too, if you can get it there.
Where I live things rust, maybe they don't rust much where you are.


I was using a little Missouri tongue-in-cheek humor there, boys. :wink: I'm not planning to paint the spring. Wouldn't make a hill of beans difference anyway. :)
Stanton
Image Circle of Safety

User avatar
Stanton
Cub Pro
Cub Pro
Posts: 7760
Joined: Mon Jun 22, 2009 6:56 am
Zip Code: 64070
Tractors Owned: 1942 Farmall AV, serial #87025
1947 Farmall Circle Cub, serial #2116
1948 Farmall Cub, serial #46066
Circle of Safety: Y
Location: Lone Jack, MO

Re: Engine Work - Update

Postby Stanton » Mon Aug 22, 2022 3:47 pm

On to other things...like the carb.

It's been sitting in an open box of parts for the last year. Gets kinda dirty in the ol' shop, so needs to be cleaned up a bit.

IMG_5447.JPG
Dirty, dirty...

IMG_5451.JPG
Be sure to lift straight UP on the carb top until the idle tube clears the bottom housing.


The carb was running fine when I took it off Nellie last autumn, but it's always good to start with a clean carb. Inside looks pretty clean...
IMG_5452.JPG

IMG_5454.JPG
Removing screws from the butterfly shutter.

IMG_5455.JPG
Removing the idler adjusting screw and spring.

IMG_5458.JPG
The discharge nozzle and gasket needs to be removed.

IMG_5459.JPG
Removing the metering jet screw.

IMG_5461.JPG
Fully disassembled carb.


I'm still too cheap to buy an ultrasonic cleaner, so some time ago, I walked into a local thrift store and bought a roaster. Since we have indoor cats, we have an abundance of kitty litter bottles that I cut the bottom off one, drilled holes in it, and use it as a parts basket. Works real good. I use the industrial version of Simple Green (which is actually purple), which you can buy at Walmart, Home Depot, Lowe's or other stores. The ratio is about 70/30 Simple Green to water. Got the roaster up to "roasting" temp, put the parts that need cleaned into the basket and submerge. Let 'em soak for about as long as it takes to cut out a couple carb gaskets...
IMG_5466.JPG


I've developed some templates over the years and keep them in a ziploc bag inside my gasket material box.
IMG_5467.JPG

IMG_5468.JPG
Here's the templates I use for the manifold and carb fuel gaskets.

IMG_5469.JPG
Gasket between the carb and manifold exhaust/intake.

IMG_5470.JPG
Fortunate for me to find a leftover strip of cork just wide enough to use for the carb fuel gasket.


You've heard me before...lather, rinse, repeat...
IMG_5472.JPG
Punch all the holes and inside radii first.

IMG_5474.JPEG
Finish cutting the straight lines with an X-Acto knife. Another carb gasket ready to use. New gasket at lower left; old one at lower right; template at top.


Meanwhile, parts are ready to come out of their bath...that haze is steam. :)
IMG_5476.JPG


Drain all the liquid back into the roaster. I use carb cleaner to spray down all the parts, then fired up the air compressor and blew the parts dry. Make sure any tiny passages, such as the metering jet and discharge nozzle openings are clean and clear, then it's time for assembly. There's a few places that carbs can leak gas past where they should, so I use just a dab of sealant (Permatex No. 2) on the threads. It's anti-gasoline and oil, stays flexible.
IMG_5477.JPG
Discharge nozzle threads...that's a toothpick (so you can gauge size).

IMG_5480.JPG
Fuel needle cage...


Made new felt washers for each end of the openings at the starting shutter shaft. I left the butterfly shaft with retainer and felt washer in place (didn't replace).
IMG_5479.JPG
Felt washer.


Gasket in place and ready to put back together. And yep, the float measures 1.4" when the top is upside down and 1.6" at full drop.
IMG_5483.JPG
Stanton
Image Circle of Safety

CharlieK
10+ Years
10+ Years
Posts: 801
Joined: Sun Apr 10, 2005 9:25 pm
Zip Code: 40165
Location: bullitt county, kentucky

Re: Engine Work - Update

Postby CharlieK » Mon Aug 22, 2022 6:29 pm

very nice job Stanton--hope you are doing well also
get er done; life is good


Return to “Farmall Cub”

Who is online

Users browsing this forum: No registered users and 45 guests