Page 4 of 5
Re: Cub Tip of the Week! July 26th, 2011
Posted: Tue Jul 26, 2011 11:36 am
by Rudi
Rudi wrote:This week's tip is courtesy of
Don McCombs eagle eyes


Rudi wrote:This weeks
"Cub Tip of the Week" is courtesy of: :
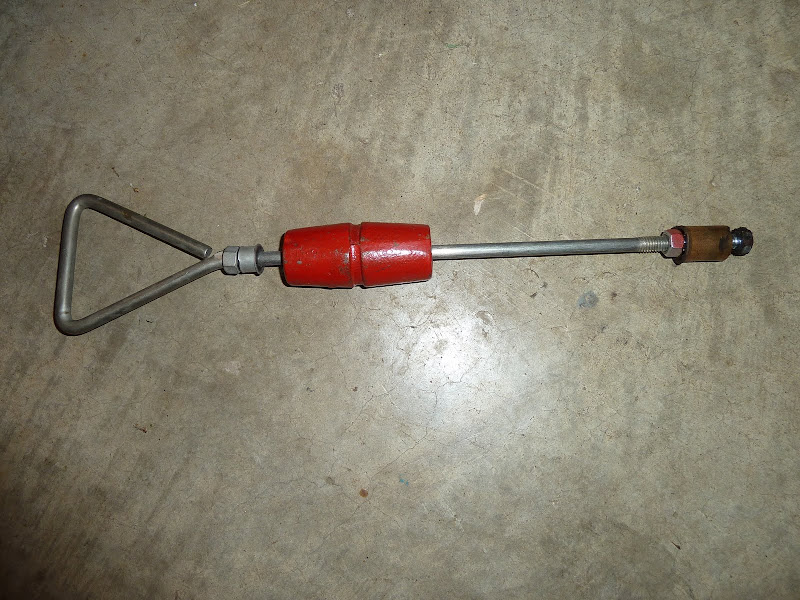
How to Remove An Output Shaft Pilot Bearing (bushing) As a first-timer, I read this forum for how to extract the brass pilot bushing. Since I didn't have a 3/4 tap, as suggested, I tried a different approach and it worked.
I had an automotive bodywork dent puller. It is a slide hammer wiTh a threaded end. I found a mating bolt, connected it with a nut, and with only very slight grinding of the bolt hex head corners it slipped right into the bushing. I just caught the backup edge of the bushing with the bolt head (moving it around a bit) and pulled it right out with just a few hammers. Might not work for one really stuck, but worked for me.
Re: Cub Tip of the Week!
Posted: Tue Nov 01, 2011 10:06 am
by Bigdog
A great tip of the week from Chief:
Re: Cub Tip of the Week! December 13th, 2011
Posted: Tue Dec 13, 2011 3:50 pm
by Rudi
Rudi wrote:This weeks
"Cub Tip of the Week" is courtesy of: :
How to Accurately Determine TC Fluid Level To get an accurate reading on the t/c fluid, make sure the rockshaft arms are rotated back so the t/c cylinder rod is retracted. If you're unsure which way that is just look under the hood and watch the cylinder rod work back and forth. If its not retracted youll get a false reading and youll overfill things. This step is usually missed when checking levels on hydraulic equipment.
Rick
Re: Cub Tip of the Week! September 17, 2012
Posted: Mon Sep 17, 2012 10:10 pm
by Rudi
I know it has been quite a while since I have added a Cub Tip of the Week. However, John has come up with a great one and I felt it should be included in the Cub Tip of the Week
Rudi wrote:This weeks
"Cub Tip of the Week" is courtesy of: :
Making Do With What You Have The cub I was repairing the touch control on had a dogleg screw broken off in the steering side radiator casting, but luckily it was the front one which is easier to get too. However when I was removing the rear screw it broke too, which is a little more difficult. I did not have a right angle drill small enough to go in there, nor a bit long enough to reach past the steering housing, so after looking through my assorted junk I came up with this. I had three or four 1/4 inch drill motors that had not been used in many years, so one of them became a chuck donor, I mixed up some JB Weld and spread on the threads of a 3/8 fine thread bolt, then screwed it in good and tight. The JB Weld is so I can use it with a left hand twist bolt if I ever need too. I cut off a dull 5/32 bit and resharpened it, and was in business. I did remove the 2 bolts in the seal holder for the steering shaft to get a little more room. The 5/32 bit is very slightly large for the 10/24 tap, but I did not have any numbered bits, which is what it should have been, but all seems ok.

Re: Cub Tip of the Week! January 11, 2013
Posted: Fri Jan 11, 2013 3:03 pm
by Rudi
Rudi wrote:I know it has been quite a while since I have added a Cub Tip of the Week. However, Bill has come up with a great one - not exactly a tip but more of an explanation to those of us who are somewhat electrically challenged which I felt it should be included in the Cub Tip of the Week
Rudi wrote:This weeks
"Cub Tip of the Week" is courtesy of: :
Batteries A battery is like a bucket in some ways. If the bucket is empty it take more water to fill it than if it is half full. If a new battery is fully charged and you start right up you only took a little electricity out so it will recharge (fill up) quickly. An old battery is like a bucket with some small holes in it. It takes longer to fill up.
Kind of a simplified way to look at it but it kind of works that way.
Bill
Re: Cub Tip of the Week! February 04, 2013
Posted: Mon Feb 04, 2013 7:48 pm
by Rudi
Rudi wrote:This is something that I am kickin' my tush on. Being a cabinet maker one would have thought that this would have been a no-brainer for me. To tell the through, I never even thought of it. Some glad Raymond did. It is so slick I felt it should be included in the Cub Tip of the Week
Rudi wrote:This weeks
"Cub Tip of the Week" is courtesy of: :
Making a Magneto Seal Installation Tool The following steps only work if you have wood working tools available...
1) Take a small piece of hardwood and plane it down to the correct thickness (23/32"), or as close as you can using a caliper to measure the board.
2) Then take a new seal and trace an outline of it on the board. Cut the outline out of the board on the inside of the line, so it's a bit smaller in diameter than the seal.
3)Cut out another circle, larger than the seal and stack it on the first circle you cut out. This will create a "lip" so that the seal isn't driven in too far. Drill a hole through both and bolt them together.
4) Now you have a driver that is the correct size as to equalize the contact points, and thickness so that the seal is set to the proper place.
I've made a few like this and they work great!
Re: Cub Tip of the Week! February 04, 2013
Posted: Mon Feb 25, 2013 12:12 am
by Rudi
Rudi wrote:This is a tip that is long overdue for inclusion in the CTotW. Somehow we missed this a few years ago

and I am glad it has been brought back up. It is a neat solution and another instance of use what you have to get the job done.
Rudi wrote:This weeks
"Cub Tip of the Week" is courtesy of: :
Making Spacers For Square Hood Cubs After much searching,I came across a union that joins two threaded rods together. It is almost perfect. It comes 1 1/2 inches long and has to be cut down to an inch. The cost is less than $1.50 each. After cutting down, I cut off the end of a 5/16 grade 5 bolt and used loctight to bond it in the sleeve. It is a good fix for the hard to find originals.
Boss
Re: Cub Tip of the Week! May 14, 2013
Posted: Tue May 14, 2013 9:58 pm
by Rudi
Rudi wrote:Some may say Cub owners are cheap, but I prefer frugal, and this tip is a real frugal one. Use what you have.
Rudi wrote:This weeks
"Cub Tip of the Week" is courtesy of: :
Leveling a Mower with a Story BoardI am still too cheap to get one of the guages. What I use is a 2x2 or 2x4 block about 6 inches long. I reach under the mower deck and stand the block upright. Then I rotate the blade until the cutting edge contacts the block, making a mark. I then go around to the other side and repeat to see if the other blade marks the block in the same place. If not adjust one side accordingly. Repeat until the marks are aligned.
Cub Tip of the Week! May 31, 2013
Posted: Fri May 31, 2013 5:40 pm
by Rudi
Rudi wrote:Using what you got to make the tool you need

Rudi wrote:This weeks
"Cub Tip of the Week" is courtesy of: :
Brake Pedal Puller Tool

Thanks for your help, mission accomplished. Made a puller from a piece
of 2- 3/8" sq. tubing. Cut 3/4" slot and welded the piece on top. Drilled
and taped 1/2-20 NF. Had kroil oil in peddle for 24 hours and used puller
the brake peddle cam off easily.
Re: Cub Tip of the Week! August 23, 2013
Posted: Fri Aug 23, 2013 3:44 pm
by Rudi
Rudi wrote:Using what you got to make the tool you need - installment #2
Rudi wrote:This weeks
"Cub Tip of the Week" is courtesy of:
How To Remove Roll Pins EasilyI learned a trick for removing spring type roll pins today. I was working on the throttle of Jeff's (non mechanic neighbor) 444 today and needed to get the lower roll pin in this picture out to replace the friction disk.

In addition to it being hard to get too, there appeared to be some weld gobbed around the pin, which I had to cut off with the Dremel. I tried to drive it out with a punch, but couldn't move it due to not being able to backup the shaft and keep it from sprining. I tried drilling it, but all I accomplished was dulling my drill bit. After thinking a little bit I remembered Jeff mentioning he was wondering about using an air chisel. I grabbed my air chisel and ground the punch bit that came with it down to the size of the roll pin, and the pin popped out almost as soon as I pulled the trigger. I think I will get some extra punches to grind down to pin sizes as I need them.
Re: Cub Tip of the Week! June 09, 2014
Posted: Sat Jun 14, 2014 11:18 pm
by Rudi
Rudi wrote:I wonder if this is what Momma meant when she asked if you was popping your cork

Rudi wrote:This weeks
"Cub Tip of the Week" is courtesy of:
How To Find TDC by Using a CorkWell fellers
I stuck a cork in the #1 plug hole and when it popped out, I lined up the mark and the rotor was 180 degrees off. Timed the mag again and she fired right up!!!! Man I was so glad!!! Thank you guys for the help and thanks to the board for all the how to stuff?
Now I'll keep my word...where can I send the parts to?
woohoo!


