This site uses cookies to maintain login information on FarmallCub.Com. Click the X in the banner upper right corner to close this notice. For more information on our privacy policy, visit this link: Privacy Policy
NEW REGISTERED MEMBERS: Be sure to check your SPAM/JUNK folders for the activation email.
Waking up the ol' Cub
Forum rules
Notice: For sale and wanted posts are not allowed in this forum. Please use our free classifieds or one of our site sponsors for your tractor and parts needs.
Notice: For sale and wanted posts are not allowed in this forum. Please use our free classifieds or one of our site sponsors for your tractor and parts needs.
-
Willy

- 5+ Years

- Posts: 519
- Joined: Sun Oct 22, 2017 4:54 pm
- Zip Code: 38330
- Tractors Owned: 1951 Cub Lil Red
- Location: Dyer, TN
Re: Waking up the ol' Cub
Ordered some parts this morning. Hydraulic pump gasket and o-ring kit, sediment bowl gasket and screen from Steiner and the X "Quad" to replace the regular on in the kit. Should be here by next week. And then the fun will begin again.
-
Willy
- 5+ Years
- Posts: 519
- Joined: Sun Oct 22, 2017 4:54 pm
- Zip Code: 38330
- Tractors Owned: 1951 Cub Lil Red
- Location: Dyer, TN
Re: Waking up the ol' Cub
Just got parts notifications. I should have the pump kit tomorrow. The X "Quad"-ring is on backorder and they're hoping to ship it by the 9th. Good thing it's not urgent. I've still got some more stuff to do to it in the mean time.
I'm thinking about replacing the broken ammeter with a voltmeter and I want to revisit the new wiring on the lights.
I'm thinking about replacing the broken ammeter with a voltmeter and I want to revisit the new wiring on the lights.
-
Willy
- 5+ Years
- Posts: 519
- Joined: Sun Oct 22, 2017 4:54 pm
- Zip Code: 38330
- Tractors Owned: 1951 Cub Lil Red
- Location: Dyer, TN
Re: Waking up the ol' Cub
Gave it a couple of tries to start late this afternoon. Had a self inflicted starter cable problem that I rectified, but never did get the engine to fire. The battery got down to about 10 volts, so I called it quits and put the battery on the charger for the night. I didn't have the fuel tank on it and just filled the float bowl as I was mainly just figuring on running it for about a minute or so because the oil is still contaminated with hydraulic oil and I wanted to get the lift into the down position for the rebuild of the hydraulic pump.
So, when I next get a chance to work on it, I'll be putting the hood and fuel tank back on it, and hooking the fuel line back up. Hopefully sometime tomorrow afternoon.
So, when I next get a chance to work on it, I'll be putting the hood and fuel tank back on it, and hooking the fuel line back up. Hopefully sometime tomorrow afternoon.
-
Willy
- 5+ Years
- Posts: 519
- Joined: Sun Oct 22, 2017 4:54 pm
- Zip Code: 38330
- Tractors Owned: 1951 Cub Lil Red
- Location: Dyer, TN
Re: Waking up the ol' Cub
Hood's still off. I decided to check the ignition wiring voltage at the connections and found some interesting and confusing voltage drops on the way to the distributor from the ignition switch. 12 volts at the switch and less than 1 at the distributor. Still scratching my head on that one.
And while I was poking around, I found that the lever the choke rod connects to was basically just moving back and forth on the shaft without moving the choke. After pulling the carb, I was trying to get lever off of the shaft to figure out how to fix it and discovered in a rather rude fashion that the lever isn't steel when it broke. I really didn't think I was being that hard on it. I've got it now getting friendly with some JB Weld overnight and hope they decide they can play nice together.
And while I had the carb apart, I also discovered it seriously needed some cleaning. I've rebuilt carbs all my adult life and rarely break a gasket and quite often can get away with reusing the old one. Guess what? I had to make a trip to the IH dealer for a new float bowl gasket.
Not sure if I can call today progress or not.
-
Glen

- 10+ Years

- Posts: 6152
- Joined: Mon Mar 19, 2012 7:33 pm
- Zip Code: 00000
- Tractors Owned: 1956 Farmall Cub with Fast Hitch, F-11 plow, Disc, Cultivator, Cub-22 mower
- Circle of Safety: Y
- Location: Wa.
Re: Waking up the ol' Cub
Hi,
The choke rod lever might have just needed tightening on the shaft. I have seen one that came loose over time, and it didn't move the choke shaft and butterfly valve. Tightening the screw fixed the one I saw.
Below is a new lever at TM Tractor, if you need one.
http://www.tmtractor.com/new/fl/522fp.htm
They usually need to be in the position in the pic below, from TM Tractor, with the choke in the fully open position, if the choke rod is the original length.
- Attachments
-
-
Willy
- 5+ Years
- Posts: 519
- Joined: Sun Oct 22, 2017 4:54 pm
- Zip Code: 38330
- Tractors Owned: 1951 Cub Lil Red
- Location: Dyer, TN
Re: Waking up the ol' Cub
Thanks.
This one had already been overtightened. The slot the screw tightens was all bent together by the screw.
Looking at the one from TM has me thinking I could probably make a new one. Should be fun trying anyway. (Retired: All the time in the world, just no money to take advantage of it)
This one had already been overtightened. The slot the screw tightens was all bent together by the screw.
Looking at the one from TM has me thinking I could probably make a new one. Should be fun trying anyway. (Retired: All the time in the world, just no money to take advantage of it)
-
Glen
- 10+ Years
- Posts: 6152
- Joined: Mon Mar 19, 2012 7:33 pm
- Zip Code: 00000
- Tractors Owned: 1956 Farmall Cub with Fast Hitch, F-11 plow, Disc, Cultivator, Cub-22 mower
- Circle of Safety: Y
- Location: Wa.
Re: Waking up the ol' Cub
Hi,
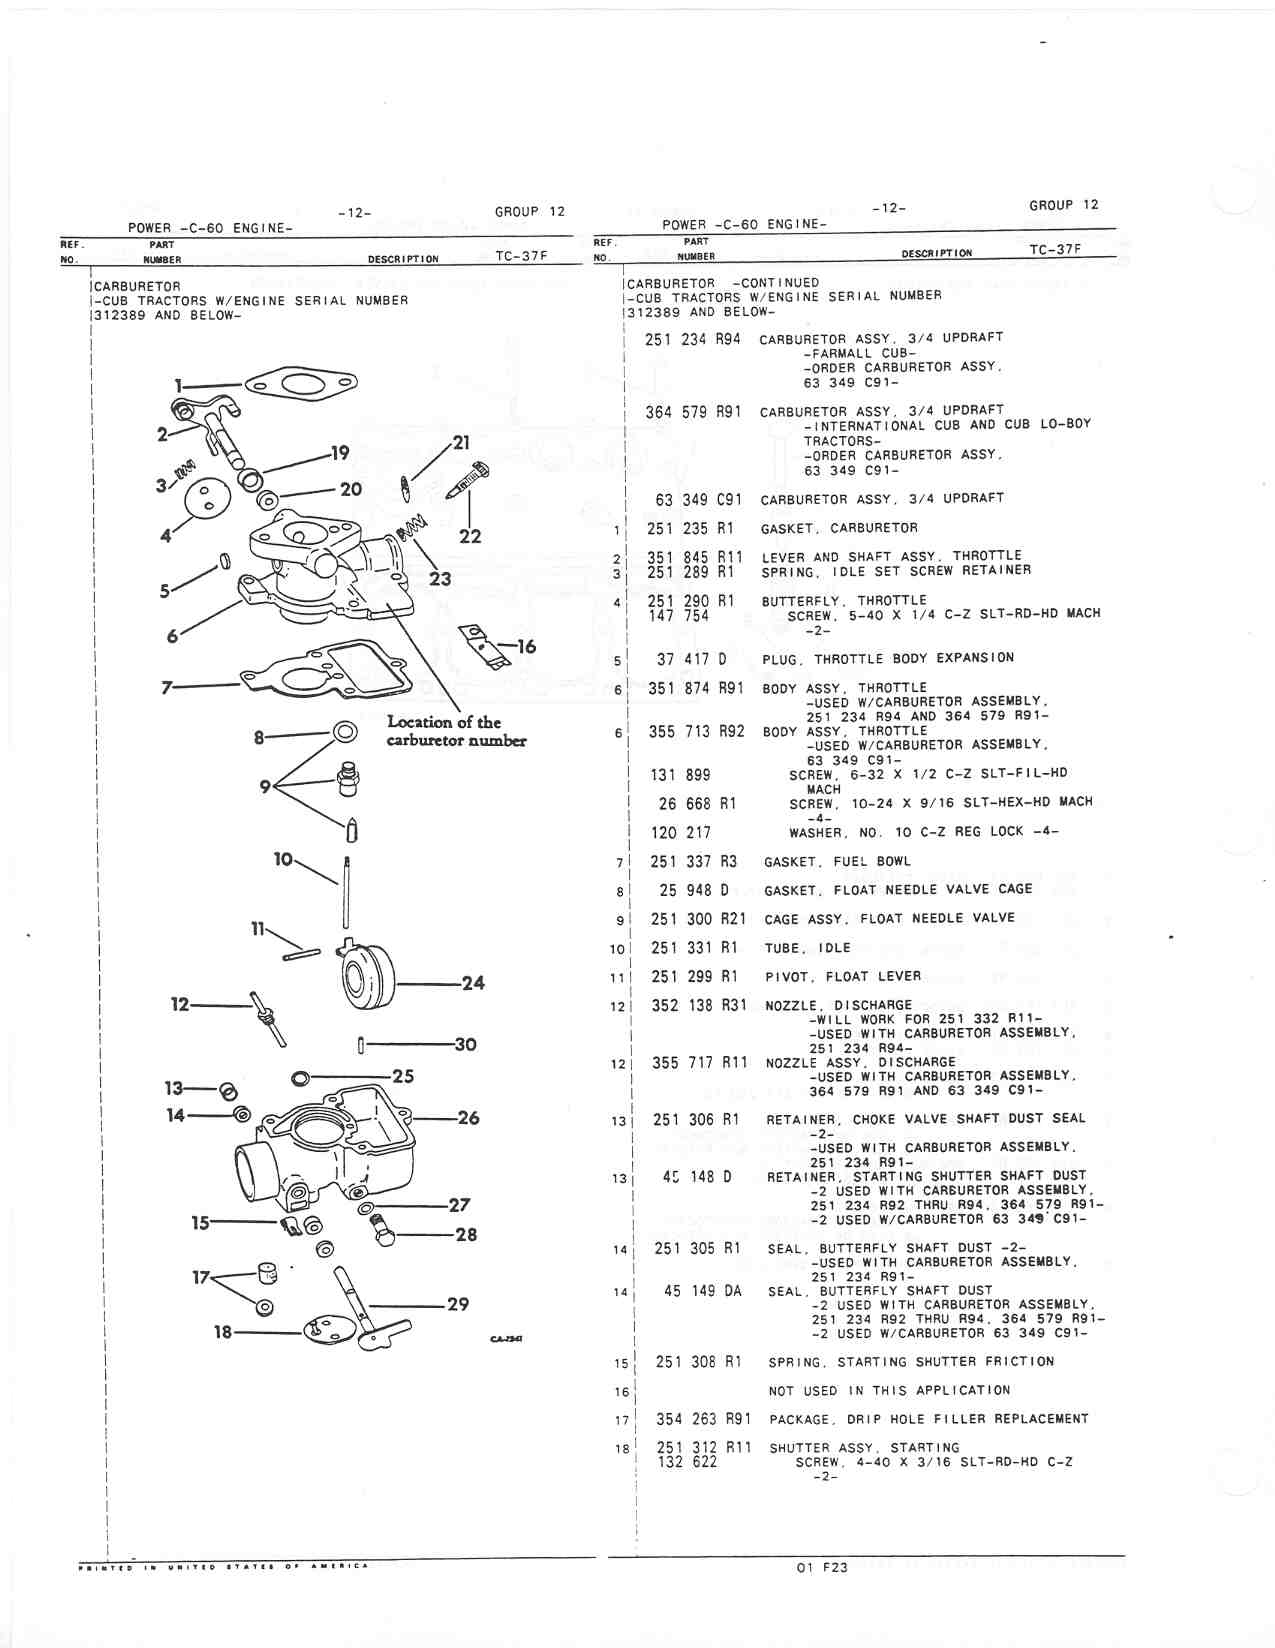
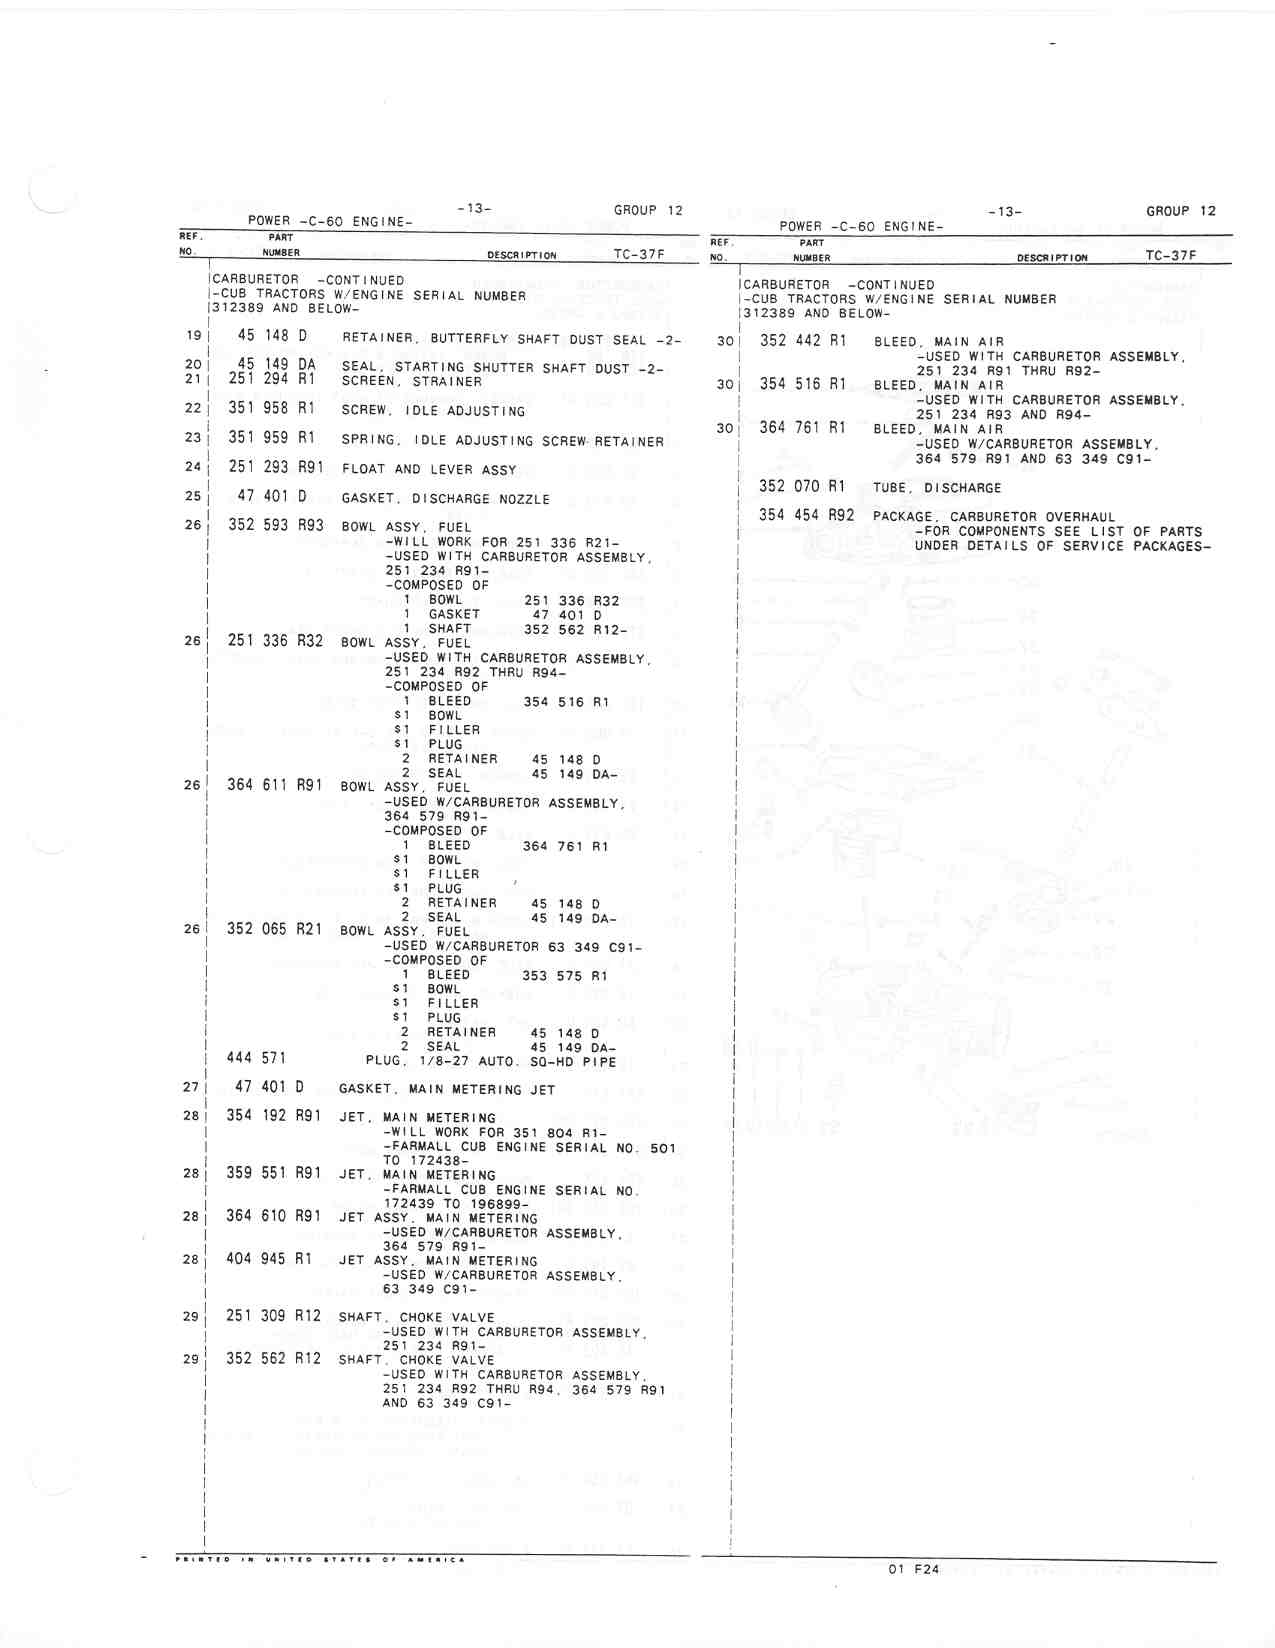
Here is info about working on the IH carburetor, if you need it.
Below is a page from the Cub parts manual showing the IH carburetor.
Pull the 2 halves straight apart, don't twist it. The idle tube, number 10 in the pic is easy to break. It screws into the top half.
I would use carburetor cleaner in it, and then blow out all the passages with air. Wear your safety goggles when using the air.
Be sure to remove the high speed jet, number 28 in the pic, and clean it, including the small hole in the end of it.
There is a small screen in the gas inlet to the carb, clean it too.
The needle and seat could be worn out and need replacing, if gas drips on the ground when the Cub is sitting. But they can drip because the float level is too high, or because there is dirt in the needle and seat.
http://www.farmallcub.info/manuals/cub_ ... 012-12.jpg
http://www.farmallcub.info/manuals/cub_ ... 012-13.jpg
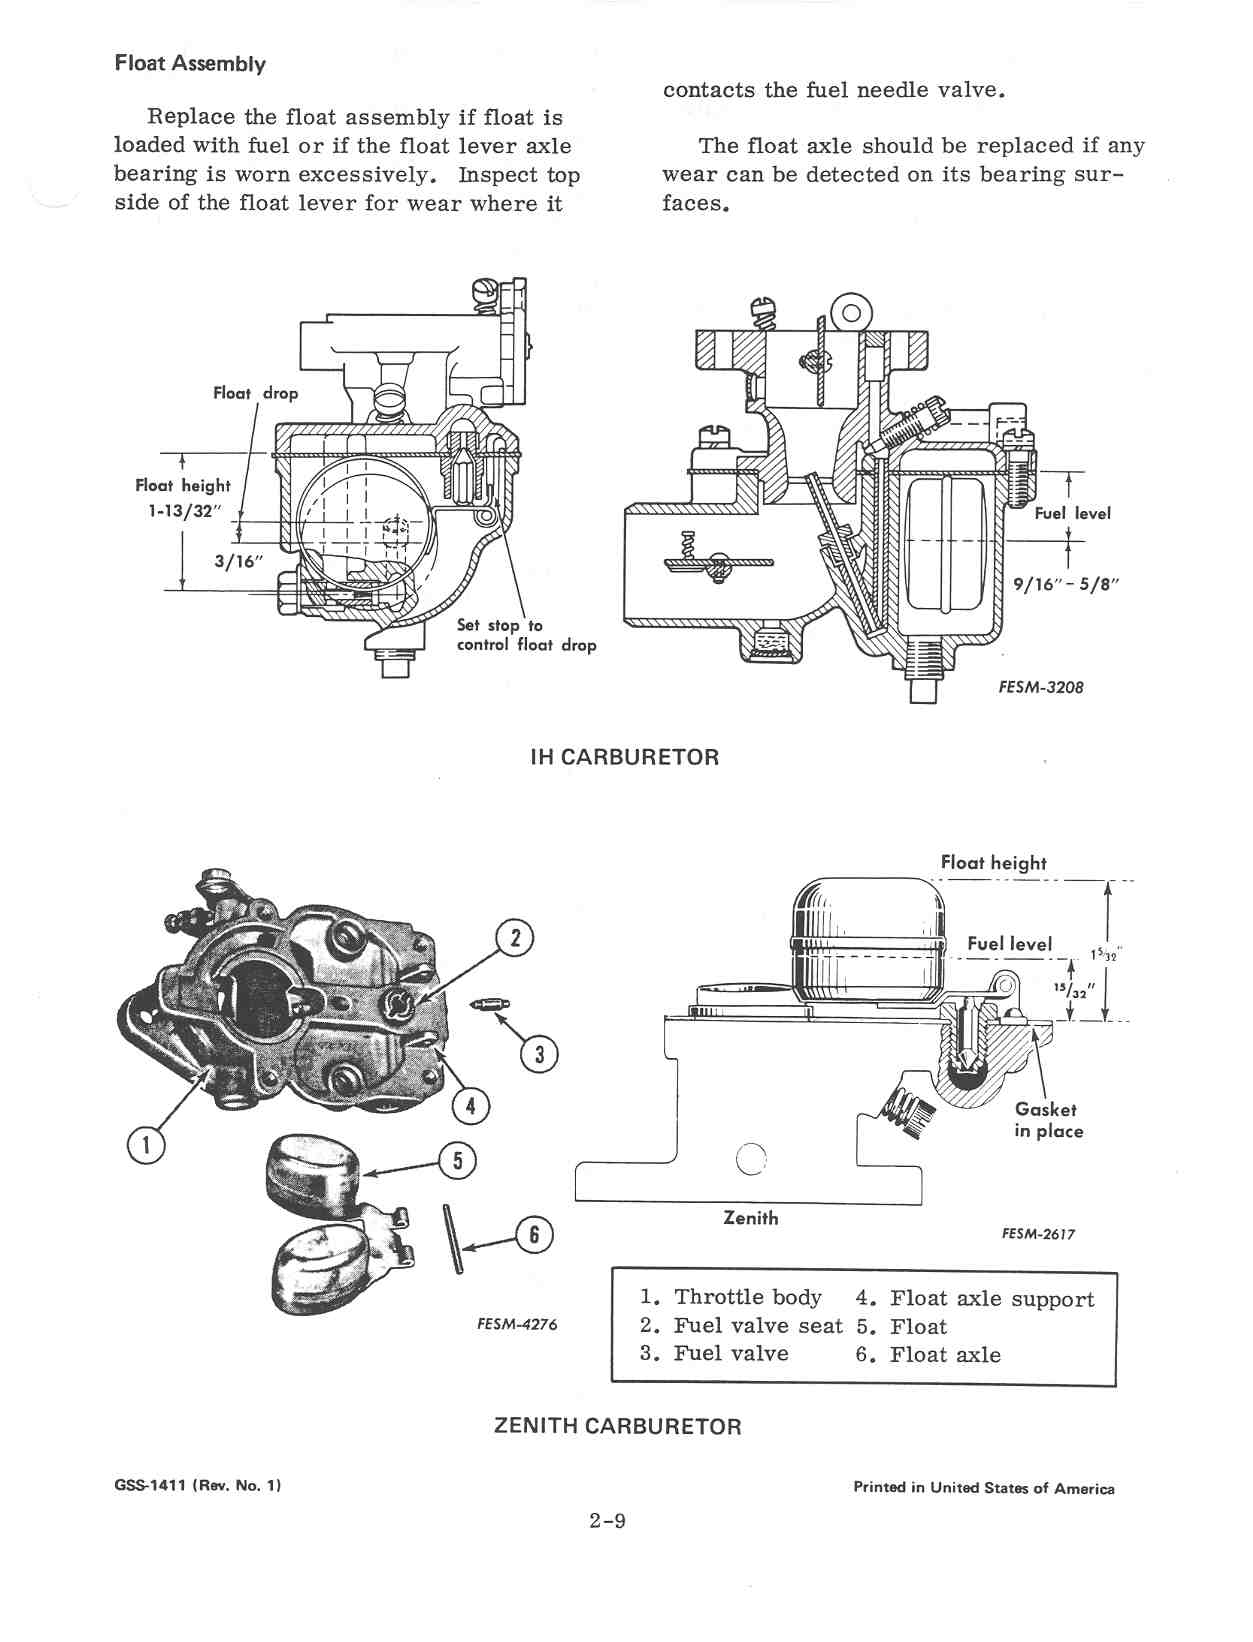
The original needle and seat were all metal. Some of the guys on here say they work better than other types. Here is a listing at TM Tractor showing how they looked.
http://www.tmtractor.com/new/fl/5183fp.htm
Set the float level accurately with a measure, some of the guys on here have said their carb would not work right until they set the level exactly.
Below is a page from the Cub service manual showing the float level, and float drop, both need setting. The IH Carb is in the upper pics, use those measurements, if you have an IH carb. Turn the top half with the float in place upside down, like the Zenith pic at the lower right, and measure the level.
The IH carb does not use the gasket in place to measure the level, the Zenith does, they are different in that way.
http://www.farmallcub.info/manuals/gss- ... 002-09.jpg
Tighten everything gently in or attaching to the carb, the metal is soft, and the threads strip out easily.
Here is info about working on the IH carburetor, if you need it.
Below is a page from the Cub parts manual showing the IH carburetor.
Pull the 2 halves straight apart, don't twist it. The idle tube, number 10 in the pic is easy to break. It screws into the top half.
I would use carburetor cleaner in it, and then blow out all the passages with air. Wear your safety goggles when using the air.
Be sure to remove the high speed jet, number 28 in the pic, and clean it, including the small hole in the end of it.
There is a small screen in the gas inlet to the carb, clean it too.
The needle and seat could be worn out and need replacing, if gas drips on the ground when the Cub is sitting. But they can drip because the float level is too high, or because there is dirt in the needle and seat.
http://www.farmallcub.info/manuals/cub_ ... 012-12.jpg
http://www.farmallcub.info/manuals/cub_ ... 012-13.jpg
The original needle and seat were all metal. Some of the guys on here say they work better than other types. Here is a listing at TM Tractor showing how they looked.
http://www.tmtractor.com/new/fl/5183fp.htm
Set the float level accurately with a measure, some of the guys on here have said their carb would not work right until they set the level exactly.
Below is a page from the Cub service manual showing the float level, and float drop, both need setting. The IH Carb is in the upper pics, use those measurements, if you have an IH carb. Turn the top half with the float in place upside down, like the Zenith pic at the lower right, and measure the level.
The IH carb does not use the gasket in place to measure the level, the Zenith does, they are different in that way.
http://www.farmallcub.info/manuals/gss- ... 002-09.jpg
Tighten everything gently in or attaching to the carb, the metal is soft, and the threads strip out easily.
-
Gary Dotson
- Team Cub Mentor

- Posts: 5641
- Joined: Thu Aug 03, 2006 6:20 am
- Zip Code: 43358
- Tractors Owned: 48 Cub Diesel (Cubota)
53 Cockshutt 20 restored (Shooter)
52 Cockshutt 20 unrestored
47 Leader "B" (Herckie)
49 Leader "D" (Princess)
49 Leader "D" very rough
48 Leader "D" unrestored
Kubota B6200E
Kubota B6200HST
Kubota B8200HST-D - Circle of Safety: Y
- Location: OH West Mansfield
Re: Waking up the ol' Cub
Less than 1 volt at the dist. sounds like the points were in the closed position. Roll the engine over about 1/4 turn and repeat your check.
-
Stanton

- Cub Pro

- Posts: 7760
- Joined: Mon Jun 22, 2009 6:56 am
- Zip Code: 64070
- Tractors Owned: 1942 Farmall AV, serial #87025
1947 Farmall Circle Cub, serial #2116
1948 Farmall Cub, serial #46066 - Circle of Safety: Y
- Location: Lone Jack, MO
Re: Waking up the ol' Cub
Here's an alternative to a stripped out choke lever made by the late George Willer:
I've made a couple and they work fine. You might make a couple and vary the length to see which one works best for your Cub. I made mine out of 1/4" flat stock aluminum.
I've made a couple and they work fine. You might make a couple and vary the length to see which one works best for your Cub. I made mine out of 1/4" flat stock aluminum.
Stanton


-
Willy
- 5+ Years
- Posts: 519
- Joined: Sun Oct 22, 2017 4:54 pm
- Zip Code: 38330
- Tractors Owned: 1951 Cub Lil Red
- Location: Dyer, TN
Re: Waking up the ol' Cub
Thanks Stanton, I hadn't thought of making it longer. And the more I think about it, the better I like that idea. I've got some 1/4 flat aluminum somewheres that I used to modify a wheelchair carrier a while back. I tend to get about twice or 3 times of whatever I think I need for project. It comes in handy later.
Gary, that's the first thing on the agenda when I get out to the shop later.
Gary, that's the first thing on the agenda when I get out to the shop later.
-
Willy
- 5+ Years
- Posts: 519
- Joined: Sun Oct 22, 2017 4:54 pm
- Zip Code: 38330
- Tractors Owned: 1951 Cub Lil Red
- Location: Dyer, TN
Re: Waking up the ol' Cub
Made a new choke arm for it. Kind of crude, but it works. Only spent about an hour on it, so I probably could have made it look better.

One of the things that I'm messing around with while I'm waiting on parts is making the drawbar height adjustable using the lift. The idea being that it would help in hitching up a trailer to the Cub. Those eyebolts are a bit smaller than what I have in mind, but for now, it's in the "seeing if it'll work phase". Also, I've replaced the height locking bolts with 1/2" clevis pins to make it easier to lock the drawbar at normal height once the trailer is hitched up.

I couldn't resist putting a cup/cell phone holder on it

One of the things that I'm messing around with while I'm waiting on parts is making the drawbar height adjustable using the lift. The idea being that it would help in hitching up a trailer to the Cub. Those eyebolts are a bit smaller than what I have in mind, but for now, it's in the "seeing if it'll work phase". Also, I've replaced the height locking bolts with 1/2" clevis pins to make it easier to lock the drawbar at normal height once the trailer is hitched up.
I couldn't resist putting a cup/cell phone holder on it
-
Willy
- 5+ Years
- Posts: 519
- Joined: Sun Oct 22, 2017 4:54 pm
- Zip Code: 38330
- Tractors Owned: 1951 Cub Lil Red
- Location: Dyer, TN
Re: Waking up the ol' Cub
Not much has been going on with the Cub due to other concerns around here. Although I do try to at go look at it and think about where I'm going with it. I did take the oil filter cover yesterday to prime the oil pump, but couldn't find a funnel quite small enough to fit inside that hole. Thinking I could use a large drinking straw between the little funnel and the hole.
Also discovered the oil filter cover gasket was mashed out of shape enough that I'm going to replace it. I measured the cover and think I can get a -232 o-ring to work there.
I think I had an "ah-ha" moment last night. I've been wanting to get the lift lowered before changing replacing the hydraulic pump shaft seals. But with the bad coil and being over the monthly budget on it, I'm having to wait to start it. I'm thinking that when I loosen the hydraulic lines between the pump and the Touch Control unit, the pressure holding the lift up should dissipate and the lift go to the lowered position. I'm going to give it a shot this afternoon and we'll see what happens.
So, for now the plan for the next few days is to next go through the hydraulic pump and put the seal kit in it. Then change the oil and filter.
Lastly, I've been working on figuring out how to put a 3 point hitch on it. Either Cat 0 or Cat 1. But I keep seeing that the 3 point implements are a bit over (or not far under) the 350lb limit I keep seeing for the Cub rear lift. Now although I'm not finished with it, but I'm far enough along that I'm pretty sure that it's ll work, the lift adjustable draw bar I've been messing with might be my answer. If I put a 2" hitch receiver on it I can still use it for pulling trailers around, but it also opens up possibilities for attaching other things to the Cub. Like a scraper blade designed for either an ATV or garden tractor. I'd have to make an adapter to go between it and the 2" but I believe it'll be doable. I've got a 2" hitch receiver for an ATV that I bought a couple of years ago at Harbor Freight that didn't work as planned on the Honda. I'm thinking notch out a piece of 2" angle to fit the receiver in the middle of the angle leaving a few inches on each side, weld 'em up and bolt it to the drawbar with 2 grade 8 bolts on each side. That ought to hold anything the lift can handle. And I can swap out the trailer hitch with other stuff as needed.
-
Glen
- 10+ Years
- Posts: 6152
- Joined: Mon Mar 19, 2012 7:33 pm
- Zip Code: 00000
- Tractors Owned: 1956 Farmall Cub with Fast Hitch, F-11 plow, Disc, Cultivator, Cub-22 mower
- Circle of Safety: Y
- Location: Wa.
Re: Waking up the ol' Cub
Hi,
I fill a clean, pump oil can with motor oil, and pump it into the hole in the block in the oil filter chamber, to prime the oil pump. It might take more than one filling of the oil can to fill the passages in the engine.
There is no pressure in the Touch Control tubes to the pump, when the engine is not running.
The Touch Control is made so you cannot move the arms by hand. I doubt that you can move them without the engine running and fluid in the system.
In your last pic above, I can't see exactly, but the battery cable, I guess it is, should not be where it keeps the clutch pedal from coming up against the edge of the platform.
There should be a spring on each of the 3 pedals under the platform to pull the pedals up.
-
Willy
- 5+ Years
- Posts: 519
- Joined: Sun Oct 22, 2017 4:54 pm
- Zip Code: 38330
- Tractors Owned: 1951 Cub Lil Red
- Location: Dyer, TN
Re: Waking up the ol' Cub
My oil can is of the old push the bottom in variety.
I discovered that about the lift this afternoon, when I pulled the hydraulic manifold off and not much came out and the lift stayed up. It was a thought and lots of times, you don't know until you try. And when it doesn't work out, you've learned something. Yeah, I'll fess up that I did try to move the darn thing by hand. Probably could have picked the tractor up by that lift arm.
The battery cable clears the clutch pedal by about 1/4 inch. That crazy spring was on there when I first saw the Cub. One of my wife's Grandaddy's old field modifications. Also on my to do list.
I got the hydraulic pump off, taken apart, cleaned up and put back together with new o-rings, etc. But the drive shaft for it has a bit more resistance to turning than I think is healthy for it. Turning the drive gear, it's got a "jerky" feel to it. I'm thinking it should be a lot smoother. So tomorrow's plan is to take it apart again and figure out what's up with it. I suspect that when I put the cover over the shaft and back on the pump body, it messed up the shaft o-ring. It was turning ok until then. That's a pretty abrupt step up for the o-ring going from over the threads to the full shaft diameter. I had it going in and out ok just putting the shaft in there while turning it before the final assembly.
-
Don McCombs

- Team Cub Mentor
- Posts: 17489
- Joined: Mon Feb 03, 2003 6:45 am
- Zip Code: 21550
- Tractors Owned: "1950 Something" Farmall Cub
1957 Farmall Cub w/FH
1977 International Cub w/FH
1978 International Cub
1948 Farmall Super A - Circle of Safety: Y
- Location: MD, Deep Creek Lake
Re: Waking up the ol' Cub
Willy wrote:But the drive shaft for it has a bit more resistance to turning than I think is healthy for it. Turning the drive gear, it's got a "jerky" feel to it. I'm thinking it should be a lot smoother. So tomorrow's plan is to take it apart again and figure out what's up with it. I suspect that when I put the cover over the shaft and back on the pump body, it messed up the shaft o-ring. It was turning ok until then. That's a pretty abrupt step up for the o-ring going from over the threads to the full shaft diameter. I had it going in and out ok just putting the shaft in there while turning it before the final assembly.
Just make sure you use lots of hydraulic fluid as lube when you reassemble.
Don McCombs
MD, Deep Creek Lake
Proud Member of Maryland Chapter 39
The best teachers are those who show you where to look, but don't tell you what to see.
A. K. Trenfor
MD, Deep Creek Lake
Proud Member of Maryland Chapter 39
The best teachers are those who show you where to look, but don't tell you what to see.
A. K. Trenfor
Who is online
Users browsing this forum: Bob McCarty, Don McCombs and 12 guests


