

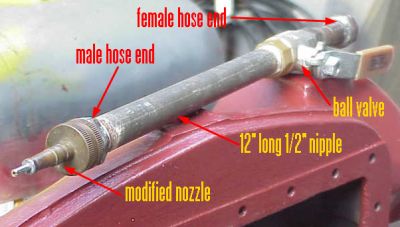
OK, this is not going to replace a sand blaster, or make your white walls look like new. But it is a way to get some force out of the garden hose. When degreasing large parts, I first spray the purple stuff on the part(s) using a spray bottle. I leave the degreaser on for awhile, 10 to 15 minutes, or until I remember it. When it comes time to remove the grease, I hit it with this spray nozzle. The water volume is not high, but the needle jet works well to get under the edge of the globs and chunks. Depending on the water pressure at your house/shop, this nozzle could almost make it into the "dangerous toy" category. I get about 100psi during non-peak watering times and the fine jet will do some damage if I'm not careful. Here is a picture of the assembled "Deluxe" version of the sprayer.
To put this together, I used pieces I had on hand, but total cost should not be over $10~$12. In fact the expensive parts aren't the ball valve or nozzle, but the hose to pipe thread adapters. The lowest cost approach would be to use an old garden hose.
- Cut a foot off each end of the hose and set aside.
- Get a 1/2" ball valve and 2 1/2" nipples 2" long.
- Screw the nipples into the ball valve and use Teflon tape on the threads.
- Get a couple of hose clamps that will fit over the garden hose.
- Take your hose ends and ball valve assembly into the kitchen and boil up some water.
- When the water is hot dip one of the hose ends into the water until it is soft.
- Jam the hose end over the 1/2" nipple.
- Repeat for the other hose end. (You did remember to slide the hose clamp over the hose BEFORE shoving the hose onto the nipple? Right?)
- You now have a short garden hose with a ball valve in the middle.
To make the nozzle, you will start with (wait for it...) a brass garden hose spray nozzle. In addition you will need one or more short pieces of brass tubing. If you have already built the Shade Tree Spot Applicator For Grease, you probably have some extra brass tubing on hand. If not, the easiest place to get brass tubing of a suitable size is at a hobby shop or crafts store like Micheal's or Hobby Lobby. Take you nozzle with you when you shop since you will probably have to use a couple of sizes to go from the nozzle ID to the OD of the new nozzle tube. The blowup of the nozzle, shown below, is 2 pieces of brass tubing. The new nozzle size is 1/16" ID and the outer piece was the right size to bush the inner tube into the nozzle.

Once you have the pieces for the nozzle insert, clean everything well using steel wool, keeping your fingers off the polished brass parts. (Finger oil makes soldering twice as difficult) Get everything setup and pull out the propane torch. Gently heat the nozzle, not the insert. (did you remember to remove the rubber/plastic washer from the nozzle before heating?) When the solder starts to flow between the insert and the nozzle, continue to apply heat and solder until you are satisfied with the joint. (Before the nozzle cools too much, wipe the joint with a piece of damp paper towel).
Once the nozzle is cool, screw it onto the male hose end. Hook it up to a garden hose and you have a controllable moderate pressure sprayer. Take it out and play with it. It is great fun! (The range and power are sufficient to knock down a hornet's nest from 25 feet away)
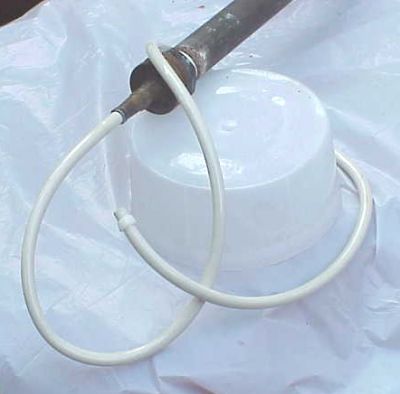
As an added bonus, find a piece of flexible plastic tubing that fits tightly over the new nozzle end. You now have a controllable tool to flush the cooling system on your Cub.
DO NOT TREAT THIS AS A TOY! It could do serious eye damage to the sprayee leading to serious emotional amd monetary damage to the sprayor
I would appreciate any feedback you have. This link will take you to the Feedback thread: Shade Tree Feedback


