Page 4 of 5
Cub Tip of the Week! November 30th, 2010
Posted: Tue Nov 30, 2010 8:06 pm
by Rudi
I keep wishing I could find a tip each week, but unfortunately I do not see them all and am depending on other members for tips to the tips

Thanks to
WisconsinCubMan for catching this one

Rudi wrote:This weeks
"Cub Tip of the Week" is courtesy of: :
How To Properly Install a Steel Fuel Line Peter Person wrote:It also helps to install the fuel inlet line before you tighten down the carb to the manifold. Cecil taught me this sequence:
1) Carb upside down attach the choke linkage.
2) Carb rightside up attach the throttle/governor linkage.
3) Mount carb to manifold loosely.
4) Install & tighten fuel inlet.
5) Tighten carb to manifold.
Never fails.
Peter
Cub Tip of the Week! December 1st, 2010
Posted: Wed Dec 01, 2010 9:03 pm
by Rudi
I keep wishing I could find a tip each week, but unfortunately I do not see them all and am depending on other members for tips to the tips
This week it seems we got two of them, so many thanks to
BigDog for pointing this one out
Rudi wrote:Rudi wrote:This weeks
"Cub Tip of the Week" is courtesy of: :
How To Remove a Stuck Oil Pressure Relief Valve midmo wrote:Got the valve out. Thanks Eugene for the tip. Here is how I got it out. I used a 7/16 dowel and cut a notch in the end and made a wedge to swell the end when it hit the bottom of the valve. The spring free length is real close. Haven't figured how to get the 9 1/2 lbs for the spring test length. I'll change the oil and filter and see how the pressure is. Thanks for all the help.
Ron in Mid Missouri
Cub Tip of the Week! December 5th, 2010
Posted: Sun Dec 05, 2010 10:04 pm
by Rudi
This week we are off to an early start thanks to
WisconsinCubMan for pointing this one out
Rudi wrote:This weeks
"Cub Tip of the Week" is courtesy of: :
How To Cheaply Repair a Broken Overflow Tube bear32055 wrote:All 3 of my Cubs have the overflow tube broken off and this may not be a correct police type fix it certainly worked and can be done with the hood on. Drilled a 9/64" hole in a 1/4 inch bolt and a jam nut on the outside of the neck. The bolt fits right in the broken tube and the threads help hold the tube in place.

Cub Tip of the Week! December 18th, 2010
Posted: Sat Dec 18, 2010 8:54 pm
by Rudi
This week's tip is a really useful one for when we are searching for parts on line. NAPA was always a difficult search for the uninitiated but thanks to
John *.?-!.* cub owner it won't be so onerous in the future
Rudi wrote:This weeks
"Cub Tip of the Week" is courtesy of: :
How To Properly Search For Cub Part Numbers at NAPA OnLine John *.?-!.* cub owner wrote:To find IH part numbers on the NAPA sight go to
http://www.napaonline.comOn the left side of the screen click on advanced search
When it asks if you are looking for a specific vehicle, click NO
Enter the IH number in the part number search line (no spaces) and click on Interchange button under part number and then click SEARCH
385703r92 steering shaft oil seal on cub shows NOS 8660, which is the one I put in the 48 I rebuilt this summer
Super A head gasket 301366r1 shows FPG 7732S
You can either order on line, or take that number to your local NAPA, and they will think you are the greatest customer they have.
Cub Tip of the Week! January 19th, 2011
Posted: Wed Jan 19, 2011 11:22 am
by Rudi
This week's tip is a different take on finding TDC. Sometimes being able to accurately find TDC on #1 can be challenging to many of us, however Gary seems to have a fool-proof technique to resolving this arcane skill

Thanks to
Winfield Dave sharp eye:!:
Rudi wrote:This weeks
"Cub Tip of the Week" is courtesy of: :
An Alternative Take on Finding TDC When Timing A Cub Gary Dotson wrote:Observing valve function is my favorite method of locating top dead center, for ignition timing purposes. I don't watch the valves on #1, however, but #4. As the piston approaches TDC. the exhaust valve is closing and just it reaches TDC, the intake valve will start to open. I stop at that point & align the timing mark. That's TDC on #1 cyl. It's easy & totally fool proof.
Cub Tip of the Week! March 26th, 2011
Posted: Sat Mar 26, 2011 3:19 pm
by Rudi
This week's tip is on the IH 3/4 Updraft Carb. For many of us we may not have an inlet screen so it is very easy to replace, but for those who actually have an inlet screen - how do you take it out? Thanks to one of our resident carb gurus
Don McCombs the fog has been lifted:!:
Rudi wrote:This weeks
"Cub Tip of the Week" is courtesy of: :
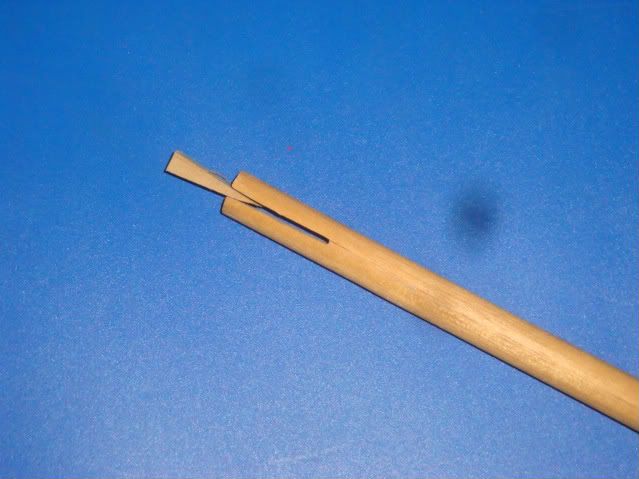
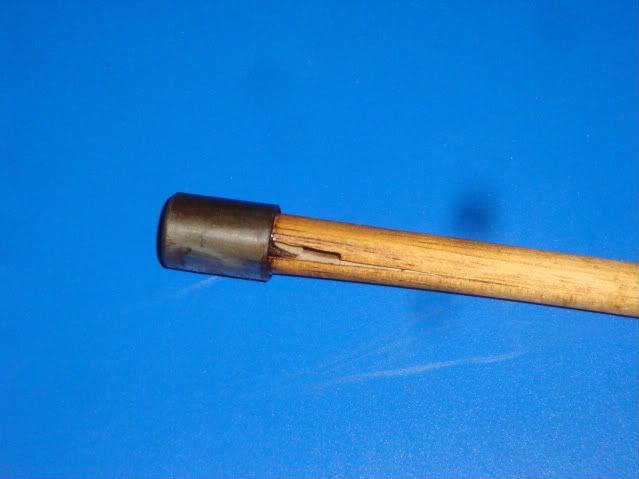
How to Replace Carburator Inlet Screen Don McCombs wrote:Push the old one out from the inside of the fuel inlet with the short end of a small Allen wrench. Then, push the new one in with the eraser end of a pencil.
Whoops, forgot to tell you to remove the needle and seat first
Cub Tip of the Week! April 26th, 2011
Posted: Tue Apr 26, 2011 9:50 am
by Rudi
Rudi wrote:This week's tip is again on the IH 3/4 Updraft Carb. For many of us we turn to a wire wheel to help clean up the crud and corrosion from years of use. However thanks to a little on-line research we now have a new method to utilize:!:
Rudi wrote:This weeks
"Cub Tip of the Week" is courtesy of: :
How to Build a Soda Blaster For Carb Cleaning & Rebuilding I contacted Nate and he has graciously given permission for us to link to his excellent article on
Soda Blaster For Carb Cleaning & Rebuilding. This is a must read article for anyone who plans on rejuvenating with their carbs.
Re: Cub Tip of the Week! July 26th, 2011
Posted: Tue Jul 26, 2011 11:36 am
by Rudi
Rudi wrote:This week's tip is courtesy of
Don McCombs eagle eyes
Rudi wrote:This weeks
"Cub Tip of the Week" is courtesy of: :
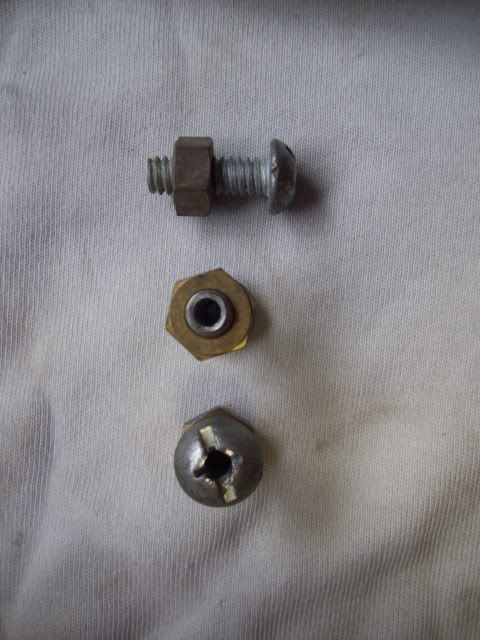
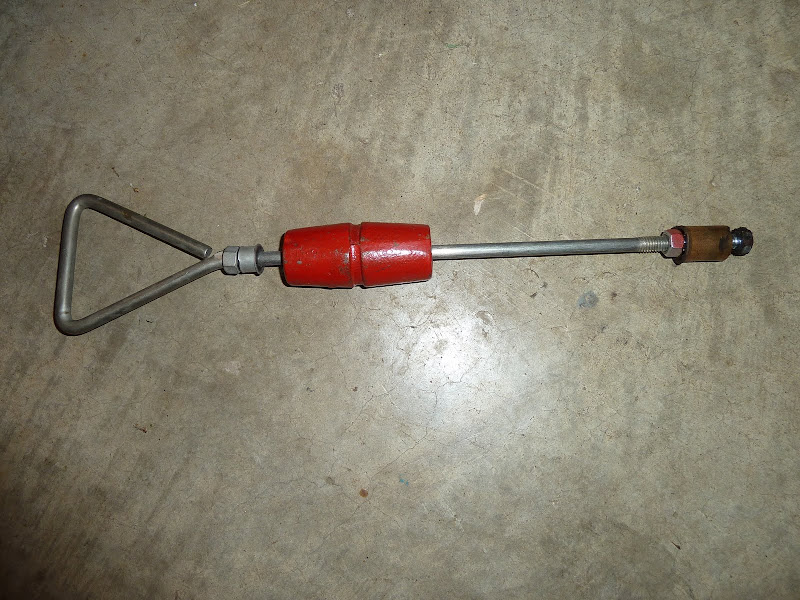
How to Remove An Output Shaft Pilot Bearing (bushing) As a first-timer, I read this forum for how to extract the brass pilot bushing. Since I didn't have a 3/4 tap, as suggested, I tried a different approach and it worked.
I had an automotive bodywork dent puller. It is a slide hammer wiTh a threaded end. I found a mating bolt, connected it with a nut, and with only very slight grinding of the bolt hex head corners it slipped right into the bushing. I just caught the backup edge of the bushing with the bolt head (moving it around a bit) and pulled it right out with just a few hammers. Might not work for one really stuck, but worked for me.
Re: Cub Tip of the Week!
Posted: Tue Nov 01, 2011 10:06 am
by Bigdog
A great tip of the week from Chief:
Re: Cub Tip of the Week! December 13th, 2011
Posted: Tue Dec 13, 2011 3:50 pm
by Rudi
Rudi wrote:This weeks
"Cub Tip of the Week" is courtesy of: :
How to Accurately Determine TC Fluid Level To get an accurate reading on the t/c fluid, make sure the rockshaft arms are rotated back so the t/c cylinder rod is retracted. If you're unsure which way that is just look under the hood and watch the cylinder rod work back and forth. If its not retracted youll get a false reading and youll overfill things. This step is usually missed when checking levels on hydraulic equipment.
Rick
Re: Cub Tip of the Week! September 17, 2012
Posted: Mon Sep 17, 2012 10:10 pm
by Rudi
I know it has been quite a while since I have added a Cub Tip of the Week. However, John has come up with a great one and I felt it should be included in the Cub Tip of the Week
Rudi wrote:This weeks
"Cub Tip of the Week" is courtesy of: :
Making Do With What You Have The cub I was repairing the touch control on had a dogleg screw broken off in the steering side radiator casting, but luckily it was the front one which is easier to get too. However when I was removing the rear screw it broke too, which is a little more difficult. I did not have a right angle drill small enough to go in there, nor a bit long enough to reach past the steering housing, so after looking through my assorted junk I came up with this. I had three or four 1/4 inch drill motors that had not been used in many years, so one of them became a chuck donor, I mixed up some JB Weld and spread on the threads of a 3/8 fine thread bolt, then screwed it in good and tight. The JB Weld is so I can use it with a left hand twist bolt if I ever need too. I cut off a dull 5/32 bit and resharpened it, and was in business. I did remove the 2 bolts in the seal holder for the steering shaft to get a little more room. The 5/32 bit is very slightly large for the 10/24 tap, but I did not have any numbered bits, which is what it should have been, but all seems ok.

Re: Cub Tip of the Week! January 11, 2013
Posted: Fri Jan 11, 2013 3:03 pm
by Rudi
Rudi wrote:I know it has been quite a while since I have added a Cub Tip of the Week. However, Bill has come up with a great one - not exactly a tip but more of an explanation to those of us who are somewhat electrically challenged which I felt it should be included in the Cub Tip of the Week
Rudi wrote:This weeks
"Cub Tip of the Week" is courtesy of: :
Batteries A battery is like a bucket in some ways. If the bucket is empty it take more water to fill it than if it is half full. If a new battery is fully charged and you start right up you only took a little electricity out so it will recharge (fill up) quickly. An old battery is like a bucket with some small holes in it. It takes longer to fill up.
Kind of a simplified way to look at it but it kind of works that way.
Bill
Re: Cub Tip of the Week! February 04, 2013
Posted: Mon Feb 04, 2013 7:48 pm
by Rudi
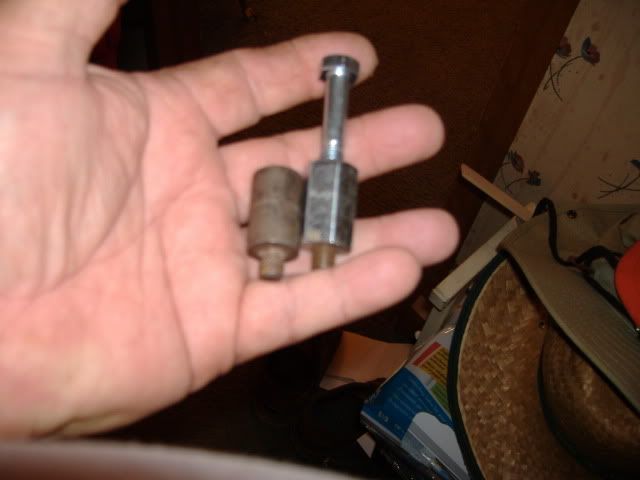
Rudi wrote:This is something that I am kickin' my tush on. Being a cabinet maker one would have thought that this would have been a no-brainer for me. To tell the through, I never even thought of it. Some glad Raymond did. It is so slick I felt it should be included in the Cub Tip of the Week
Rudi wrote:This weeks
"Cub Tip of the Week" is courtesy of: :
Making a Magneto Seal Installation Tool The following steps only work if you have wood working tools available...
1) Take a small piece of hardwood and plane it down to the correct thickness (23/32"), or as close as you can using a caliper to measure the board.
2) Then take a new seal and trace an outline of it on the board. Cut the outline out of the board on the inside of the line, so it's a bit smaller in diameter than the seal.
3)Cut out another circle, larger than the seal and stack it on the first circle you cut out. This will create a "lip" so that the seal isn't driven in too far. Drill a hole through both and bolt them together.
4) Now you have a driver that is the correct size as to equalize the contact points, and thickness so that the seal is set to the proper place.
I've made a few like this and they work great!
Re: Cub Tip of the Week! February 04, 2013
Posted: Mon Feb 25, 2013 12:12 am
by Rudi
Rudi wrote:This is a tip that is long overdue for inclusion in the CTotW. Somehow we missed this a few years ago

and I am glad it has been brought back up. It is a neat solution and another instance of use what you have to get the job done.
Rudi wrote:This weeks
"Cub Tip of the Week" is courtesy of: :
Making Spacers For Square Hood Cubs After much searching,I came across a union that joins two threaded rods together. It is almost perfect. It comes 1 1/2 inches long and has to be cut down to an inch. The cost is less than $1.50 each. After cutting down, I cut off the end of a 5/16 grade 5 bolt and used loctight to bond it in the sleeve. It is a good fix for the hard to find originals.
Boss
Re: Cub Tip of the Week! May 14, 2013
Posted: Tue May 14, 2013 9:58 pm
by Rudi
Rudi wrote:Some may say Cub owners are cheap, but I prefer frugal, and this tip is a real frugal one. Use what you have.
Rudi wrote:This weeks
"Cub Tip of the Week" is courtesy of: :
Leveling a Mower with a Story BoardI am still too cheap to get one of the guages. What I use is a 2x2 or 2x4 block about 6 inches long. I reach under the mower deck and stand the block upright. Then I rotate the blade until the cutting edge contacts the block, making a mark. I then go around to the other side and repeat to see if the other blade marks the block in the same place. If not adjust one side accordingly. Repeat until the marks are aligned.

