Jersey_cub
This site uses cookies to maintain login information on FarmallCub.Com. Click the X in the banner upper right corner to close this notice. For more information on our privacy policy, visit this link: Privacy Policy
NEW REGISTERED MEMBERS: Be sure to check your SPAM/JUNK folders for the activation email.
154 Started as a repair turning into a project
Forum rules
Notice: For sale and wanted posts are not allowed in this forum. Please use our free classifieds or one of our site sponsors for your tractor and parts needs.
Notice: For sale and wanted posts are not allowed in this forum. Please use our free classifieds or one of our site sponsors for your tractor and parts needs.
-
Jersey_cub

- 10+ Years

- Posts: 150
- Joined: Sat Jun 19, 2004 10:41 am
- Zip Code: 07727
- Skype Name: Jersey_cub
- Tractors Owned: 1972 154 Low Boy
1952 Farmall Cub The Little Red Binder - Location: Farmingdale,NJ
154 Started as a repair turning into a project
Jersey_cub
-
RaymondDurban

- Cub Pro

- Posts: 4435
- Joined: Wed Dec 26, 2007 7:45 pm
- Zip Code: 32536
- Circle of Safety: Y
- Location: FL, Crestview
Re: 154 Started as a repair turning into a project
Just the usual problems? What have you run into?
Good luck and keep us posted and lets see some photos!!
Good luck and keep us posted and lets see some photos!!
Screwstick #3934
FCub - LoBoy - Numbered Series - Power Unit Databases
FCub - LoBoy - Numbered Series - Power Unit Databases
-
Jersey_cub
- 10+ Years
- Posts: 150
- Joined: Sat Jun 19, 2004 10:41 am
- Zip Code: 07727
- Skype Name: Jersey_cub
- Tractors Owned: 1972 154 Low Boy
1952 Farmall Cub The Little Red Binder - Location: Farmingdale,NJ
Re: 154 Started as a repair turning into a project
Screwstick:
It started out with what I thought was a locked up transmission but turned out to be a snapped clutch brake adjusting bolt that had wedged against the clutch
  then I found that the 1st and reverse shifter fork was broke and the shift fork set screw was striped. At that point my son suggested cleaning off all the grease and grime, after that it was the clutch release bearing
  you get the picture I am sure. Anyway we have decided to spruce up the old 154 before putting her back to work. Ill be taking pictures in the next few days.
Jersey_cub
It started out with what I thought was a locked up transmission
Jersey_cub
-
BigBill
- 10+ Years
- Posts: 7388
- Joined: Sat Jul 22, 2006 5:02 pm
- Zip Code: 00000
- Location: in northern usa
Re: 154 Started as a repair turning into a project
Yup I have been there before and before you know it the deeper we get into it we may as well give it a bath and some paint too after its all repaired. After all now is the time to really look it over and fix it while its apart too so take advantage of it. With one of my cub cadets the more i got into the more i found things to fix. I ended up pulling the motor and really cleaning it up. She's one of my best runners now. I hope to disassemble all 3 of my 154's and restore them from the ground up. Its great your son is helping out too, he is getting the learning experience too.
I'm just going to spray my 154's with rattle cans. Some of my cadets look awesome.
I'm just going to spray my 154's with rattle cans. Some of my cadets look awesome.
I'm technically misunderstood at times i guess its been this way my whole life so why should it change now.
-
Jersey_cub
- 10+ Years
- Posts: 150
- Joined: Sat Jun 19, 2004 10:41 am
- Zip Code: 07727
- Skype Name: Jersey_cub
- Tractors Owned: 1972 154 Low Boy
1952 Farmall Cub The Little Red Binder - Location: Farmingdale,NJ
Re: 154 Started as a repair turning into a project
BigBill wrote:Yup I have been there before and before you know it the deeper we get into it we may as well give it a bath and some paint too after its all repaired. After all now is the time to really look it over and fix it while its apart too so take advantage of it. With one of my cub cadets the more i got into the more i found things to fix. I ended up pulling the motor and really cleaning it up. She's one of my best runners now. I hope to disassemble all 3 of my 154's and restore them from the ground up. Its great your son is helping out too, he is getting the learning experience too.
I'm just going to spray my 154's with rattle cans. Some of my cadets look awesome.
BigBill: That's just what is happening, but my son is the one pushing me to do more and more to the 154 he is really getting into fixing it up.
I plan on doing the same with painting the 154 (Rattle Can) What paint brand do you use
-
BigBill
- 10+ Years
- Posts: 7388
- Joined: Sat Jul 22, 2006 5:02 pm
- Zip Code: 00000
- Location: in northern usa
Re: 154 Started as a repair turning into a project
The correct color for the int154 is federal yellow. Since i been buying up the cub cadet yellow paint i'm going to use that on my int154 cub's too. I may also use the international white on the hood and rims too.(valspar also) Its a shade lighter than cub cadet beige but it almost matches the white on my 154. Thats my plan right now is to use the cub cadet yellow and international white at TSC its in the rattle cans and made by valspar. My cub cadets some out awesome looking with the valspar paint. I pay special attention to prepping the hoods and sheetmetal parts. If there rusted i will prime them. I plan on using the red lead on the pitted areas next to try it and see how it comes out on the hoods. I'm going to be really fussy on the preperation now, i'm not rushing anymore just to get it done, i'm going take my time and get it looking really awesome.
On my cub cadet hoods i used the valspar clear coat right over the new paint and decals so there sealed and protected too plus it adds a little more shine to the paint too. I'm hoping the paint won't fade using the clear to protect it too. I'm not sure how the gas if spilled on the clear coat will react yet. I know in the past on cars and motorcycle gas tanks the clear laquer would get cloudy when it got gas on it. With the 154 hood with the gas tank filler it could be a problem. I'll have to do a sample test with valspar clear and gas soon before i clear my 154 hoods. But they look so good when there clear painted too.
On my cub cadet hoods i used the valspar clear coat right over the new paint and decals so there sealed and protected too plus it adds a little more shine to the paint too. I'm hoping the paint won't fade using the clear to protect it too. I'm not sure how the gas if spilled on the clear coat will react yet. I know in the past on cars and motorcycle gas tanks the clear laquer would get cloudy when it got gas on it. With the 154 hood with the gas tank filler it could be a problem. I'll have to do a sample test with valspar clear and gas soon before i clear my 154 hoods. But they look so good when there clear painted too.
I'm technically misunderstood at times i guess its been this way my whole life so why should it change now.
-
Jersey_cub
- 10+ Years
- Posts: 150
- Joined: Sat Jun 19, 2004 10:41 am
- Zip Code: 07727
- Skype Name: Jersey_cub
- Tractors Owned: 1972 154 Low Boy
1952 Farmall Cub The Little Red Binder - Location: Farmingdale,NJ
Re: 154 Started as a repair turning into a project
BigBill:
I assume TSC is tractor supply company RIGHT 
I assume TSC is tractor supply company
-
pharmerphil3

- 10+ Years
- Posts: 954
- Joined: Sat Apr 22, 2006 11:10 am
- Zip Code: 06468
- Tractors Owned: 1948 Cub
1955 Cub
1961 Cub
1963 Cub
1964 Cub Cadet 70
1969 Cub Cadet 125
100 Spreader
144 Cultivator
3 Field Cultivator
22 Sickle Mower
193 Plow
54-Plow
59 Wood's Mower
2030 John Deere - Circle of Safety: Y
- Location: CT, Monroe
Re: 154 Started as a repair turning into a project
Jersey Cub, good luck with your 154 project; I think splitting them is the biggest hassle. For me splitting the full size Cub was always a pain in the butt! Remember to post some photos! 
-
Jersey_cub
- 10+ Years
- Posts: 150
- Joined: Sat Jun 19, 2004 10:41 am
- Zip Code: 07727
- Skype Name: Jersey_cub
- Tractors Owned: 1972 154 Low Boy
1952 Farmall Cub The Little Red Binder - Location: Farmingdale,NJ
Re: 154 Started as a repair turning into a project
pharmerphil3 wrote:Jersey Cub, good luck with your 154 project; I think splitting them is the biggest hassle. For me splitting the full size Cub was always a pain in the butt! Remember to post some photos!
pharmerphil3: I have been trying to post a picture all day and can't seam to get it down, but I am working on it.
-
BigBill
- 10+ Years
- Posts: 7388
- Joined: Sat Jul 22, 2006 5:02 pm
- Zip Code: 00000
- Location: in northern usa
Re: 154 Started as a repair turning into a project
Yup "TSC" Tractor Supply Company.
I'm technically misunderstood at times i guess its been this way my whole life so why should it change now.
-
Jersey_cub
- 10+ Years
- Posts: 150
- Joined: Sat Jun 19, 2004 10:41 am
- Zip Code: 07727
- Skype Name: Jersey_cub
- Tractors Owned: 1972 154 Low Boy
1952 Farmall Cub The Little Red Binder - Location: Farmingdale,NJ
Re: 154 Started as a repair turning into a project
I have a question. The PTO clutch control arm connects to a piece of flat stock and the hole is pretty worn my parts manual doesn't show that particular part but I would like to replace it. does anyone have any suggestions?
I am taking pictures as I go along in hopes that I will eventually find out how to post them
-
pharmerphil3
- 10+ Years
- Posts: 954
- Joined: Sat Apr 22, 2006 11:10 am
- Zip Code: 06468
- Tractors Owned: 1948 Cub
1955 Cub
1961 Cub
1963 Cub
1964 Cub Cadet 70
1969 Cub Cadet 125
100 Spreader
144 Cultivator
3 Field Cultivator
22 Sickle Mower
193 Plow
54-Plow
59 Wood's Mower
2030 John Deere - Circle of Safety: Y
- Location: CT, Monroe
Re: 154 Started as a repair turning into a project
Good luck Jersey, will be waiting for all those photos! Hope all goes well with your project.
Phil
Phil
-
Jersey_cub
- 10+ Years
- Posts: 150
- Joined: Sat Jun 19, 2004 10:41 am
- Zip Code: 07727
- Skype Name: Jersey_cub
- Tractors Owned: 1972 154 Low Boy
1952 Farmall Cub The Little Red Binder - Location: Farmingdale,NJ
Re: 154 Started as a repair turning into a project
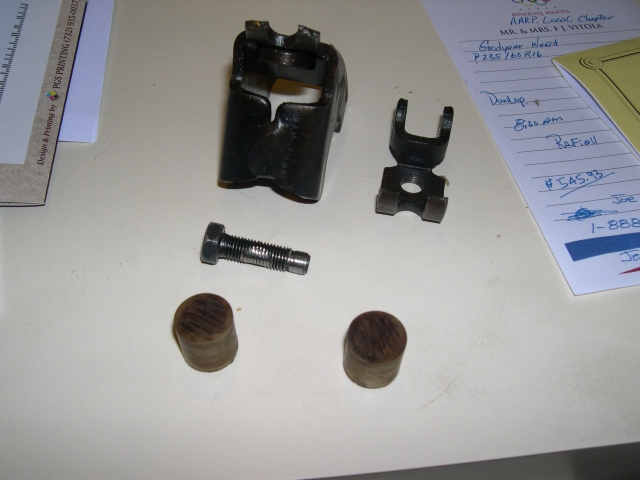
Well just came in from my barn after installing the new 1st & R shifter fork and I want to share this with everyone.
If your 154 has creeper drive it definitely has to be removed, I tried to slide the shifting fork control rod back without removing the creeper drive as some had suggested and it would only move back about an inch an a half and stop solid.
I decided to remove the creeper drive because the control rod would move much further in that direction. After removing the creeper drive I could see a freeze out plug in the hole that aligned with the control rod. I taped on the rod to move it further which removed the freeze out plug and behind it was the little ball detente that I had compressed before trying to move the control rod. I was wondering what happened to it because I did hold my thumb over the top hole in the transmission to prevent detente ball launch,which I did but the little ball went the other way you see. Now I was able to install the shifter fork and I started the control rod til it was flush with the top hole in the tranny, I then installed the ball compressed it and pushed the rod forward once it was threw the shifter fork I aligned the rod with the slot in it with the shifter fork bold and installed the bolt shifted it into neutral and re-installed the freeze out plug. THAT'S A WRAP
Glad I bought the gasket for the creeper drive
One other thing I found that working on this by myself gave me time to think it out and have a uneventful experience
-
Jersey_cub
- 10+ Years
- Posts: 150
- Joined: Sat Jun 19, 2004 10:41 am
- Zip Code: 07727
- Skype Name: Jersey_cub
- Tractors Owned: 1972 154 Low Boy
1952 Farmall Cub The Little Red Binder - Location: Farmingdale,NJ
Re: 154 Started as a repair turning into a project
You can see more pictures of my 154 Rebuild, pics will be added as it progresses
-
Jersey_cub
- 10+ Years
- Posts: 150
- Joined: Sat Jun 19, 2004 10:41 am
- Zip Code: 07727
- Skype Name: Jersey_cub
- Tractors Owned: 1972 154 Low Boy
1952 Farmall Cub The Little Red Binder - Location: Farmingdale,NJ
Re: 154 Started as a repair turning into a project
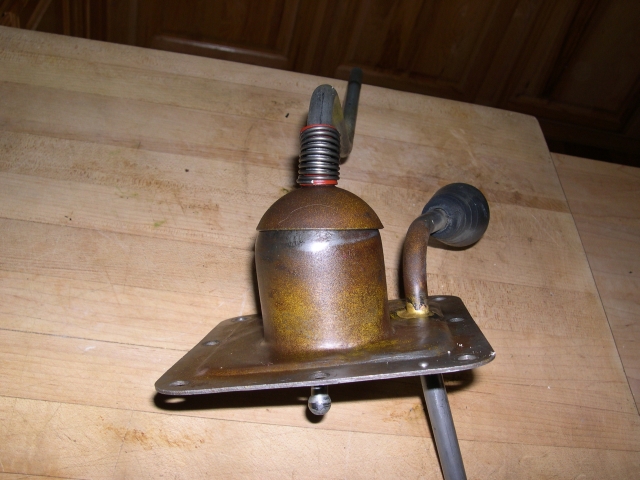
Updating my 154 project today.
Re-connected the creeper drive to the transmission and bolted the shifter housing back to the transmission, I had to weld the shift lever back to the guide and at the same time replaced the spring shifter lever assembly, I'm taking my time replacing what is needed next thing is filling everything with Hy-Tran.
Looks like me and my son will start to put the 154 back together on Wednesday, cant wait to take it out for a test run. Today would have been a great day for it since it went up to 71 and melted all the snow that we got this past week.
Ill be taking more pictures when we start re-assembling everything.
Return to “Lo-Boy Series - 154, 184, 185”
Who is online
Users browsing this forum: tucker86 and 7 guests


