This site uses cookies to maintain login information on FarmallCub.Com. Click the X in the banner upper right corner to close this notice. For more information on our privacy policy, visit this link:
Privacy Policy

NEW REGISTERED MEMBERS: Be sure to check your SPAM/JUNK folders for the activation email.

Building a Cub Mounted Wood Splitter - Part 3

The Cub Club -- Questions and answers to all of your Cub related issues.
Forum rules
Notice: For sale and wanted posts are not allowed in this forum. Please use our free classifieds or one of our site sponsors for your tractor and parts needs.
User avatar
Rudi
Cub Pro
Cub Pro
Posts: 28706
Joined: Sun Feb 02, 2003 8:37 pm
Zip Code: E1A7J3
Skype Name: R.H. "Rudi" Saueracker, SSM
Tractors Owned: 1947 Cub "Granny"
1948 Cub "Ellie-Mae"
1968 Cub Lo-Boy
Dad's Putt-Putt
IH 129 CC
McCormick 100 Manure Spreader
McCormick 100-H Manure Spreader
Post Hole Digger
M-H #1 Potato Digger
Circle of Safety: Y
Twitter ID: Rudi Saueracker, SSM
Location: NB Dieppe, Canada
Contact:

Building a Cub Mounted Wood Splitter - Part 3

Postby Rudi » Thu Oct 21, 2010 9:29 pm

Saturday morning was plumbing day. Had to take Ellie to Princess to get the plumbing done. Mostly cause with me having next to no experience plumbing hydraulics, what I had wasn't exactly the best setup, in fact it was kinda rinky dink to be blunt. But.. that is part of the learning curve. Gotta mess up a few times before you get it right.

Image

Saturday morning was not exactly a great day. Friday it rained cats and dogs.. in fact Moncton got the most rain over the weekend from the 1st Nor' Easter of the season. Almost 50mm Friday and Saturday was shaping up to be cold and wet. The first job of the day was to get Ellie up on Ray's float. As you can see, the float is almost 4 feet off of the ground. Ellie was a little rear heavy which meant that she had to be backed up the ramps onto the float.

Can anyone tell what the problems are going to be :?: I know I didn't think of it until it happened. :shock:

1st, the ramps were wet. 2nd, Ellie's rears were wet too. 3rd, .. with a gravity fed fuel system, horizontal is best or maybe even a slight incline. An almost 35 degree incline front to rear is not exactly ideal. What happened was a rather quick fuel starvation event. So just as Ellie would get to the top of the ramps.. she would stall and die. Tried it 4 times before we gave up :(

However, having an auger truck does have it's advantages. Ray simply hooked on to Ellie's drawbar and winched her up on the deck. So... in a rather unorthodox way, I loaded Ellie onto a float for the very first time :{_}:

Image

After a quick stop for breakfast at Timmy's, Ray and I got to Princess shortly after 9am. Did I mention this is my favourite department store :?: :roll: :lol:

Ray and I ended up leaving around 5pm. It was a cold, wet and very busy day. What normally would have taken about 2 - 3 hours ended up taking most of the day as every time Dennis went back into the store to get a part or cut/crimp a hose he would be accosted by another half dozen customers... which meant Ray and I ended up waiting a lot. It was ok as it gave me time to play and install all the hoses. The only problem was that it was too wet to leave orifices open very long nor was it conducive to taking pics as we went along.

Image

Leo - Hydraulic Team Leader, has been helping me with putting together both my hydraulic projects. As Rick walked me through the hydraulic blade project, Leo helped me with the parts I needed to source locally and he made all of the hoses for me. He has also been instrumental along with Larry the Asst. Mgr of Princess in helping me source the other items I needed at the great deals I got on the beam and the cylinder as well as the rest of the stock.

Image

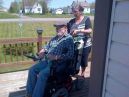
So, I figured, Leo deserved a pic with Ellie :D

Image

Monday was a busy day with appointments so I didn't get to take the pics I was lacking, so Tuesday morning it was bright and crisp out. 0c or about a balmy 32F or just about the perfect :roll: temp to take pics :lol:

One of the things I wanted to do was to improve how the hydraulics were setup given what I had. So below will be some before and some after pics to document what I did in improving (I hope) the system.

I am trying to find a pic of the jumpers that I have been using for the front end of the system. With the pressure relief valve now, I am not sure that I need them, but since I do not understand that, I am going to keep using the jumpers just to be safe. With the open centre valves.. I somehow think that the jumpers might be a good idea. Comments are always welcome.


Image

This is a before pic of the Pressure Relief Valve, the Cessna Eaton, and the mish-mash plumbing. More of it can be seen in the More Seat Time thread :roll:

Image

Image

Image

Image

Thanks to Rick Prentice, I actually was able to understand how this all went together as seen in the pics above. Again from the previous More Seat Time thread ..

Image

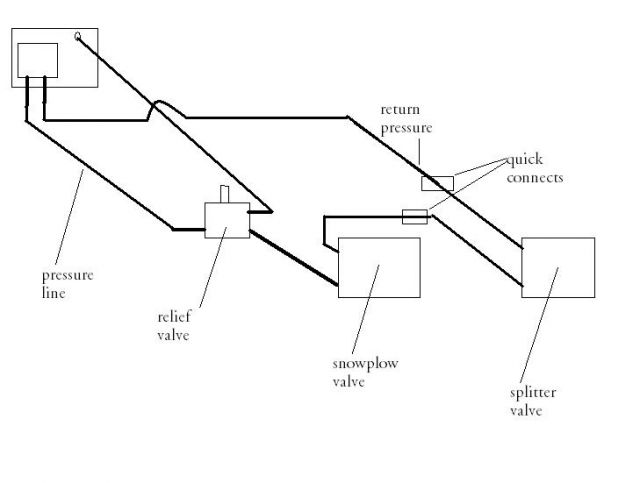
The cylinder is all plumbed.

Image

Valve is plumbed and has actual bushings in place of the washers.

Image

and , Voila! the finished splitter.

Now, here it is Thursday and a number of things have happened since Tuesday. Some of the concerns that were raised in the previous threads have not fallen on deaf ears. I have decided that yup, yes indeedy this new system definitely needs an auxillary reservoir and that was the focus of today's playtime. And will be described in Part 4. This has become a huge project for me. There are over 140 pictures alone to document so far and I have yet to split a single piece of wood. :lol:


NB: Please note that there had been a revision to the hydraulic system setup. Consult the Building A Cub Mounted Wood Splitter - Part 3 in the How To Forum.
Confusion breeds Discussion which breeds Knowledge which breeds Confidence which breeds Friendship


SPONSOR AD

Sponsor


Sponsor
 

User avatar
Rick Prentice
Team Cub Guide
Team Cub Guide
Posts: 5636
Joined: Mon Nov 01, 2004 7:24 am
Zip Code: 43528
Tractors Owned: 47(circle cub),48(Floyd backhoe),49,,51,54 and another 55
Circle of Safety: Y
Location: OH, Holland
Contact:

Re: Building a Cub Mounted Wood Splitter - Part 3

Postby Rick Prentice » Thu Oct 21, 2010 9:59 pm

Rudi, things are looking great. Just make sure you address the issue of:
Apparently my PRV is set at the factory at 2100 psi. Have to re-check the other thread to see if I lowered it or not..

and make sure the PRV is set below the cub pump's pressure to protect it. If it isn't set lower, it'll be like it isn't even there. It's the single most important thing you can do.

Rick
When I told my dad I've been misplacing things and doing stupid stuff----His reply---"It only gets better"

BigMatt
10+ Years
10+ Years
Posts: 527
Joined: Sat Jul 17, 2010 10:41 am
Zip Code: 46163
Tractors Owned: 1948 Cub "Moe"
1950 Farmall M
1978 IH 184
Circle of Safety: Y
Location: New Castle, IN

Re: Building a Cub Mounted Wood Splitter - Part 3

Postby BigMatt » Fri Oct 22, 2010 9:31 am

WOW, talk about 10 pounds of hydraulics in the proverbial 5 pound sack! You can going to have to buy another cub if you are going to do another project like this!

User avatar
Rudi
Cub Pro
Cub Pro
Posts: 28706
Joined: Sun Feb 02, 2003 8:37 pm
Zip Code: E1A7J3
Skype Name: R.H. "Rudi" Saueracker, SSM
Tractors Owned: 1947 Cub "Granny"
1948 Cub "Ellie-Mae"
1968 Cub Lo-Boy
Dad's Putt-Putt
IH 129 CC
McCormick 100 Manure Spreader
McCormick 100-H Manure Spreader
Post Hole Digger
M-H #1 Potato Digger
Circle of Safety: Y
Twitter ID: Rudi Saueracker, SSM
Location: NB Dieppe, Canada
Contact:

Re: Building a Cub Mounted Wood Splitter - Part 3

Postby Rudi » Fri Oct 22, 2010 11:16 am

Rick:

Yup, that is one of the things that I have to check and make sure that all is well. I was looking back at some threads and I still am not sure. I know I put the pressure gauge into the circuit to check it, just gotta either find the thread or re-do it. I imagine a good way to check it is after the PRV. Around 1500 should be ok yes :?: And that will be done right after I get the hydraulic fluid flushed. So far I have put 2 gallons through and it all came out milky. It has been sitting now and hopefully there is no more moisture in the system. All of the Hy-Tran seems to have cleared up in the bucket.. but not sure if that is anything of an indicator. Hopefully get that done this afternoon/tonight.

Matt:

I have another Cub - my 1947 aka Granny. She is getting the snowblower project. Also, I have a 1950 aka Jethro although he really is a basket case. Most of his parts are in a basket :lol: . As he gets rebuilt .. I am hoping that he will be taking up some of the duties around here as well.

What is nice about this project, it has taught me a lot and I now have a Cub that is capable of fulfilling a number of roles/functions/jobs which is a real boon.
Confusion breeds Discussion which breeds Knowledge which breeds Confidence which breeds Friendship


BigMatt
10+ Years
10+ Years
Posts: 527
Joined: Sat Jul 17, 2010 10:41 am
Zip Code: 46163
Tractors Owned: 1948 Cub "Moe"
1950 Farmall M
1978 IH 184
Circle of Safety: Y
Location: New Castle, IN

Re: Building a Cub Mounted Wood Splitter - Part 3

Postby BigMatt » Fri Oct 22, 2010 1:32 pm

I am interested in the snow blower project. I have read some threads on here about it and it sounds pretty cool.

User avatar
Rudi
Cub Pro
Cub Pro
Posts: 28706
Joined: Sun Feb 02, 2003 8:37 pm
Zip Code: E1A7J3
Skype Name: R.H. "Rudi" Saueracker, SSM
Tractors Owned: 1947 Cub "Granny"
1948 Cub "Ellie-Mae"
1968 Cub Lo-Boy
Dad's Putt-Putt
IH 129 CC
McCormick 100 Manure Spreader
McCormick 100-H Manure Spreader
Post Hole Digger
M-H #1 Potato Digger
Circle of Safety: Y
Twitter ID: Rudi Saueracker, SSM
Location: NB Dieppe, Canada
Contact:

Re: Building a Cub Mounted Wood Splitter - Part 3

Postby Rudi » Fri Oct 22, 2010 2:10 pm

Matt:

It is another one of the projects that I have had on the back burner for a couple years now. This one has been on the shelf the longest, so it got done first.

I am hoping to have the snowblower built before it snows too much. All depends on how things go I guess.
Confusion breeds Discussion which breeds Knowledge which breeds Confidence which breeds Friendship


CapeCodCubs
10+ Years
10+ Years
Posts: 3328
Joined: Fri Jan 11, 2008 5:30 pm
Zip Code: 02747
Tractors Owned: .
1948 F Cub Fast hitch
1949 F Cub
1950 F Cub Fast hitch
1965 Loboy Fast hitch
1966 Loboy with 1000 loader
1976 International Cub
several walk behind garden tractors
(20) FastHitch implements
tons' of cultivating and planting stuff
C-16 Cub Middlebuster
(2) A33 Cub bean harvester
NOS Planet Jr. planter
172 planter, large combo hopper, 101A fertilzer hopper
Cole 250# fertilizer hopper with chain drive.
Location: MA, Dartmouth

Re: Building a Cub Mounted Wood Splitter - Part 3

Postby CapeCodCubs » Fri Oct 22, 2010 2:25 pm

BigMatt wrote:I am interested in the snow blower project. I have read some threads on here about it and it sounds pretty cool.


Tell us about your snowthrower project next!!!! Might get me motivated again....
Image

cody's cub
10+ Years
10+ Years
Posts: 131
Joined: Fri Jul 23, 2010 7:47 pm
Zip Code: 17752
Tractors Owned: farmall cub 64 white hood 12v
Fh attachments
Woods mower
Spring harrow
Ih100 blade
Plow with coulter
Location: Pa

Re: Building a Cub Mounted Wood Splitter - Part 3

Postby cody's cub » Fri Oct 22, 2010 5:42 pm

I would also like to see the snow blower project... ya did a nice job on the wood splitter, have fun splitting wood!
:tractor:


Return to “Farmall Cub”

Who is online

Users browsing this forum: No registered users and 51 guests