This site uses cookies to maintain login information on FarmallCub.Com. Click the X in the banner upper right corner to close this notice. For more information on our privacy policy, visit this link:
Privacy Policy

NEW REGISTERED MEMBERS: Be sure to check your SPAM/JUNK folders for the activation email.

Not Exactly Restoring my 50

The Cub Club -- Questions and answers to all of your Cub related issues.
Forum rules
Notice: For sale and wanted posts are not allowed in this forum. Please use our free classifieds or one of our site sponsors for your tractor and parts needs.
User avatar
kpaine
10+ Years
10+ Years
Posts: 23
Joined: Tue Jul 02, 2013 11:19 am
Zip Code: 39735
Tractors Owned: 1948 Farmall Cub
1950 Farmall Cub
Location: Ackerman, MS

Not Exactly Restoring my 50

Postby kpaine » Wed Aug 21, 2013 8:37 pm

I am starting this thread because I started the process of looking at my '50. Its not going to be a restoration as I am mainly going to try to get it running and I will have tons of questions so I will try and keep them combined to this thread. That way there will be a history.

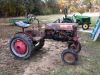
This is the tractor. http://www.farmallcub.com/phpBB2/viewtopic.php?t=79838&p=638814#p638814

I removed the hood today, pulled out he plugs and added Marvel Mystery oil to each cylinder and reinserted the pugs. They will have to be replaced, but they plug the hole nicely to prevent debris from getting in. After doing this I turned the fan and the fan and all pulleys turn so I guess that means the engine is not seized up? :D

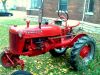
The electrical system looks to be a mess as is the radiator. I want to pull the radiator off, but I am not having any luck getting the fan shroud off. Is it possible to get the radiator off without the shroud being removed? Looks like there are some bolts that I will not be able to get to. I cannot get the flat head screws holding the shroud on to break loose. I have used copious amounts of PB blaster on them. How do you deal with a situation like this?

IMG_0785.JPG
IMG_0785.JPG (85.75 KiB) Viewed 838 times


The coil is attached to the hood and is badly rusted. The coil wire fell apart when I tried to unplug it to remove the hood.

The Points and rotor are in bad shape and I am not sure if they will be usable or not.
IMG_0783.JPG
IMG_0783.JPG (93.7 KiB) Viewed 838 times

IMG_0784.JPG
IMG_0784.JPG (110.07 KiB) Viewed 838 times


As always, thanks for the help.

Ken

SPONSOR AD

Sponsor


Sponsor
 

stevey30
10+ Years
10+ Years
Posts: 113
Joined: Mon Aug 19, 2013 2:03 pm
Zip Code: 28110

Re: Not Exactly Restoring my 50

Postby stevey30 » Wed Aug 21, 2013 8:52 pm

Yes you can remove the radiator without removing shroud,it makes it more difficult but it can be done.I found that the 2 hardest bolts where the ones directly under the shroud edges.Make sure you have a long extension and swivel for your ratchet.

Bob McCarty
Team Cub
Team Cub
Posts: 11854
Joined: Tue May 25, 2004 8:02 pm
Zip Code: 80501
Tractors Owned: Cubs, MH Pony, Shaw, Allis G, 1934 Silver King, JD LA and LI, Gibson D, David Bradley Tri-Trac
Circle of Safety: Y
Location: CO, Longmont

Re: Not Exactly Restoring my 50

Postby Bob McCarty » Wed Aug 21, 2013 8:55 pm

At some point you might as well grind or use a cold chisel to knock the heads off those four screws. I've never tried to remove the radiator with the shroud in place, but I can't believe that it will be easy to get those middle ones out on the back.

Bob
"We don't need to think more,
we need to think differently."
-Albert Einstein

Smokeycub
10+ Years
10+ Years
Posts: 1050
Joined: Tue Apr 26, 2011 10:47 am
Zip Code: 44266
Tractors Owned: 48 F Cub #11678
65 Cub Cadet 104
70 450C JD loader
67 Cub Cadet 107
90 B7100HST-D Kubota
72 Cub Cadet 149
54 Super C
Circle of Safety: Y
Location: Ravenna, Ohio

Re: Not Exactly Restoring my 50

Postby Smokeycub » Thu Aug 22, 2013 6:56 am

Hi Ken, Looks like you have a real project there, especially having been sitting outside for 14 years. It may seem like a daunting ordeal right now but as Rudi and others have said in your older posts, it WILL be worth the effort. When you have this thing running you'll be glad you did! :-:-): Keep us in the loop as your progress. I was curious to know how you made out with the cultivators/plows/mower? You mentioned some things were there but not what you ended up with.
Ray
Smokeycub
Attachments - 193 plow - 144 cultivator - 22 mower - 28A disc harrow - 54 leveling blade - Woods 59C2 - drag harrows - Mott D9 flail - flat belt pulley
Image
The squeaky wheel may get the grease but it's usually the first to be replaced!

User avatar
kpaine
10+ Years
10+ Years
Posts: 23
Joined: Tue Jul 02, 2013 11:19 am
Zip Code: 39735
Tractors Owned: 1948 Farmall Cub
1950 Farmall Cub
Location: Ackerman, MS

Re: Not Exactly Restoring my 50

Postby kpaine » Thu Aug 22, 2013 7:07 am

Smokeycub wrote:Hi Ken, Looks like you have a real project there, especially having been sitting outside for 14 years. It may seem like a daunting ordeal right now but as Rudi and others have said in your older posts, it WILL be worth the effort. When you have this thing running you'll be glad you did! :-:-): Keep us in the loop as your progress. I was curious to know how you made out with the cultivators/plows/mower? You mentioned some things were there but not what you ended up with.


Ray,

The tractor has the cultivator tool bars on it, but all that could be located were 2 plows and a couple wedge clamps. I would have liked to have gotten more of the cultivator parts, but I am not complaining. I have a full set of cultivators for my '48. Once I have this one running I would like to look for a sickle bar mower for it, or possibly a belly mower.

I hope to get it running. It is certainly encouraging that the engine is not seized up.

Ken

User avatar
Hengy
10+ Years
10+ Years
Posts: 7153
Joined: Sat Feb 18, 2006 8:12 pm
Zip Code: 15101
eBay ID: lacrosseorgans
Skype Name: Mike.Hengelsberg
Tractors Owned: 1949 Cub "Merlin"
1955 Cub "Lewis"
Cub Trailer
A-60 Blade
Cub-22 Mower
193 Plow
Circle of Safety: Y
Location: PA, Allison Park (Am Hengelsberg)
Contact:

Re: Not Exactly Restoring my 50

Postby Hengy » Thu Aug 22, 2013 8:40 am

Love it when someone tears into a "lost and found" cub! Good luck on it. Keep posting pics and if we can help, we will! On the mag, are you going to keep the external coil or are you going to go back to original and do the internal coil?

If you can do a quick compression check, you'll see whether you have a stuck valve or two or if you have compression. I wouldn't be surprised if several of them are gummed up after sitting in old oil for years. Taking the valve cover off and spraying with penetrant can help to free them.

Keep at it! Nothing like hearing them run after a long sleep!!!
Mike (Happy as a Lark in Allison Park, PA)
Image Image

Check out my Restoration Thread (1955 Cub, Lewis)

User avatar
kpaine
10+ Years
10+ Years
Posts: 23
Joined: Tue Jul 02, 2013 11:19 am
Zip Code: 39735
Tractors Owned: 1948 Farmall Cub
1950 Farmall Cub
Location: Ackerman, MS

Re: Not Exactly Restoring my 50

Postby kpaine » Thu Aug 22, 2013 10:08 am

Hengy wrote:Love it when someone tears into a "lost and found" cub! Good luck on it. Keep posting pics and if we can help, we will! On the mag, are you going to keep the external coil or are you going to go back to original and do the internal coil?


Well, here comes my ignorance. I am not sure what a mag is, nor what one looks like. I am pretty sure this machine was converted to 12 volt, this is what it looks like.
Image

I think it has a 12 volt alternator and would be a negative ground 12 volt system with external coil, but since there was not battery on the tractor and I am not really sure what I am looking at I will have lots of questions when I get to the ignition portion of the adventure.

Hengy wrote:If you can do a quick compression check, you'll see whether you have a stuck valve or two or if you have compression. I wouldn't be surprised if several of them are gummed up after sitting in old oil for years. Taking the valve cover off and spraying with penetrant can help to free them.

Keep at it! Nothing like hearing them run after a long sleep!!!


I have never done a compression test on anything before. From what I gather you screw a gauge into each cylinder, then turn over the engine with the starter and see what the gauge reads. That is a dry test, but I don't know how a wet test is accomplished. Looking at the valve cover I guess the lift arm for the hydraulics and the hydraulic lines must be removed to access the cover?

User avatar
PVF1799
10+ Years
10+ Years
Posts: 1475
Joined: Fri Mar 15, 2013 9:46 pm
Zip Code: 12009
eBay ID: kepara
Tractors Owned: 1929 Farmall Regular #T111250 (Original Owner)
1942 Farmall M #55654
1948 Farmall Cub #21005
1955 Farmall Cub #190769
1961 Cub Cadet #16509
1975 Cub Cadet 1250H
197x IH 990 Haybine
1994 JD 5320 Diesel
Attachments: Woods 42F Fast Hitch, L38 Disc Fast Hitch, F11 Plow Fast Hitch, Land Plow, Snow Plow, Grader Blade, Planter w/Fertilizer, Cultivators, Hilling Disks, Sickle Bar Mower(2), IH 7' Sickle Bar Mower, Flail Mower and 5' International Belly Mower.
Circle of Safety: Y
Location: Altamont, NY
Contact:

Re: Not Exactly Restoring my 50

Postby PVF1799 » Thu Aug 22, 2013 11:45 am

Ken - Good to see someone else doing this type of work. I have one advantage, my Cub actually drove the two miles from the farm to my garage shop. I'll help anyway possible. Perhaps some of my pictures will help.

Ken

bythepond88
10+ Years
10+ Years
Posts: 1421
Joined: Sun Apr 30, 2006 2:54 pm
Zip Code: 60073
Circle of Safety: Y
Location: IL, Round Lake Heights

Re: Not Exactly Restoring my 50

Postby bythepond88 » Thu Aug 22, 2013 11:51 am

Is there room to get a hand held impact driver on the heads of the bolts securing the fan shroud? I would try that before grinding/chiseling them off.
Michael Cummings
Eddie - a 1959 International Lo-Boy named after my father in law, who who bought her new.

User avatar
PVF1799
10+ Years
10+ Years
Posts: 1475
Joined: Fri Mar 15, 2013 9:46 pm
Zip Code: 12009
eBay ID: kepara
Tractors Owned: 1929 Farmall Regular #T111250 (Original Owner)
1942 Farmall M #55654
1948 Farmall Cub #21005
1955 Farmall Cub #190769
1961 Cub Cadet #16509
1975 Cub Cadet 1250H
197x IH 990 Haybine
1994 JD 5320 Diesel
Attachments: Woods 42F Fast Hitch, L38 Disc Fast Hitch, F11 Plow Fast Hitch, Land Plow, Snow Plow, Grader Blade, Planter w/Fertilizer, Cultivators, Hilling Disks, Sickle Bar Mower(2), IH 7' Sickle Bar Mower, Flail Mower and 5' International Belly Mower.
Circle of Safety: Y
Location: Altamont, NY
Contact:

Re: Not Exactly Restoring my 50

Postby PVF1799 » Thu Aug 22, 2013 11:55 am

bythepond88 wrote:Before grinding/chiseling off the heads of the bolts securing the fan shroud, try a hand held impact driver. That worked for mine.


Lots of Kroil and I used my Bosch impact screwdriver. It worked on some but now all. Replace them all with Stainless when you put it back together :D

User avatar
Hengy
10+ Years
10+ Years
Posts: 7153
Joined: Sat Feb 18, 2006 8:12 pm
Zip Code: 15101
eBay ID: lacrosseorgans
Skype Name: Mike.Hengelsberg
Tractors Owned: 1949 Cub "Merlin"
1955 Cub "Lewis"
Cub Trailer
A-60 Blade
Cub-22 Mower
193 Plow
Circle of Safety: Y
Location: PA, Allison Park (Am Hengelsberg)
Contact:

Re: Not Exactly Restoring my 50

Postby Hengy » Thu Aug 22, 2013 12:01 pm

You have a magneto on your tractor. At some point the internal coil failed and the PO replaced it with an external unit. You can go two ways with that... Fix the mag to be a mag or keep the external coil. For initial starting, is keep the coil as it is...it was working that way at one time...

Dry compression test is exactly what you describe. Remove all 4 spark plugs. Screw in the compression tester, crank the engine with the starter for several revolutions and your reading will show on the gauge. A wet test is simply repeating what you just did before but with a little oil squirted down each spark plug hole.

If the wet and dry readings are both low, then you can suspect valves. If the dry is lower than the wet by a significant amount, it is rings.

Taking the valve cover off is not hard... Two bolts and a little gyration to fit it out, and out it comes...

Mike
Mike (Happy as a Lark in Allison Park, PA)
Image Image

Check out my Restoration Thread (1955 Cub, Lewis)

User avatar
Stanton
Cub Pro
Cub Pro
Posts: 7760
Joined: Mon Jun 22, 2009 6:56 am
Zip Code: 64070
Tractors Owned: 1942 Farmall AV, serial #87025
1947 Farmall Circle Cub, serial #2116
1948 Farmall Cub, serial #46066
Circle of Safety: Y
Location: Lone Jack, MO

Re: Not Exactly Restoring my 50

Postby Stanton » Thu Aug 22, 2013 12:14 pm

It appears you have a magneto setup (acting as a distributor), with a 12v alternator (can see the base of if bolted above the magneto).

If you haven't done so already, copy and print off the Cub Parts Manual (since you have a '50, you can look at the '49 or the '52).

They are located here: http://www.cleancomputes.com/Cub/Cub%20 ... index.html

It will get you familiar with pieces, parts and appropriate names. For example, the '49 Parts Manual only lists a magneto in the index, but the '52 Parts Manual lists both distributor and magneto. By looking at those two Parts Manuals, you should be able to find the part in question.

A compression tester is not expensive and good to have around. I bought one from O'Reilly Auto Parts for $30. Has all the adaptors to fit my Cub. Some auto parts stores may have a lending program where you can borrow one.

The first picture shows paint and rust gunked over the pan head screw. I'd get a small wire wheel for the end of drill or a Dremel with a wire wheel and thoroughly clean all that stuff off first, then hit it with the PB Blaster (several shots a day for a few days). Then take a screwdriver to it. There are (4) four screws holding the shroud on; all fine thread and should come out. BTW: mix 1/2 acetone and 1/2 automatic transmission fluid for a great penetrant.

If you're wanting to leave the shroud on yet remove the radiator, then use a very long ratchet extension (or a couple together) to reach the rear bolts at the base. With the upper and lower radiator hoses removed, there's nothing holding the radiator on except the bolts at the base (think there's 18 if I recall).

Have patience. Don't get overwhelmed. Focus on one task at a time. And enjoy it. :D
Stanton
Image Circle of Safety

User avatar
kpaine
10+ Years
10+ Years
Posts: 23
Joined: Tue Jul 02, 2013 11:19 am
Zip Code: 39735
Tractors Owned: 1948 Farmall Cub
1950 Farmall Cub
Location: Ackerman, MS

Re: Not Exactly Restoring my 50

Postby kpaine » Thu Aug 22, 2013 6:43 pm

After work today I had another shot at the fan shroud. I got it off, albeit by using the cold chisel method to take off a couple screw heads, and now I have another problem. The two bolts in the center behind the radiator are so badly corroded the heads are no longer hex. A wrench or socket just slip on the bolt.

IMG_0789 copy.jpg
IMG_0789 copy.jpg (176.17 KiB) Viewed 603 times

There was debris, pinestraw and leaves piled up in this area. The bottom of the fan shroud is about to fall apart as well. Lots of corrosion damage in this area. Part of the crankshaft pulley has cracked off as well.

Does this mean I will need to remove the bolster to get at these bolts somehow? If I do I am wondering how I will be able to break them free without being able to get a good hold on them? :oops:

Thanks,

Ken

Bob McCarty
Team Cub
Team Cub
Posts: 11854
Joined: Tue May 25, 2004 8:02 pm
Zip Code: 80501
Tractors Owned: Cubs, MH Pony, Shaw, Allis G, 1934 Silver King, JD LA and LI, Gibson D, David Bradley Tri-Trac
Circle of Safety: Y
Location: CO, Longmont

Re: Not Exactly Restoring my 50

Postby Bob McCarty » Thu Aug 22, 2013 6:53 pm

Sears, and others make this type of socket to grip corroded bolts: http://www.sears.com/craftsman-10-pc-da ... ockType=G1 In your case, I'd clean those with a wire brush as well as possible, heat them with a torch (if you think you can do it without damaging the radiator), and then try a bolts-out type socket to see if you can get them out. If they twist off, you can later redrill and helicoil the bolt holes if necessary.

Bob
"We don't need to think more,
we need to think differently."
-Albert Einstein

User avatar
Rudi
Cub Pro
Cub Pro
Posts: 28706
Joined: Sun Feb 02, 2003 8:37 pm
Zip Code: E1A7J3
Skype Name: R.H. "Rudi" Saueracker, SSM
Tractors Owned: 1947 Cub "Granny"
1948 Cub "Ellie-Mae"
1968 Cub Lo-Boy
Dad's Putt-Putt
IH 129 CC
McCormick 100 Manure Spreader
McCormick 100-H Manure Spreader
Post Hole Digger
M-H #1 Potato Digger
Circle of Safety: Y
Twitter ID: Rudi Saueracker, SSM
Location: NB Dieppe, Canada
Contact:

Re: Not Exactly Restoring my 50

Postby Rudi » Thu Aug 22, 2013 8:57 pm

Ken:

Image to what Bob said. Clean the area up really good and then go at it with the Bolt Outs.

Image

For the bolts/screws that the heads are missing, these work good as well. Irwin makes a set like this.

Image

You may have to remove the bolster .. be easier to get to the other stuff including the crankshaft pulley. Oh well.. the hood is off right :D
Confusion breeds Discussion which breeds Knowledge which breeds Confidence which breeds Friendship


Return to “Farmall Cub”

Who is online

Users browsing this forum: Peter Person and 30 guests