After much preparation I got my '49 Cub split this Saturday afternoon. My first time so took several hours including typical little problems and working alone. The clutch was stuck, so I decided I would replace it (existing are original parts I'm pretty sure). Haven't bought any parts yet. While I have it apart I suppose I'll replace the belts, radiator hose, radiator (leaks), maybe the spark plugs and plug wires and put in electronic ignition in addition to replacing entire clutch including throwout bearing. Some folks mention replacing a seal of some sort presumably behind the flywheel. I'm not sure about that - comments? And I've seen an example of someone who modified the throwout bearing by replacing the graphite part with a chevy bearing insert. How well does that work out? Any other comments or suggestions about what I should do while it is split or comments on something in these images would be appreciated. (this is a great forum!)
thanks much
- Perry
This site uses cookies to maintain login information on FarmallCub.Com. Click the X in the banner upper right corner to close this notice. For more information on our privacy policy, visit this link: Privacy Policy
NEW REGISTERED MEMBERS: Be sure to check your SPAM/JUNK folders for the activation email.
clutch replacement project, etc.
Forum rules
Notice: For sale and wanted posts are not allowed in this forum. Please use our free classifieds or one of our site sponsors for your tractor and parts needs.
Notice: For sale and wanted posts are not allowed in this forum. Please use our free classifieds or one of our site sponsors for your tractor and parts needs.
-
TrentonJ
- 10+ Years

- Posts: 12
- Joined: Thu Feb 14, 2013 8:00 am
- Zip Code: 30041
- Tractors Owned: 1949 Cub
1969 John Deere 1020
2006 Kuboto M5700
clutch replacement project, etc.
- Attachments
-
- image6.jpg (72.25 KiB) Viewed 1156 times
-
- image5.jpg (62.36 KiB) Viewed 1156 times
-
- Here you can see my "tractor trolley" for ease in re-aligning the halves. A floor jack rides on the trolley.
- image4.jpg (84.54 KiB) Viewed 1156 times
-
- I've got the front end stabilized three ways - oak wedges on front axle, square iron beam through the square hole in steering gear housing base supported by jack-stands, and my homemade cradle under the oil pan.
- image3.jpg (95.64 KiB) Viewed 1156 times
-
- image2.jpg (72.47 KiB) Viewed 1156 times
-
- image1.jpg (87.24 KiB) Viewed 1156 times
-
tst
- 10+ Years
- Posts: 5206
- Joined: Tue Jan 12, 2010 2:08 pm
- Zip Code: 12514
- Circle of Safety: Y
Re: clutch replacement project, etc.
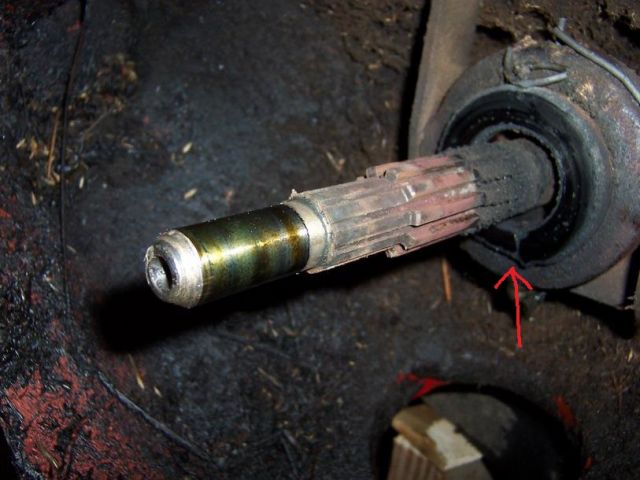
The clutch looks to be decent, by the rust on the imput shaft maybe the disc was stuck on the splines?, that clutch is probably better quality that what you can buy today, even the throwout bearing looks good, clean it up and put it back together,a little lube on the imput shaft and pilot bushing, check finger height on the pressure plate
Tim
Tim
-
Eugene
- Team Cub Mentor

- Posts: 20370
- Joined: Fri Jul 02, 2004 9:52 pm
- Zip Code: 65051
- Circle of Safety: Y
- Location: Mo. Linn
Re: clutch replacement project, etc.
Just from photos only, agree with Tim. Lub the throwout bearing.
I would take a Scotch Brite pad or some very fine steel wool and polish up the fly wheel and pressure plate where the clutch disk resides. Polish as in clean up.
I would take a Scotch Brite pad or some very fine steel wool and polish up the fly wheel and pressure plate where the clutch disk resides. Polish as in clean up.
I have an excuse. CRS.
-
staninlowerAL
- 10+ Years
- Posts: 4987
- Joined: Fri Oct 29, 2010 11:34 pm
- Zip Code: 36558
- Tractors Owned: Cubs: (3)'49's, (1 is for parts), (1)'57 IH Cub LoBoy w/FH, (2)154 Number Series Loboys, (1 is for parts), '76 Longstripe w/FH, Mowers: C-22, Bush Hog 412, Pennington 59, Woods RM42CF, Woods 42, assorted FCub plows, planters, discs, etc. OTHERS: '49 AC B & Ind. Sickle mower, '61 AC D12 Ser 2, '52 8N, '56 Ferguson 35 Deluxe, '47 & '49 Avery V, '53 MM BG (offset), '51 JD M (regular), '56 JD 420C, with Blade and fire plow, '85 JD 850 (Yanmar) w/72" belly mower, '76? Yanmar 2TR15 1500 & Bush Hog SQ42S-2 mower, '78? FORD Dexta, '86 FORD LGT14D & 48" Mower, (2)Cub Cadets & Mowers (MTD), (4) Sears Surburban's, other MTD mowers, Jeeps & other misc. "treasures"
- Circle of Safety: Y
- Location: AL (Southwest)
Re: clutch replacement project, etc.
The seal behind the clutch/pressure plate assembly you are referring to is the rear crankshaft seal. It rests in a retainer which holds the seal in place to prevent the oil under pressure for lubing the engine from excaping around the rear of the crankshaft. If yours is leaking (as mine is) the preferred option is to renew the seal and the modified retainer which is available from Tim (tst) on this site. This will give a better and less costly repair than the retainer which is available through CaseIH. If yours is not leaking, you might opt to leave it alone. Personally, I would replace it while the tractor is split. Cost of modified retainer and new seal should be about $50 to $60 for parts. Good Luck, Stan.
Stan in LA (lower AL)
USAF & Reserves, Reg ARMY, ARMY NG (AL)
USAF & Reserves, Reg ARMY, ARMY NG (AL)
-
Scrivet
- 10+ Years
- Posts: 2929
- Joined: Sun Apr 19, 2009 9:51 pm
- Zip Code: 63664
- Location: MO, Potosi
Re: clutch replacement project, etc.
On the "Chevy bearing insert" you will most likely end in failure. A roller bearing insert is designed to be centered on the clutch fingers. The cub throw out bearing isn't always centered. The graphite bearing allows for some "offcenteredness" without harm.
Look at the pictures in this post and then scroll down and read my post at the end.http://www.farmallcub.com/phpBB2/viewtopic.php?f=1&t=82134&hilit=graphite
I'm not as sure as the others about the TOB you have. Is that a couple cracks I see or just something on it? If you replace it make sure the new one is marinated good before you put it all back together. Cheap grease is a TOB's best friend (second best friend is an operator who doesn't ride the clutch
  )
)
Look at the pictures in this post and then scroll down and read my post at the end.http://www.farmallcub.com/phpBB2/viewtopic.php?f=1&t=82134&hilit=graphite
I'm not as sure as the others about the TOB you have. Is that a couple cracks I see or just something on it? If you replace it make sure the new one is marinated good before you put it all back together. Cheap grease is a TOB's best friend
-
Don McCombs

- Team Cub Mentor
- Posts: 17477
- Joined: Mon Feb 03, 2003 6:45 am
- Zip Code: 21550
- Tractors Owned: "1950 Something" Farmall Cub
1957 Farmall Cub w/FH
1977 International Cub w/FH
1978 International Cub
1948 Farmall Super A - Circle of Safety: Y
- Location: MD, Deep Creek Lake
Re: clutch replacement project, etc.
I agree with Scrivet, if the area marked on the photo is a crack and/or a chip. the TOB needs replaced.
To clarify his "marinate" comment a little... hit the bearing with the cheap grease until it comes out the relief hole on the top. Place the TOB in a zip lock bag with several tablespoons of engine oil. Work the oil into all surfaces of the graphite and let it soak for several days, continuing to work it into the graphite. Add more oil if necessary. Make sure the grease zerk is pointed down when you install it.
To clarify his "marinate" comment a little... hit the bearing with the cheap grease until it comes out the relief hole on the top. Place the TOB in a zip lock bag with several tablespoons of engine oil. Work the oil into all surfaces of the graphite and let it soak for several days, continuing to work it into the graphite. Add more oil if necessary. Make sure the grease zerk is pointed down when you install it.
Don McCombs
MD, Deep Creek Lake

Proud Member of Maryland Chapter 39
The best teachers are those who show you where to look, but don't tell you what to see.
A. K. Trenfor
MD, Deep Creek Lake
Proud Member of Maryland Chapter 39
The best teachers are those who show you where to look, but don't tell you what to see.
A. K. Trenfor
-
TrentonJ
- 10+ Years
- Posts: 12
- Joined: Thu Feb 14, 2013 8:00 am
- Zip Code: 30041
- Tractors Owned: 1949 Cub
1969 John Deere 1020
2006 Kuboto M5700
Re: clutch replacement project, etc.
Thanks everyone for all the great comments and advice. I've got some good take-aways now: clean rusty splines and lightly lube, clean clutch faces, no automotive bearing - use original type graphite throwout bearing and lubricate it well, yes it is cracked and needs to be replaced, rear seal - to be determined, but likely to take some action and will need further research on that topic.
There is about 1/16 inch friction material left before the plate wears into the rivets. No more than I use it (turn over garden soil and harrow every year) I may be able to just clean it up, adjust and re-use. Just hard to resist temptation to replace with new while it is apart.
There is about 1/16 inch friction material left before the plate wears into the rivets. No more than I use it (turn over garden soil and harrow every year) I may be able to just clean it up, adjust and re-use. Just hard to resist temptation to replace with new while it is apart.
-
John *.?-!.* cub owner

- Cub Pro

- Posts: 23701
- Joined: Sun Feb 02, 2003 2:09 pm
- Zip Code: 63664
- Tractors Owned: 47, 48, 49 cub plus Wagner loader & other attachments. 41 Farmall H.
- Location: Mo, Potosi
Re: clutch replacement project, etc.
Be sure to clean up the rust on the smaller splines on the input shaft and inside the friction disk of the clutch. It has to have a slight bit of movement on those splines to be able to release.
If you are not part of the solution,
you are part of the problem!!!
you are part of the problem!!!
-
glennhuff
- 10+ Years
- Posts: 42
- Joined: Thu Jun 21, 2007 9:14 pm
- Zip Code: 97458
- Tractors Owned: 49 Cub
- Location: OR, Myrtle Point
Re: clutch replacement project, etc.
I would definitely replace the rear main seal while you have it apart. The clutch and pressure plate are probably good for quite a few more years. Looks like the throw out bearing definitely needs replaced, and another caution to install it with the grease fitting down (BTDT). I would also take the flywheel and have it surfaced. I think that you will probably get a lot more hours out of your clutch with a fresh surface. Any good automotive machine shop should be able to grind the flywheel for a reasonable price. You might also look at the pilot shaft bushing in the end of the crank. If it has excessive play it can cause the clutch disc to wobble around, which makes a funny noise when you have the clutch pedal in. Good luck.
glenn
glenn
-
TrentonJ
- 10+ Years
- Posts: 12
- Joined: Thu Feb 14, 2013 8:00 am
- Zip Code: 30041
- Tractors Owned: 1949 Cub
1969 John Deere 1020
2006 Kuboto M5700
Re: clutch replacement project, etc.
What do y'all use to clean the rust on the inside (in the hole) splines? A toothbrush probably is not ideal. For the splines on the shaft I can use a steel or brass brush, but I don't know about what I would use on the splines in the hole.
thanks
thanks
-
AL Farmall Boy

- 10+ Years
- Posts: 2555
- Joined: Tue Aug 10, 2010 6:38 pm
- Zip Code: 35630
- Circle of Safety: Y
Re: clutch replacement project, etc.
Dremel with a brass brush??
Regards,
Chase
205-368-5339
ihfarmallrtr@gmail.com
 Follow my page "Alabama Tractor Pickers" on YouTube & Facebook!
Chase
205-368-5339
ihfarmallrtr@gmail.com
Follow my page "Alabama Tractor Pickers" on YouTube & Facebook! -
Fireman Bob
- 10+ Years
- Posts: 21
- Joined: Sun Aug 11, 2013 8:34 am
- Zip Code: 97123
Re: clutch replacement project, etc.
I went with the chevy style bearing in mine about two years and a lot of hours ago and have had really good luck with it.
Just machined out the graphite center on my lathe and pressed the roller type in .
Just a different way to do it.....the graphite type has proven it will hold up fine over the years with proper maintenance.
I would agree with the above comments to resurface the flywheel, change the rear main seal and swap out the pilot bushing while your in there.
Good luck !
-
Scrivet
- 10+ Years
- Posts: 2929
- Joined: Sun Apr 19, 2009 9:51 pm
- Zip Code: 63664
- Location: MO, Potosi
Re: clutch replacement project, etc.
I'd say you're lucky and have the bearing centered on the clutch.Fireman Bob wrote:I went with the chevy style bearing in mine about two years and a lot of hours ago and have had really good luck with it.......
Is your chevy bearing pressed into the graphite or into the metal housing?Fireman Bob wrote:..........Just machined out the graphite center on my lathe and pressed the roller type in......
-
Fireman Bob
- 10+ Years
- Posts: 21
- Joined: Sun Aug 11, 2013 8:34 am
- Zip Code: 97123
Re: clutch replacement project, etc.
I machined the small end collar off the auto bearing so it was the same dimension for the length of It that went into the graphite. I then opened up the previously damaged graphite to that size. The auto bearings big surface actually rests against the old metal collar that held the graphite before. The old graphite now takes no force but just acts as a centering method for the auto bearing.
While there will be some lateral/radial movement between the clutch fingers and the bearing if everything is not centered both of these surfaces are hardened to over Rockwell 55 and should easily tolerate this.
I am not disparaging the graphite system but almost every clutch throwout system in the last 50 years has used a roller bearing with great success.
-
bythepond88
- 10+ Years
- Posts: 1421
- Joined: Sun Apr 30, 2006 2:54 pm
- Zip Code: 60073
- Circle of Safety: Y
- Location: IL, Round Lake Heights
Re: clutch replacement project, etc.
TrentonJ wrote:What do y'all use to clean the rust on the inside (in the hole) splines?
Try spraying it with WD40 and scrubbing with a regular or a wire bristled toothbrush.
If that doesn't work, try to find some Naval Jelly.
Michael Cummings
Eddie - a 1959 International Lo-Boy named after my father in law, who who bought her new.
Eddie - a 1959 International Lo-Boy named after my father in law, who who bought her new.
Who is online
Users browsing this forum: No registered users and 15 guests


