Page 2 of 3

Re: adding hydraulic power

Posted: Tue Feb 11, 2020 7:57 am
by Sadcub
Anyone know what implement used the long lever by the right hand fender?

Re: adding hydraulic power

Posted: Tue Feb 11, 2020 8:14 am
by Gary Dotson
That's the depth adjust lever for the plow. You might see if he still has the plow.

Re: adding hydraulic power

Posted: Tue Feb 11, 2020 8:26 am
by Urbish
Gary Dotson wrote:That's the depth adjust lever for the plow. You might see if he still has the plow.


If you go back looking for a plow, study these photos first to see what you're looking for: http://www.tmtractor.com/tm-tractor/gim/193_plow_001.htm

Re: adding hydraulic power

Posted: Tue Feb 11, 2020 8:32 am
by Dale Finch
Well, at least your cubs will have each other to keep them company! You may need to change your forum name from Sadcub to Happycubs!! That's a nice solid-looking cub in its work clothes! Congrats!

Re: adding hydraulic power

Posted: Tue Feb 11, 2020 8:50 am
by radioguy41
Looks like it's got good bones. I'm amazed at how straight those tierods are. If you cut off that lift handle and remove the ratchet ring the rockshaft end will be good to go with no expense.

1948 Farmall Cub-069cr.jpg

Re: adding hydraulic power

Posted: Tue Feb 11, 2020 9:49 am
by Don McCombs
Looks good.

Re: adding hydraulic power

Posted: Tue Feb 11, 2020 8:16 pm
by Sadcub
I probably need to start a new post for this one... but any of you who have answered and may know...
My cub has a new clutch that I can see through the bell housing . Something was was wrong though... it had about 1 inch of clearance between throw out bearing and the clutch fingers. The pedal adjustment was to the extreme of what was needed already. I have the service manual and have read all I can find about adjustment on here. I decided to back the clutch fingers off enough to get my 1/8 clearance, which took quite a bit of wrenching. My question is, it sure looks like a lot more than the 1-1/8-1-1/2 specified gap between the center of fingers and backing plate. I was thinking of trying to get in there with a telescoping gauge to check. Is rough adjusting the fingers to throw out bearing a good starting place ? I can’t see how else to get my 1” free clutch travel. Seemed to help doing what I did and no more toughness feeling in clutch at slight engagement. Thank you guys for the support and help.

Re: adding hydraulic power

Posted: Wed Feb 12, 2020 1:37 am
by Glen
Hi,
The distance between the throwout bearing and the pressure plate fingers is set by adjusting the clutch pedal free play to the right amount.
But the pressure plate fingers need to be the right height first.

IH changed the method of adjusting the free play during 1948, at serial number 32229.
You didn't say what the serial number of the Cub is.
The free play is measured at the surface you put your foot on.

Serial numbers 32228 and below, with the internal adjustment, use 1 3/16" of free play, the Cub operator's manual shows.
Serial numbers 32229 and above, with the external adjustment, use 1" of free play, the Cub operator's manual shows.

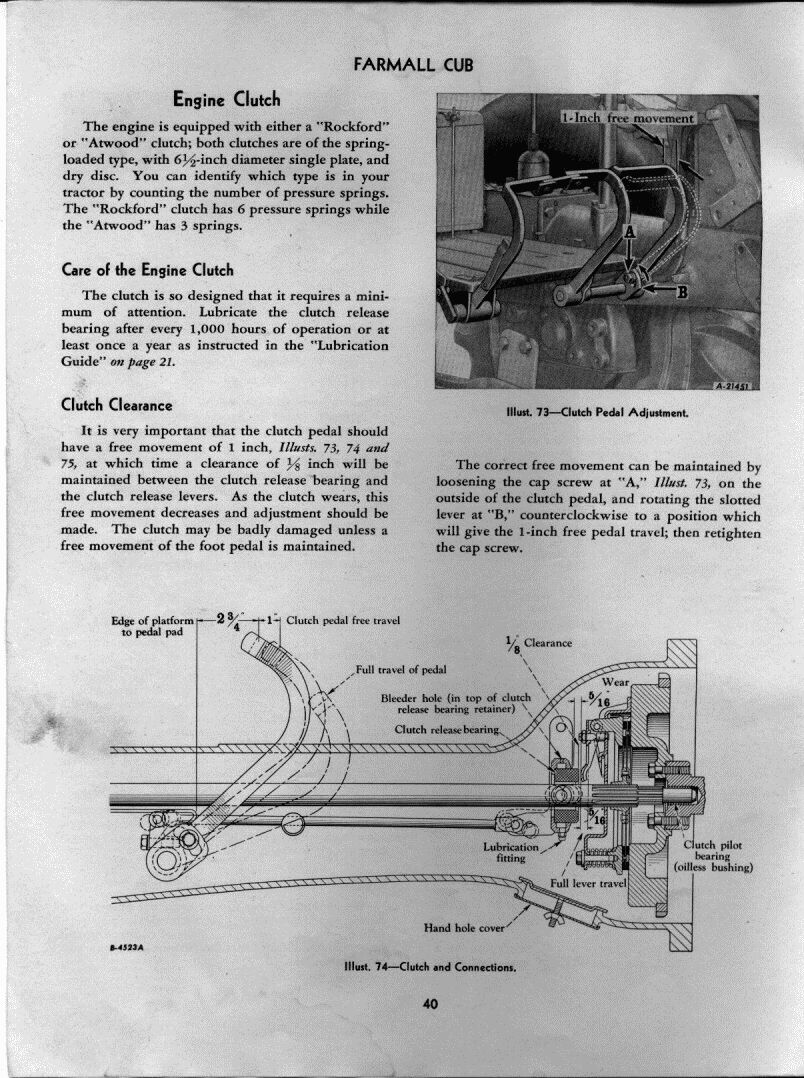
Below is a page from the 1947 Cub operator's manual, showing the clutch. The free play adjustment is a yoke on a threaded rod, inside the clutch housing, to the rear of the throwout bearing.

http://farmallcub.com/rudi_cub/www.clea ... age-40.jpg

Below is a page from the 1950 Cub operator's manual.

http://farmallcub.com/rudi_cub/www.clea ... e%2040.jpg

The pedal should have a return spring, to hold it up against the platform. Sometimes the spring is broken or gone. There may not be any free play without the return spring. The pedal won't stay up against the edge of the platform without the return spring.
TM Tractor, at the bottom of the page, has a new spring.

The pressure plate fingers might not be adjusted to the right height.
Below is a How To post, showing how to adjust the fingers.
You would need to make the tool shown in the post.
They have said on here to set the finger height to about 1 1/8" high, with the internal free play adjustment,
and 1 1/4", or 1 3/16" high, with the external free play adjustment.

viewtopic.php?f=141&t=66543

The throwout bearing graphite can be worn down, then it might not release right.
Grease the throwout bearing with cheap grease, so the oil in the grease can absorb into the graphite material.
I put a thin layer of grease on the front of the throwout bearing, part way around is good enough, the fingers will spread it around.

Below is a pic of a pressure plate, showing where to measure the finger height.
The height should be measured with the pressure plate assembled on the flywheel, not off, like in the pic.
The 2nd pic shows a new throwout bearing, the graphite sticks out 5/16".
The 3rd pic shows a pedal spring, it is a brake pedal in the pic, the clutch pedal spring goes in the same position on the clutch pedal.

Something to check on the Cub is the setscrews on the 2 steering arms, at the top of the spindle shafts, at each end of the front axle. They can wear and become loose over time.
Tighten them if they are loose, or the arm is loose on the shaft when you turn the steering wheel.

I can't see in your pic if the Cub has a drawbar.
The 193 Plow in the pics from TM Tractor has to be used with the IH drawbar. It is turned forward in the plow pics.
The drawbar is normally on the rear, facing rearward, to pull things. It is shown in the Cub operator's manual. :)

Re: adding hydraulic power

Posted: Sun Feb 16, 2020 5:53 pm
by Sadcub
Glen- Thanks for all of the information! I did make a tool as shown out of some flat stock I had on hand. After adjusting the clutch fingers and pedal free travel it works much better now. The one thing I did do BEFORE I read on here about using cheap grease, is hot the TO bearing with some of the red super tacky grease I use on all my other tractors. I see now that was not the thing to do. Not sure If I should try to force it out with new cheap grease, or just let it be. I was told this tractor had a rebuilt engine with about 3 hours on it (been sitting for years since). Looks like they put in a new clutch and TO bearing when it was split. I decided to change the oil and filter today. I got quite a bit of large metal shavings and even a cricket out of the pan. I was not very happy to find the metal shavings, but if it has not had to oil changed since the machine work I guess it could be expected. Did not see anything caught in the oil filter. What did scare me though was after my oil change as I was backing out of the garage and had to stop and wait for my wife to get the kids clear (clutch depressed the whole time) and white smoke started coming out the hand hole cover. I shut it down and went to inspect. The clutch finger I could touch was hot. It obviously was grease of the graphite on the TO bearing burning. Is this normal for 30 seconds on the clutch? Wrong grease part of the problem? Something else I am missing?

Re: adding hydraulic power

Posted: Sun Feb 16, 2020 7:25 pm
by Glen
Hi,
I would try changing the grease in the throwout bearing, by pumping the cheap grease into the grease fitting. There should be a small hole in the top of the throwout bearing to let out excess grease.
The original bearings have the hole, I don't know if every replacement bearing does or not.

Try to wipe up the grease that comes out of the bearing after you are done greasing it.

I haven't had any problem with smoking because of the grease wiped on the front of the bearing. If yours is smoking, you could wipe the grease off and try it again.

I don't know why it has metal shavings in the engine oil. You could remove the engine oil pan, and remove the crankshaft bearing caps, and see if the bearings are ok.
If they look ok, you could measure them using Plastigauge to check the clearance.
Be sure to torque the nuts and bolts to the torques in the Cub service manual.
I would read the engine section in the Cub service manual, before doing the work.

You didn't say if your free play adjustment is the older or newer style. :)

Re: adding hydraulic power

Posted: Sun Feb 16, 2020 8:19 pm
by Sadcub
Glen- I may end up dropping the pan to have a look. The shavings were more like shavings from machine work than rod or main bearing material. I will give your idea putting the correct grease in a try. I do not think my TO bearing has a hole in top, the excess grease runs out the back of the bearing on the transmission side. Thinking if I ever split the tractor I may look at the thrust bearing style. Thanks for all your help!

Re: adding hydraulic power

Posted: Sun Feb 16, 2020 8:25 pm
by Sadcub
Clutch free play adjustment at peddle, so new style I suppose.

Re: adding hydraulic power

Posted: Sun Feb 16, 2020 8:27 pm
by Dale Finch
I'd be willing to bet your TOB DOES have the hole on top. It's tiny, and squirts a small stream of grease about the size of a 18 gauge insulated wire!

Re: adding hydraulic power

Posted: Wed Feb 19, 2020 2:05 pm
by welderrx
I have done well in the past buying complete junker tractors to get large assemblies or implements that I needed and ended up with some extra pieces that I sold or traded to offset the cost. Just curious what you plan on doing that you need the touch control for, I played with a manual lift a little bit and it has decent leverage and kept it for my Lo-Boy the key is lubricating the pivot points often. TJ

Re: adding hydraulic power

Posted: Wed Feb 19, 2020 7:34 pm
by Sadcub
I have a 144 cultivator setup I was planning to put on it. I might use the Woods belly mower of my other Cub, but I doubt I would like it nearly as well as my zero turn. I thought it would be nice to no have to manually lift at the end of every row, but no more than I would be doing, probably would not matter much. I have a 50 HP Ford diesel that does most of the heavy work around the place. Cubs are scarce here in TX, way too high $$$, and usually not very good. I paid way too much for my first 48, and did not get much for what I paid. It had a busted and poorly welded block in the right corner, busted and welded lower radiator casting. This all showed up after I got it home and washed off all the grease. Oh and noisy trans and final drives. At least the hood and fenders were good. This prompted to just buy the second 48, it was going to be cheaper to start with something better. I did pick up a standard bore R8 block that I was going to build for the first cub, but the overhaul would have cost as much as I paid for the new Cub with a rebuilt motor. I am not sure what Cub #1 fate will be. I like your idea, I wish there was something around to buy with some usable parts that was reasonably priced.