Ok, I knew I should check the flow, but sometimes logic gets in the way, meaning, I had the tank off and cleaned and rebuilt the glass bowl/screen assembly, and even added a plastic filter, but a simple check of the jet and fuel flow wouldn't take more than a couple minutes. I suppose I could just blow back through the fuel line and see if it runs better. If it does, then there's my problem. If it doesn't, then move on to the carb main jet, float or inlet. Easy peasy.
And yes, I did see them for as low as about $30. I bet they're all made by the same factory anyway...
Thanks guys.
This site uses cookies to maintain login information on FarmallCub.Com. Click the X in the banner upper right corner to close this notice. For more information on our privacy policy, visit this link: Privacy Policy
NEW REGISTERED MEMBERS: Be sure to check your SPAM/JUNK folders for the activation email.
1950 Cub in Cool, CA
Forum rules
Notice: For sale and wanted posts are not allowed in this forum. Please use our free classifieds or one of our site sponsors for your tractor and parts needs.
Notice: For sale and wanted posts are not allowed in this forum. Please use our free classifieds or one of our site sponsors for your tractor and parts needs.
-
Stoffregen Motorsports
- Cub Star

- Posts: 152
- Joined: Sun May 30, 2021 10:27 am
- Zip Code: 95614
-
Stoffregen Motorsports
- Cub Star
- Posts: 152
- Joined: Sun May 30, 2021 10:27 am
- Zip Code: 95614
Re: 1950 Cub in Cool, CA
On a side note, it's funny that the Amazon listings say "free gasket included". I would expect nothing less.
-
Bob McCarty
- Team Cub

- Posts: 11861
- Joined: Tue May 25, 2004 8:02 pm
- Zip Code: 80501
- Tractors Owned: Cubs, MH Pony, Shaw, Allis G, 1934 Silver King, JD LA and LI, Gibson D, David Bradley Tri-Trac
- Circle of Safety: Y
- Location: CO, Longmont
Re: 1950 Cub in Cool, CA
If your fuel filter was not expressly made for a gravity fuel supply system, it could be restricting fuel flow.
"We don't need to think more,
we need to think differently."
-Albert Einstein
we need to think differently."
-Albert Einstein
-
Glen

- 10+ Years

- Posts: 6151
- Joined: Mon Mar 19, 2012 7:33 pm
- Zip Code: 00000
- Tractors Owned: 1956 Farmall Cub with Fast Hitch, F-11 plow, Disc, Cultivator, Cub-22 mower
- Circle of Safety: Y
- Location: Wa.
Re: 1950 Cub in Cool, CA
Hi,
Try cleaning the main jet, like in the pic below. It is low on the side of the IH carburetor.
It could be partly plugged.
Wash it after using the wire.
Tighten everything on an IH carb gently, The carb is soft metal, and threads can strip.
The main jet can break overtightening it also.
Try cleaning the main jet, like in the pic below. It is low on the side of the IH carburetor.
It could be partly plugged.
Wash it after using the wire.
Tighten everything on an IH carb gently, The carb is soft metal, and threads can strip.
The main jet can break overtightening it also.
- Attachments
-
-
Clemsonfor
- 501 Club

- Posts: 1118
- Joined: Sun Nov 10, 2019 5:14 pm
- Zip Code: 29848
- Tractors Owned: Yanmar YM2000
Yanmar YM186 (non running)
1952 Farmall Cub - Circle of Safety: Y
- Location: Greenwood County SC
Re: 1950 Cub in Cool, CA
Stoffregen Motorsports wrote:Hi guys. Back again.
The Cub project came to a halt when it finally became driveable, but I need some advice before I can resume work on it.
I know that the magneto drive gears are off a tooth, and that is on the to-do list, but in the meantime, I want to buy a new (cheap) carburetor. Right now, it will only run with the choke half on, which means a clog in the carb somewhere. I have had the carb apart and cleaned in my ultrasonic cleaner, but there's still something going on there. My solution - buy one of those $40 Amazon carburetors and give it a try.
Here's a whole page full of them - https://www.amazon.com/s?k=251234R91+Ca ... nb_sb_noss
If this were 1995 again, there would not be such a thing as a $40 replacement carb, so I would be forced to give another shot at rebuilding mine, or buy another expensive carb from one of the great parts supplers, but we do have these cheap parts available and I want to give it a shot. Worst case, I'm out $40. Best case, it works flawlessly. Middle of the road case, it works for a while and then is garbage.
So the question is - have any of you bought and/or used a cheap Amazon carb?
Plenty of people have, with mixed results. You know what your doing. I'd say go for it. Make sure your float is set once you get it based on the specs. Mount it and run it. I agree with you. Most of this stuff is junk. Some is ok, some of perfectly fine and some won't last decades but half that is a win. I have used plenty of those china carbs on things like weedeaters and chain saws. I just put one on a echo weed eater. $10 for carb, fuel line, filter, extra primer bulbs. And run perfect.
A lot of folks are going to say there absolute garbage. Some of these people are only parroting what others say and others have legitimately bought and installed them and had one that wasn't good for one reason or the other. China has massive quality control issues on these low quality replacement parts of all kinds.
Like I said I say go for it. Make sure everything is set right. If it legitimately has a problem I bet you can get them to send you a replacement if that ones bad too get your money back...or at worst your out $40. At best your tractor is running fine for years.
-
Nelson 634
- 5+ Years

- Posts: 308
- Joined: Thu May 24, 2018 9:57 pm
- Zip Code: 22958
- Tractors Owned: 5 Cubs
1952 100
1960 460 Utility - Location: Central Va.
Re: 1950 Cub in Cool, CA
I have purchased and installed the "Chinese" version of a Cub carburetor. It works on the tractor I have it on. I did follow Don McCombs recommendations. The float was out of specs. and had to be adjusted. The tractor started right up after installation.
I did go over the carburetor with the old one in one hand and new one in the other. I used a set of calipers to measure all openings and dimensions I could. Checked fuel metering jet, choke and throttle butterflies also the discharge nozzle.
Biggest problem I have starting my cubs is water in ethanol gas. First step is to remove plug on bottom of carburetor and drain the water out then check the glass sediment bowel under the gas tank for water. They usually fire right up after that. And yes I've tried additive, doesn't help. Wish I had a source for non ethanol gas.
Walter
-
Stoffregen Motorsports
- Cub Star
- Posts: 152
- Joined: Sun May 30, 2021 10:27 am
- Zip Code: 95614
Re: 1950 Cub in Cool, CA
I figure a carburetor is just an aluminum block with holes drilled in it. Obviously, this theory gets less and less accurate when the complexity of the carburetor goes up, but on these simplistic AG carbs, there's not much to them.
-
Stoffregen Motorsports
- Cub Star
- Posts: 152
- Joined: Sun May 30, 2021 10:27 am
- Zip Code: 95614
Re: 1950 Cub in Cool, CA
Hi everyone. It's been a while.
The Cub is fine, and gets driven every once in a while, though I did find something yesterday.
The lower steering box/front axle pivot is cracked, almost all the way through. I was poking around trying to come up with a game plan to fix the radiator and lower radiator/steering box leaks when I found the crack.
So I need to find a good used lower radiator and lower steering box/axle pivot. Why used? I want to keep the patina and am trying to avoid buying a new lower radiator portion, and am considering having the crack in that part welded, but the axle pivot is beyond repair, or at least, the repair would be so noticeable, that it would bother me.
I have an ad in the classifieds if anyone is interested in helping. Thanks.
-
Glen
- 10+ Years
- Posts: 6151
- Joined: Mon Mar 19, 2012 7:33 pm
- Zip Code: 00000
- Tractors Owned: 1956 Farmall Cub with Fast Hitch, F-11 plow, Disc, Cultivator, Cub-22 mower
- Circle of Safety: Y
- Location: Wa.
Re: 1950 Cub in Cool, CA
Hi,
You could look at J P Tractor salvage, at the bottom of the page. People on here say they have good service.
If you are talking about a casting, I haven't seen new ones available, only used ones.
If you have the steering gear apart, it is a good time to rebuild it. Worn bushings in it make more free play in the steering wheel's movement.
There is an oil seal at the bottom of the steering gear also.
TM Tractor has new bushings, and oil seals for it.
I would read steering section in the Cub and LoBoy service manual before taking the front end apart.
Below is the manual.
There is a table of contents beginning on page 1 of most sections.
http://farmallcub.com/rudi_cub/www.clea ... index.html
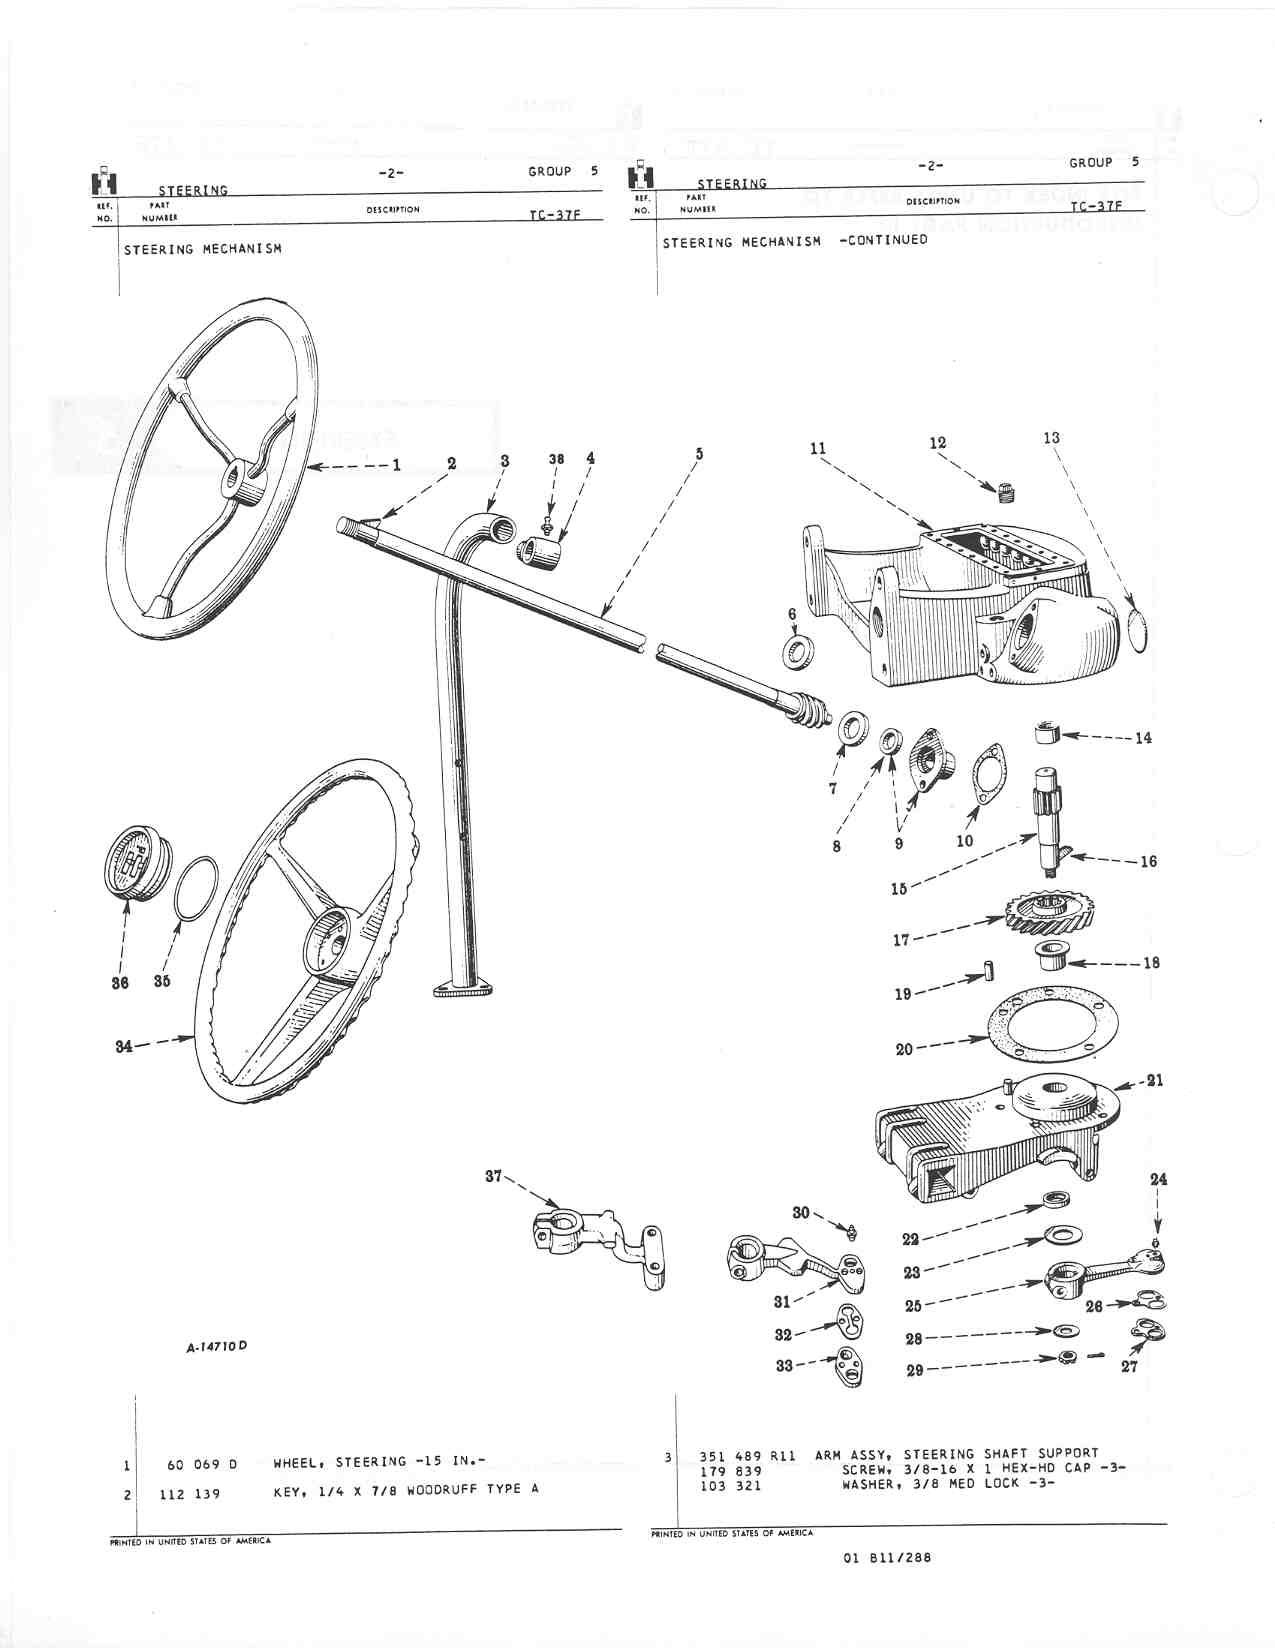
Below are pages from the Cub and LoBoy parts manual.
The bushings are for the vertical shaft, they are numbers 14 and 18.
The lower oil seal is number 22.
There are thick washers at the gear on the upper shaft, numbers 6 and 7, they might need replacing if worn.
Washer 7 can fall off the end of the upper shaft when removing it from the steering gear.
When putting the upper shaft in the steering gear, be careful washer 7 doesn't fall off the end of the shaft.
http://www.farmallcub.info/manuals/cub_ ... 005-02.jpg
http://www.farmallcub.info/manuals/cub_ ... 005-03.jpg
http://www.farmallcub.info/manuals/cub_ ... 005-04.jpg
You have to remove the steering wheel to replace the upper washer, or the upper oil seal.
The steering wheel can be tight, and need a puller to remove.
You can turn the large gear 1/2 turn on the splines and it will use teeth that are unused.
Look closely at the gear teeth and see if someone turned it around before, or if the teeth are unused.
After the steering gear is together, the nut holding the arm on the bottom of the shaft needs adjusting.
Don't tighten the nut too tight, it will make the gear bind.
The bolt through the arm has to be loose, so the arm will move on the shaft.
When adjusting it, I jack up the front of the Cub, so the front wheels are just off the ground, then the steering wheel will turn freely from side to side.
Tighten the nut until the play is gone, but not so tight that the steering binds.
The nut and shaft only have a few positions where the cotter key will go through, so you may not be able to remove all up and down movement of the shaft, to put the key in.
Tighten the bolt and nut through the arm when done adjusting the nut.
Below is a pic from TM Tractor of the steering gear base. It is held on with 5 bolts in a circle.
The oil seal is in the shiny area.
The bolts can come loose from use, and the bolt threads in the upper housing get worn from using the Cub with the bolts loose.
People on here have had to repair the threads, or replace the housings because of worn threads.
Check the threads if you are buying used parts.
You could look at J P Tractor salvage, at the bottom of the page. People on here say they have good service.
If you are talking about a casting, I haven't seen new ones available, only used ones.
If you have the steering gear apart, it is a good time to rebuild it. Worn bushings in it make more free play in the steering wheel's movement.
There is an oil seal at the bottom of the steering gear also.
TM Tractor has new bushings, and oil seals for it.
I would read steering section in the Cub and LoBoy service manual before taking the front end apart.
Below is the manual.
There is a table of contents beginning on page 1 of most sections.
http://farmallcub.com/rudi_cub/www.clea ... index.html
Below are pages from the Cub and LoBoy parts manual.
The bushings are for the vertical shaft, they are numbers 14 and 18.
The lower oil seal is number 22.
There are thick washers at the gear on the upper shaft, numbers 6 and 7, they might need replacing if worn.
Washer 7 can fall off the end of the upper shaft when removing it from the steering gear.
When putting the upper shaft in the steering gear, be careful washer 7 doesn't fall off the end of the shaft.
http://www.farmallcub.info/manuals/cub_ ... 005-02.jpg
http://www.farmallcub.info/manuals/cub_ ... 005-03.jpg
http://www.farmallcub.info/manuals/cub_ ... 005-04.jpg
You have to remove the steering wheel to replace the upper washer, or the upper oil seal.
The steering wheel can be tight, and need a puller to remove.
You can turn the large gear 1/2 turn on the splines and it will use teeth that are unused.
Look closely at the gear teeth and see if someone turned it around before, or if the teeth are unused.
After the steering gear is together, the nut holding the arm on the bottom of the shaft needs adjusting.
Don't tighten the nut too tight, it will make the gear bind.
The bolt through the arm has to be loose, so the arm will move on the shaft.
When adjusting it, I jack up the front of the Cub, so the front wheels are just off the ground, then the steering wheel will turn freely from side to side.
Tighten the nut until the play is gone, but not so tight that the steering binds.
The nut and shaft only have a few positions where the cotter key will go through, so you may not be able to remove all up and down movement of the shaft, to put the key in.
Tighten the bolt and nut through the arm when done adjusting the nut.
Below is a pic from TM Tractor of the steering gear base. It is held on with 5 bolts in a circle.
The oil seal is in the shiny area.
The bolts can come loose from use, and the bolt threads in the upper housing get worn from using the Cub with the bolts loose.
People on here have had to repair the threads, or replace the housings because of worn threads.
Check the threads if you are buying used parts.
- Attachments
-
-
Stoffregen Motorsports
- Cub Star
- Posts: 152
- Joined: Sun May 30, 2021 10:27 am
- Zip Code: 95614
Re: 1950 Cub in Cool, CA
Glen, thanks for the thorough reply. Is there enough meat to oversize the thread size if they are unusable? I assume they are 3/8-16, so that would mean 7/16-14.
Also, great info on tightening the pitman arm. I probably would have figured that out by error, but warned in advance is valuable.
I really don't want to tear into the Cub to do this repair, but I have an inability to let running equipment sit broken. It must be repaired. So you trust JP Salvage? I found another yard in Texas too.
-
Glen
- 10+ Years
- Posts: 6151
- Joined: Mon Mar 19, 2012 7:33 pm
- Zip Code: 00000
- Tractors Owned: 1956 Farmall Cub with Fast Hitch, F-11 plow, Disc, Cultivator, Cub-22 mower
- Circle of Safety: Y
- Location: Wa.
Re: 1950 Cub in Cool, CA
Hi,
The Cub parts manual says the 5 bolts that hold the base to the upper housing are 7/16" x 1 1/4",
14 thread. You can find the listing at the description for number 21 in the parts pages, in my post above.
People on here use thread inserts to repair damaged threads, then you can use the same size original bolts. McMaster Carr and other places have them, I think.
I think there is enough material to use the thread repair coils, other people on here have done it, I think.
Hopefully you can buy a housing with good threads.
People on here have said J P Tractor Salvage has good used parts, I haven't needed to buy castings there.
If you found a parts place closer to where you live, you can buy parts there if you want.
If you are buying an upper housing, you could change the serial number plate and put your plate on the housing you are using.
They have said on here you could use a thin putty knife and get in behind the plate, near the rivets, and gently pry it to start the rivets out.
You might need to gently tap the putty knife in. Be careful to not damage the plate.
Below is a pic from TM Tractor of the upper housing, you can see where the bolt holes are.
1 hole is for the dowel.
- Attachments
-
-
DBIZZELL
- Posts: 33
- Joined: Thu Sep 23, 2021 7:00 am
- Zip Code: 75763
Re: 1950 Cub in Cool, CA
Take a picture of serial number with your phone, you can blow it up and read.
-
Stoffregen Motorsports
- Cub Star
- Posts: 152
- Joined: Sun May 30, 2021 10:27 am
- Zip Code: 95614
Re: 1950 Cub in Cool, CA
I just ordered the parts from JP Tractor Salvage in Missouri. Super helpful and very reasonable prices. I asked if they had parts that had not been cleaned, so I could maintain the patina, but the lower radiator housings they sell have all been cleaned and magnafluxed, then primed. Hopefully I can get it to match with some other color paints and maybe a roll in the dirt.
I asked them about radiators, specifically the cheap ones you find on Amazon for $135 bucks. He told me they were junk, but I told him I'm a roll-the-dice kind of guy, so I'm going to get one of them and install it while it's all apart. I figure this tractor isn't used for anything but putting around the property, maybe a 4th of July parade, so I'm willing to risk it.
Thanks again for your help guys. I'll let you know how it goes back together.
-
Don McCombs

- Team Cub Mentor

- Posts: 17488
- Joined: Mon Feb 03, 2003 6:45 am
- Zip Code: 21550
- Tractors Owned: "1950 Something" Farmall Cub
1957 Farmall Cub w/FH
1977 International Cub w/FH
1978 International Cub
1948 Farmall Super A - Circle of Safety: Y
- Location: MD, Deep Creek Lake
Re: 1950 Cub in Cool, CA
I think you may find that the problems with the cheap radiators are not one of function, but of fit.
Don McCombs
MD, Deep Creek Lake

Proud Member of Maryland Chapter 39
The best teachers are those who show you where to look, but don't tell you what to see.
A. K. Trenfor
MD, Deep Creek Lake
Proud Member of Maryland Chapter 39
The best teachers are those who show you where to look, but don't tell you what to see.
A. K. Trenfor
-
Glen
- 10+ Years
- Posts: 6151
- Joined: Mon Mar 19, 2012 7:33 pm
- Zip Code: 00000
- Tractors Owned: 1956 Farmall Cub with Fast Hitch, F-11 plow, Disc, Cultivator, Cub-22 mower
- Circle of Safety: Y
- Location: Wa.
Re: 1950 Cub in Cool, CA
Hi,
They have said on here that some of the new radiators for Cubs are too short, or the filler neck is too short.
The neck doesn't come up high enough above the hood, so the radiator cap scrapes on the hood turning it.
If your radiator that you have is the right height, I would measure the height of it, and the new radiator, before putting the new one on, and see if it looks like the new one will work.
It could save you the work of putting the new one on, if it measures too short.
Other things they have said on here were, I think there have been problems with the bottom not fitting right, and the side channels not fitting right on some of the new radiators also.
-
- Similar Topics
- Replies
- Views
- Last post
-
- 7
- 262
-
by Barnyard
Tue Jul 12, 2022 12:46 pm
-
- 12
- 317
-
by Waif
Sun Jun 19, 2022 8:51 am
-
- 26
- 952
-
by CharlieK
Tue May 30, 2023 9:28 am
-
- 10
- 281
-
by staninlowerAL
Tue May 30, 2023 9:40 am
-
- 24
- 763
-
by Greenthumbfarms
Sun Jan 23, 2022 3:23 pm
Who is online
Users browsing this forum: No registered users and 1 guest


