My plan so far (which is open to advise and change) is to use a garden pressure tank to spray some kerosene in around the crank area and clean it up as much as possible (along with the resulting mess). And eventually when I get it running use seafoam in the oil and frequent oil changes as I have seen advised in other posts on this board. But I know very little about the history of this tractor, and what I have found so far indicates that it has been a long time since basic maintenance steps were done. I only saw it run briefly last fall, and I think I recall some smoke in the exhaust. All D21 plugs are black and fouled. And the starter rarely engages the fly wheel, even after I had a starter shop rework it. When removing the back bolts on the oil pan it is very oily with bits of metal in the area of the ring gear. So I probably need to split the tractor to fix the ring gear and replace the rear seal and am wondering what other issues might need to be addressed. I was also hoping that after cleaning the oil pan and putting it back on, refill the oil and try to get compression numbers even with a hand crank (or maybe a drill drive?). So any thoughts on the source of these roll pins and what I should look into further would be appreciated. I read through the engine section of the service manual a couple of times but did not locate where these pins might have come from. I did not remove the mag or governor yet, but probably should look at them. I am wondering whether the mag internal coil is up to snuff.
This site uses cookies to maintain login information on FarmallCub.Com. Click the X in the banner upper right corner to close this notice. For more information on our privacy policy, visit this link: Privacy Policy
NEW REGISTERED MEMBERS: Be sure to check your SPAM/JUNK folders for the activation email.
'48 Cub -metal parts in oil pan
Forum rules
Notice: For sale and wanted posts are not allowed in this forum. Please use our free classifieds or one of our site sponsors for your tractor and parts needs.
Notice: For sale and wanted posts are not allowed in this forum. Please use our free classifieds or one of our site sponsors for your tractor and parts needs.
-
phill_mi
- Cub Star

- Posts: 162
- Joined: Tue Oct 05, 2021 7:22 pm
- Zip Code: 49435
- Tractors Owned: '47 Ford 2N (with '50 8N motor)
'48 Farmall Cub
C22 sickle
'52 Ferguson TO-30
'63 Farmall 560 gas with loader - Circle of Safety: Y
'48 Cub -metal parts in oil pan
I have been changing fluids on my '48 Cub, 6v, Mag, no TC, and after finding rust in the tank, removed the IH 3/4 carb. After disassembly ordered specific parts needed, and while waiting on parts removed the valve cover to check the lash adjustment. Since I found a lot of gritty sludge I used a paint brush to wipe it down with seafoam. After cleaning and adjusting the valves (most were close, none were stuck) I drained the oil again and proceeded to remove the oil pan. In the sludge near the oil drain I found three bent and ragged pieces of 'roll spring pins'. Any thoughts on where these came from and what further I should check?
My plan so far (which is open to advise and change) is to use a garden pressure tank to spray some kerosene in around the crank area and clean it up as much as possible (along with the resulting mess). And eventually when I get it running use seafoam in the oil and frequent oil changes as I have seen advised in other posts on this board. But I know very little about the history of this tractor, and what I have found so far indicates that it has been a long time since basic maintenance steps were done. I only saw it run briefly last fall, and I think I recall some smoke in the exhaust. All D21 plugs are black and fouled. And the starter rarely engages the fly wheel, even after I had a starter shop rework it. When removing the back bolts on the oil pan it is very oily with bits of metal in the area of the ring gear. So I probably need to split the tractor to fix the ring gear and replace the rear seal and am wondering what other issues might need to be addressed. I was also hoping that after cleaning the oil pan and putting it back on, refill the oil and try to get compression numbers even with a hand crank (or maybe a drill drive?). So any thoughts on the source of these roll pins and what I should look into further would be appreciated. I read through the engine section of the service manual a couple of times but did not locate where these pins might have come from. I did not remove the mag or governor yet, but probably should look at them. I am wondering whether the mag internal coil is up to snuff.
My plan so far (which is open to advise and change) is to use a garden pressure tank to spray some kerosene in around the crank area and clean it up as much as possible (along with the resulting mess). And eventually when I get it running use seafoam in the oil and frequent oil changes as I have seen advised in other posts on this board. But I know very little about the history of this tractor, and what I have found so far indicates that it has been a long time since basic maintenance steps were done. I only saw it run briefly last fall, and I think I recall some smoke in the exhaust. All D21 plugs are black and fouled. And the starter rarely engages the fly wheel, even after I had a starter shop rework it. When removing the back bolts on the oil pan it is very oily with bits of metal in the area of the ring gear. So I probably need to split the tractor to fix the ring gear and replace the rear seal and am wondering what other issues might need to be addressed. I was also hoping that after cleaning the oil pan and putting it back on, refill the oil and try to get compression numbers even with a hand crank (or maybe a drill drive?). So any thoughts on the source of these roll pins and what I should look into further would be appreciated. I read through the engine section of the service manual a couple of times but did not locate where these pins might have come from. I did not remove the mag or governor yet, but probably should look at them. I am wondering whether the mag internal coil is up to snuff.
-
wrz
- 5+ Years

- Posts: 177
- Joined: Sun Jun 01, 2014 8:41 am
- Zip Code: 85233
- Tractors Owned: 47 Fcub
51 Fcub
57 Lo Boy FH
59 Lo Boy FH 45 Loader - Location: AZ,Gilbert
Re: '48 Cub -metal parts in oil pan
The only thing I can think of is the pins that hold the weights in place on the governor.
Wm
Wm
-
tst
- 10+ Years

- Posts: 5214
- Joined: Tue Jan 12, 2010 2:08 pm
- Zip Code: 12514
- Circle of Safety: Y
Re: '48 Cub -metal parts in oil pan
I think that is a good guess, possible in the past it was repaired and never were cleaned out
-
phill_mi
- Cub Star
- Posts: 162
- Joined: Tue Oct 05, 2021 7:22 pm
- Zip Code: 49435
- Tractors Owned: '47 Ford 2N (with '50 8N motor)
'48 Farmall Cub
C22 sickle
'52 Ferguson TO-30
'63 Farmall 560 gas with loader - Circle of Safety: Y
Re: '48 Cub -metal parts in oil pan
Thanks. I will look at the governor. I cleaned the crankcase area and put the oil pan back on, but maybe that was premature, if parts and sludge from the governor can get back to the oil pan. I also removed the small cover plate to the left front of the engine behind the camshaft drive gear. I have not had a chance yet to find it in the parts database,(a great resource if I can figure out how to get back to it again). But I was surprised to find that there was no gasket. It was sealed by the paint job, which also covered rubber hoses, etc.
-
Glen

- 10+ Years
- Posts: 6152
- Joined: Mon Mar 19, 2012 7:33 pm
- Zip Code: 00000
- Tractors Owned: 1956 Farmall Cub with Fast Hitch, F-11 plow, Disc, Cultivator, Cub-22 mower
- Circle of Safety: Y
- Location: Wa.
Re: '48 Cub -metal parts in oil pan
Hi,
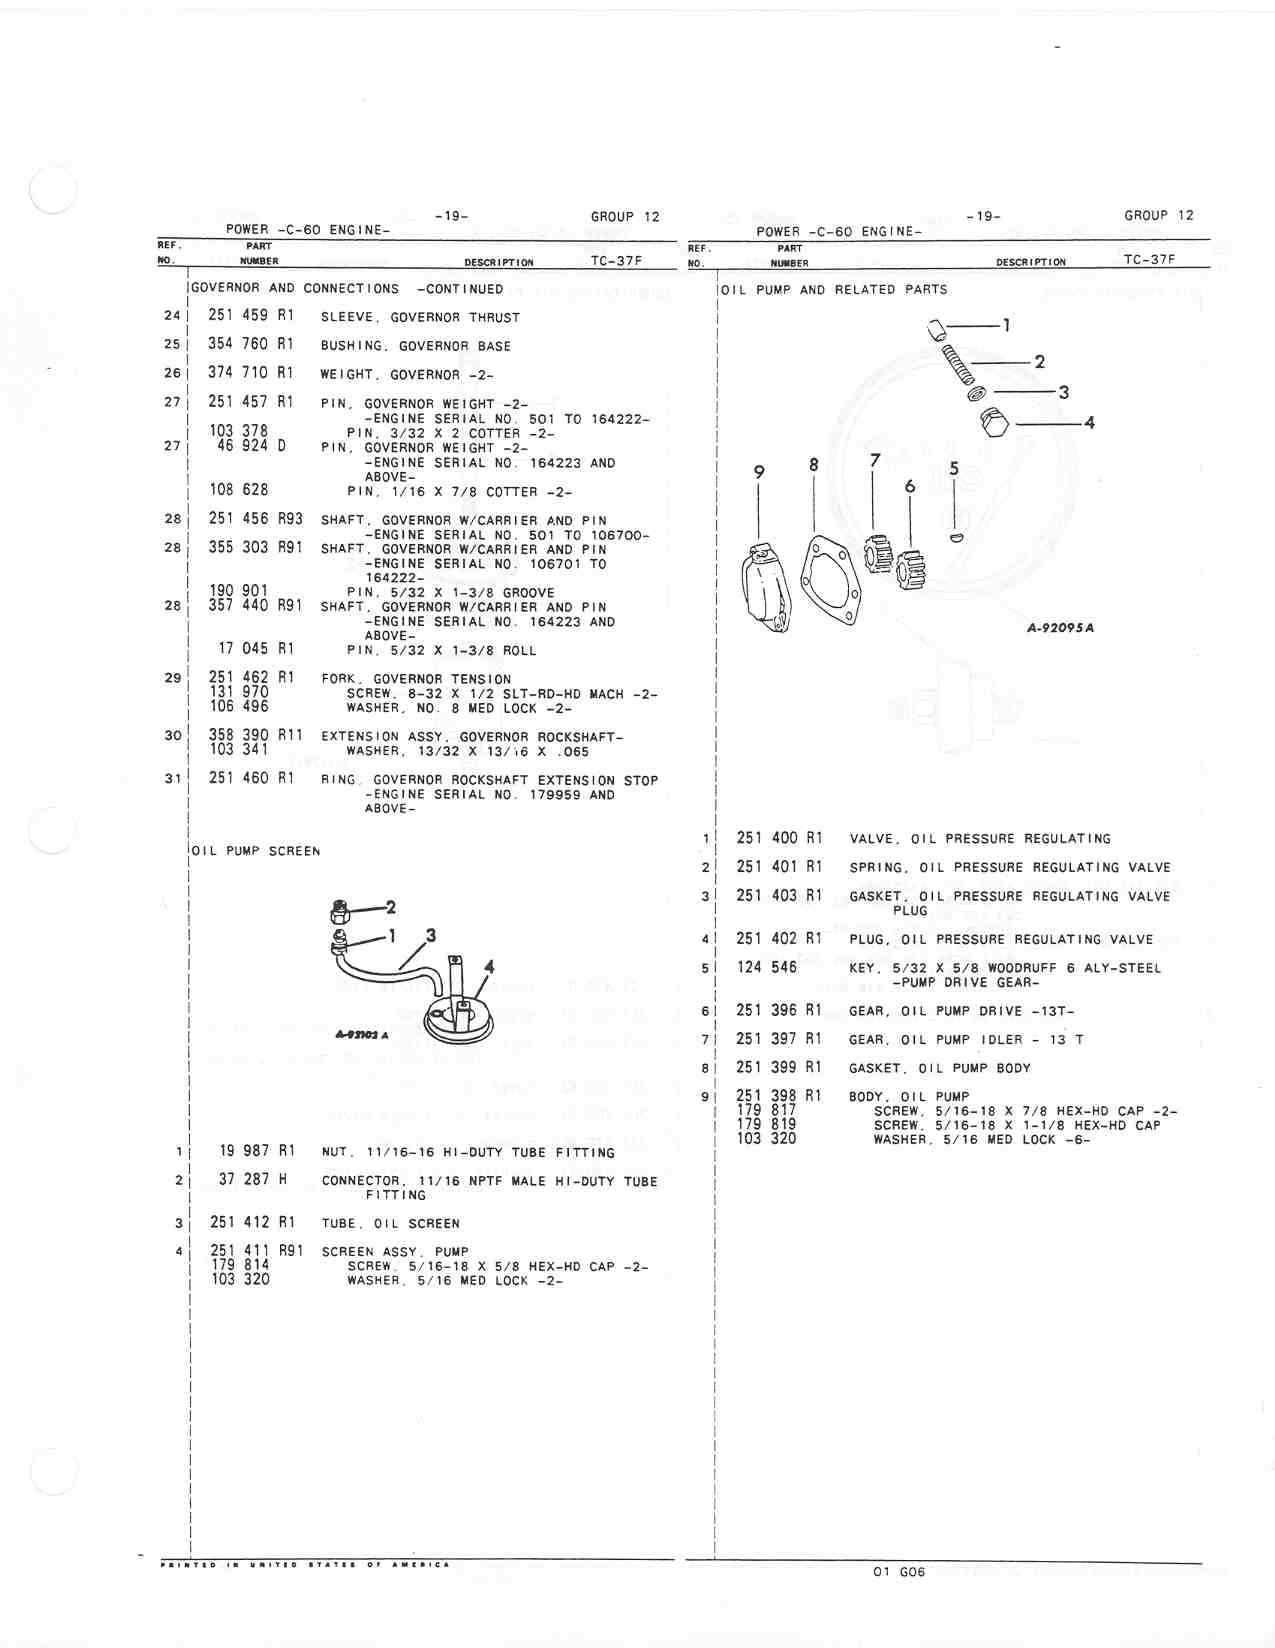
Below are pages from the Cub and Loboy parts manual, it says in the description for the pins that hold the 2 weights on in the governor, that the pins use cotter keys in them.
I was thinking that the weights use regular pins in them, but not sure.
It shows the pins at number 27 in the pic, and the description.
http://www.farmallcub.info/manuals/cub_ ... 012-18.jpg
http://www.farmallcub.info/manuals/cub_ ... 012-19.jpg
-
wrz
- 5+ Years
- Posts: 177
- Joined: Sun Jun 01, 2014 8:41 am
- Zip Code: 85233
- Tractors Owned: 47 Fcub
51 Fcub
57 Lo Boy FH
59 Lo Boy FH 45 Loader - Location: AZ,Gilbert
Re: '48 Cub -metal parts in oil pan
Glen's posting of the assembly drawing number 28 has a roll pin but it is for a later engine. Thing could of been changed at a later date.
Wm
Wm
-
Stanton

- Cub Pro

- Posts: 7760
- Joined: Mon Jun 22, 2009 6:56 am
- Zip Code: 64070
- Tractors Owned: 1942 Farmall AV, serial #87025
1947 Farmall Circle Cub, serial #2116
1948 Farmall Cub, serial #46066 - Circle of Safety: Y
- Location: Lone Jack, MO
Re: '48 Cub -metal parts in oil pan
phill_mi wrote:...I also removed the small cover plate to the left front of the engine behind the camshaft drive gear. I have not had a chance yet to find it in the parts database,(a great resource if I can figure out how to get back to it again). But I was surprised to find that there was no gasket. It was sealed by the paint job, which also covered rubber hoses, etc.
That would be the cover plate to where the T/C pump mounts. Yes, it needs a gasket. Easy to make with a hole punch and X-acto knife.
You have access to the all the PDF Manuals on this site. There’s a few ways to do that:
- From a desktop or laptop, go to "Quick Links" in the upper left corner of your screen. Hit that and a pull-down appears where you'll find "PDF Manuals".
- You can also go to “Cub Info” in the upper toolbar, then hit “Rudi’s Manuals”. From there, you can access a variety of information.
- If you're using a phone, go to the "Links Directory" (second category down the main page). Once in "Links Directory" , scroll down to the second section "Tractor Parts & Manuals" and you'll find them there.
Stanton


-
phill_mi
- Cub Star
- Posts: 162
- Joined: Tue Oct 05, 2021 7:22 pm
- Zip Code: 49435
- Tractors Owned: '47 Ford 2N (with '50 8N motor)
'48 Farmall Cub
C22 sickle
'52 Ferguson TO-30
'63 Farmall 560 gas with loader - Circle of Safety: Y
Re: '48 Cub -metal parts in oil pan
Thanks for the advise. Stanton, your remark in my other thread about making gaskets got me researching how to make a gasket for this cover. I found your how-to on making gaskets helpful. When I go into town I will pick up some hole punches and gasket material. In the mean time I pulled both the IH J4 mag and the governor. I did not pull the radiator, although it looks like I need to. I have not been able to get the dog leg slotted screws or the fan shroud loose to get at all the radiator bolts. But my attempt to drive the old mag seal out already resulted in a miss the punch and damage to the front of the radiator (OEM which was not leaking to my knowledge, but might now). I often miss what I aim for, but this is disappointing! So is there any advise on how to get the old seal out without removing the radiator? The seal was already damaged and I have a new one so I don't care what happens to the old one, I just need to get it out without doing more damage. Thanks Phill
-
Mht
- 5+ Years
- Posts: 408
- Joined: Sun Jul 08, 2018 9:02 pm
- Zip Code: 27606
- Tractors Owned: 1949 farmall cub(building from parts) 1950 farmall cub
1971 David Brown 880 selectamatic - Circle of Safety: Y
Re: '48 Cub -metal parts in oil pan
If you or a friend is a shooter empty brass makes nice hole punches. The won’t last as long as steel ones but the price is right
-
Dale Finch

- 10+ Years
- Posts: 6684
- Joined: Tue Apr 27, 2010 11:34 am
- Zip Code: 27517
- Tractors Owned: '51 Cub #140966 "Bruno" with Woods 59 mower
'55 Cub #187541 "Betty" with Fast Hitch
'55 Cub #190482 "Ben" with Woods 42 mower
'55 Cub #191739 "Bertha" with Woods 42 mower
'56 Cub #194370 "Boris" with Mott Flail mower - Circle of Safety: Y
- Location: NC, Chapel Hill
Re: '48 Cub -metal parts in oil pan
In removing the gov seal, you can try screwing in a couple sheetmetal screws from the mag side & pulling the seal out to the rear.
Also, while you have things out, you might consider making a punch mark (or paint mark if not enough clearance) on the GOVERNOR side of the gov gear, opposite the punch mark on the mag side. You'll need it for reinstalling the governor.
Also, while you have things out, you might consider making a punch mark (or paint mark if not enough clearance) on the GOVERNOR side of the gov gear, opposite the punch mark on the mag side. You'll need it for reinstalling the governor.
Dale Finch
-
phill_mi
- Cub Star
- Posts: 162
- Joined: Tue Oct 05, 2021 7:22 pm
- Zip Code: 49435
- Tractors Owned: '47 Ford 2N (with '50 8N motor)
'48 Farmall Cub
C22 sickle
'52 Ferguson TO-30
'63 Farmall 560 gas with loader - Circle of Safety: Y
Re: '48 Cub -metal parts in oil pan
I got it out. I just needed to let my inner aggression out with a larger hammer. Why didn't I think of that earlier?
And now I see the very faint mark on the mag side of the idler gear. I will make a corresponding mark on the governor side of the gear. Thanks.
And now I see the very faint mark on the mag side of the idler gear. I will make a corresponding mark on the governor side of the gear. Thanks.
-
phill_mi
- Cub Star
- Posts: 162
- Joined: Tue Oct 05, 2021 7:22 pm
- Zip Code: 49435
- Tractors Owned: '47 Ford 2N (with '50 8N motor)
'48 Farmall Cub
C22 sickle
'52 Ferguson TO-30
'63 Farmall 560 gas with loader - Circle of Safety: Y
Re: '48 Cub -metal parts in oil pan
So I did not open the governor up. Just looking through the cracks the cotter pins are in their where maybe the roll pins in the oil pan used to be. Maybe some dropped them into the oil pan and left them. The governor shafts feel solid so not sure if I should take the time to open the governor up or use it as it is now that I know how easy it will be to get out next time 
-
Glen
- 10+ Years
- Posts: 6152
- Joined: Mon Mar 19, 2012 7:33 pm
- Zip Code: 00000
- Tractors Owned: 1956 Farmall Cub with Fast Hitch, F-11 plow, Disc, Cultivator, Cub-22 mower
- Circle of Safety: Y
- Location: Wa.
Re: '48 Cub -metal parts in oil pan
Hi,
The inside of the governor should easily come out of the outside housing, so you can look at the weights and pins.
You should check the weights and pins for wear, since you have the governor off the engine.
Twist the weights sideways and see if there is play or wear.
Look and see if the weights have been rubbing inside the housing.
It needs repair if worn too much.
Be careful of the 3 piece ball bearing at the end of the governor shaft, inside the housing, put the bearing together the right way.
Would you post pics of what the pins look like, with it assembled, don't take the pins out if it isn't worn.
There is an oil seal on the side of the governor, on the shaft that goes to the carburetor linkage, if the seal leaks it needs replacing.
There is a needle bearing on the shaft also, by the seal, be sure it is good.
TM Tractor has new governor parts.
Below is a listing at TM tractor for a new seal.
http://www.tmtractor.com/new/gv/642fp.htm
There are timing marks for the governor gear, and idler gear in the engine that runs the governor.
I guess you found them.
They are single dots.
The mark on the idler gear is on the rear facing side of the gear.
-
phill_mi
- Cub Star
- Posts: 162
- Joined: Tue Oct 05, 2021 7:22 pm
- Zip Code: 49435
- Tractors Owned: '47 Ford 2N (with '50 8N motor)
'48 Farmall Cub
C22 sickle
'52 Ferguson TO-30
'63 Farmall 560 gas with loader - Circle of Safety: Y
Re: '48 Cub -metal parts in oil pan - governor review
Glen, thanks for the advice. I also read several posts on governor rebuild, and it did come apart easily with a firm hit of the hammer. I took several pics but I had to crop them down severely to meet the file size limitations.
Shows internal wear all the way around the cover. The weights seem to be solid on their pivot without any wobble.
This shows the gear wearing against the cover. Seems to be too much wobble in the main shaft, but this is out of the cover and the shaft is not supported by the bearing in the cover. So is this a concern? When it was in the cover I noticed that the shaft moved front to back enough to rub against the piece of housing in this picture.
The back busing and the regulator screw that is hollow in the middle.
The outer seal and the spring. Spring looks OK to me. Has a strong pull.
When initially removed here is a shot into the cover with the trust bearing parts laying where they fell.
So how do I evaluate which parts to replace and how do I address the weights rubbing against the outer shell. I have run this tractor very little, only the half mile drive home from the PO last fall, and then briefly a week or so ago until I noticed a gas leak and shut it down. But a week or so ago it was sputtering to get going and did not really respond to increasing the throttle. Since then I found gas leaking from sediment bowl, rust in sediment bowl and tank, carb affected by dirty gas as all screens had been removed and carb gasket sucked into bowl, and then while taking this governor of it seems to me that the pivot on left front of tractor connecting back to the carb was not free, as the pin was rusty and lever did not move freely. So that is the background info I have at this time.
-
Glen
- 10+ Years
- Posts: 6152
- Joined: Mon Mar 19, 2012 7:33 pm
- Zip Code: 00000
- Tractors Owned: 1956 Farmall Cub with Fast Hitch, F-11 plow, Disc, Cultivator, Cub-22 mower
- Circle of Safety: Y
- Location: Wa.
Re: '48 Cub -metal parts in oil pan
Hi,
Thanks for the pics.
I can't see what the 2nd pic is, it is out of focus and not enough light.
Would you take pics from back a little farther, with more light.
If the weights are snug feeling on the mounting pins, and not loose, then I don't think the weights can rub in the housing.
It may have rubbed in the housing before you bought it, and someone repaired it.
Does the rubbing look new or older.
You can put the governor parts back in the housing, look in with a light, and move the weights to their fully expanded positions, and see if they rub in the housing.
Would you take a pic from back farther of the wear on the weights, if they are damaged too much from wear, they might need replacing. They have to weigh a certain amount to work right.
Below are pics from TM Tractor of governor parts, they should look like these pics.
http://www.tmtractor.com/tm-tractor/ggv ... or_001.htm
http://www.tmtractor.com/tm-tractor/ggv ... r1_001.htm
I think there were 2 styles of the Fork, number 29 in the parts manual pic that I posted before, 1 is like in the TM Tractor pic, and 1 is like yours has.
Move the cover with the bushing next to the drive gear straight sideways side to side, and see if it seems worn.
They usually say on here to replace the governor spring when you have a governor apart.
Below is a listing for it at TM Tractor, you can look at the pic.
http://www.tmtractor.com/new/gv/357fp.htm
I use pliers and twist the top or bottom to the side slightly, so the wire end opens, and then it will come off, or go on. I think putting the top on in position first works better, but not sure.
I think there is info in the How To Forum about rebuilding a governor, it probably has more info.
Thanks for the pics.
I can't see what the 2nd pic is, it is out of focus and not enough light.
Would you take pics from back a little farther, with more light.
phill_mi wrote:Shows internal wear all the way around the cover. The weights seem to be solid on their pivot without any wobble.
If the weights are snug feeling on the mounting pins, and not loose, then I don't think the weights can rub in the housing.
It may have rubbed in the housing before you bought it, and someone repaired it.
Does the rubbing look new or older.
You can put the governor parts back in the housing, look in with a light, and move the weights to their fully expanded positions, and see if they rub in the housing.
Would you take a pic from back farther of the wear on the weights, if they are damaged too much from wear, they might need replacing. They have to weigh a certain amount to work right.
Below are pics from TM Tractor of governor parts, they should look like these pics.
http://www.tmtractor.com/tm-tractor/ggv ... or_001.htm
http://www.tmtractor.com/tm-tractor/ggv ... r1_001.htm
I think there were 2 styles of the Fork, number 29 in the parts manual pic that I posted before, 1 is like in the TM Tractor pic, and 1 is like yours has.
Move the cover with the bushing next to the drive gear straight sideways side to side, and see if it seems worn.
They usually say on here to replace the governor spring when you have a governor apart.
Below is a listing for it at TM Tractor, you can look at the pic.
http://www.tmtractor.com/new/gv/357fp.htm
I use pliers and twist the top or bottom to the side slightly, so the wire end opens, and then it will come off, or go on. I think putting the top on in position first works better, but not sure.
I think there is info in the How To Forum about rebuilding a governor, it probably has more info.
Last edited by Glen on Mon Jun 20, 2022 7:38 pm, edited 2 times in total.
-
- Similar Topics
- Replies
- Views
- Last post
-
-
Bondo still the Best option for pitted metal?
by Bennydh » Mon Oct 24, 2022 4:05 pm » in Farmall Cub - 9
- 468
-
by Urbish
Wed Oct 26, 2022 10:35 am
-
-
-
Is there 'yellow metal' in the steering assembly?
by phill_mi » Sun Mar 27, 2022 7:09 pm » in Farmall Cub - 3
- 306
-
by phill_mi
Tue Mar 29, 2022 5:44 pm
-
-
- 6
- 346
-
by baldwindiesel
Wed Mar 08, 2023 3:58 pm
-
- 9
- 481
-
by Turner1018
Sat Nov 05, 2022 9:55 pm
-
- 6
- 417
-
by Eugene
Fri Oct 15, 2021 3:16 pm
Who is online
Users browsing this forum: No registered users and 4 guests


