This site uses cookies to maintain login information on FarmallCub.Com. Click the X in the banner upper right corner to close this notice. For more information on our privacy policy, visit this link: Privacy Policy
NEW REGISTERED MEMBERS: Be sure to check your SPAM/JUNK folders for the activation email.
R.O.C.K Restoration Project
Forum rules
Notice: For sale and wanted posts are not allowed in this forum. Please use our free classifieds or one of our site sponsors for your tractor and parts needs.
Notice: For sale and wanted posts are not allowed in this forum. Please use our free classifieds or one of our site sponsors for your tractor and parts needs.
-
rockfarmer
- 5+ Years

- Posts: 515
- Joined: Mon Apr 13, 2015 6:35 pm
- Zip Code: 78633
- Tractors Owned: 1947 Circle Cub
1948 Cub
1949 Cub (Rocky)
1950 Cub
1962 Cub - Circle of Safety: Y
Re: R.O.C.K Restoration Project
Had to hit the road for a week. Hopefully I will have him out of surgery this evening.
-
rockfarmer
- 5+ Years
- Posts: 515
- Joined: Mon Apr 13, 2015 6:35 pm
- Zip Code: 78633
- Tractors Owned: 1947 Circle Cub
1948 Cub
1949 Cub (Rocky)
1950 Cub
1962 Cub - Circle of Safety: Y
Re: R.O.C.K Restoration Project
Installed new head gasket with copper spray. Did not let dry and torqued bolts to 25, 30, 35, 40, 45 foot-lbs following the sequence provided by Stanton. I re-sealed the bolts with aviation since there were traces of it from the initial install. Also, applied a small amount to the air cleaner bolts. Not sure why, but did it anyway. Will someone explain why this is important?
Let dry for 48 hours, only because I had other things to do. No SAFE pony tank available, so on with the hood and new glass sediment bowl.
I am happy to report no leaks, anywhere .....yet.
I recorded the following videos with my cel phone. Hope the quality is OK.
https://nam01.safelinks.protection.outl ... reserved=0
https://www.youtube.com/watch?v=YjmIVKa ... eG&index=2
Let dry for 48 hours, only because I had other things to do. No SAFE pony tank available, so on with the hood and new glass sediment bowl.
I am happy to report no leaks, anywhere
I recorded the following videos with my cel phone. Hope the quality is OK.
https://nam01.safelinks.protection.outl ... reserved=0
https://www.youtube.com/watch?v=YjmIVKa ... eG&index=2
-
staninlowerAL
- 10+ Years

- Posts: 4996
- Joined: Fri Oct 29, 2010 11:34 pm
- Zip Code: 36558
- Tractors Owned: Cubs: (3)'49's, (1 is for parts), (1)'57 IH Cub LoBoy w/FH, (2)154 Number Series Loboys, (1 is for parts), '76 Longstripe w/FH, Mowers: C-22, Bush Hog 412, Pennington 59, Woods RM42CF, Woods 42, assorted FCub plows, planters, discs, etc. OTHERS: '49 AC B & Ind. Sickle mower, '61 AC D12 Ser 2, '52 8N, '56 Ferguson 35 Deluxe, '47 & '49 Avery V, '53 MM BG (offset), '51 JD M (regular), '56 JD 420C, with Blade and fire plow, '85 JD 850 (Yanmar) w/72" belly mower, '76? Yanmar 2TR15 1500 & Bush Hog SQ42S-2 mower, '78? FORD Dexta, '86 FORD LGT14D & 48" Mower, (2)Cub Cadets & Mowers (MTD), (4) Sears Surburban's, other MTD mowers, Jeeps & other misc. "treasures"
- Circle of Safety: Y
- Location: AL (Southwest)
Re: R.O.C.K Restoration Project
Tim, I've read on the FORUM that the air cleaner bolts penetrate the water jacket.
Stan in LA (lower AL)
USAF & Reserves, Reg ARMY, ARMY NG (AL)
USAF & Reserves, Reg ARMY, ARMY NG (AL)
-
lliberto

- 10+ Years
- Posts: 222
- Joined: Wed Jul 08, 2009 2:05 pm
- Zip Code: 26062
- Tractors Owned: 1947 Farmall Cub
http://farmallcub.com/phpBB2/viewtopic.php?f=1&t=94614
1952 Farmall Cub
http://farmallcub.com/phpBB2/viewtopic.php?f=1&t=100147
2011 Husqvarna YTH24V42LS - Location: WV, Weirton
Re: R.O.C.K Restoration Project
rockfarmer wrote:Installed new head gasket with copper spray. Did not let dry and torqued bolts to 25, 30, 35, 40, 45 foot-lbs following the sequence provided by Stanton. I re-sealed the bolts with aviation since there were traces of it from the initial install. Also, applied a small amount to the air cleaner bolts. Not sure why, but did it anyway. Will someone explain why this is important?
Let dry for 48 hours, only because I had other things to do. No SAFE pony tank available, so on with the hood and new glass sediment bowl.
I am happy to report no leaks, anywhere
I recorded the following videos with my cel phone. Hope the quality is OK.
https://nam01.safelinks.protection.outl ... reserved=0
https://www.youtube.com/watch?v=YjmIVKa ... eG&index=2
What a beautiful paint job. How did you get the cast iron components so smooth and shinny?
1947 Circle Cub Restoration http://farmallcub.com/phpBB2/viewtopic.php?f=1&t=94614
1952 Farmall Cub Project http://farmallcub.com/phpBB2/viewtopic.php?f=1&t=100147
1952 Farmall Cub Project http://farmallcub.com/phpBB2/viewtopic.php?f=1&t=100147
-
Dale Finch

- 10+ Years
- Posts: 6684
- Joined: Tue Apr 27, 2010 11:34 am
- Zip Code: 27517
- Tractors Owned: '51 Cub #140966 "Bruno" with Woods 59 mower
'55 Cub #187541 "Betty" with Fast Hitch
'55 Cub #190482 "Ben" with Woods 42 mower
'55 Cub #191739 "Bertha" with Woods 42 mower
'56 Cub #194370 "Boris" with Mott Flail mower - Circle of Safety: Y
- Location: NC, Chapel Hill
Re: R.O.C.K Restoration Project
I sure hope you wore soft rubber soled shoes getting on that platform!! Sure don't want any scuff marks! 
How are you going to promote/advertise for the auction/drawing? With all that work and money spent, you really need someone to promote it like crazy.
 Oh....unless your plan all along is to put in the only bids yourself!!!
How are you going to promote/advertise for the auction/drawing? With all that work and money spent, you really need someone to promote it like crazy.
Dale Finch


-
Eugene H.

- 10+ Years
- Posts: 95
- Joined: Wed Jul 29, 2009 7:04 am
- Zip Code: 36255
- Tractors Owned: 1952 Cub
1973 154-Lo-Boy - Location: Cragford, Alabama
-
Bill Hudson

- Team Cub

- Posts: 9528
- Joined: Wed Jul 26, 2006 10:50 am
- Zip Code: 44057
- Tractors Owned: 57 F-Cub - Dad & Mom's Cub
77 F-Cub - Red Long Stripe - Circle of Safety: Y
- Location: OH, Madison
Re: R.O.C.K Restoration Project
YEEEEEEEHAW!!!!! Gig 'em Aggies! Simply beautiful.
Bill
Bill
Bill
"The probability of life originating from accident is comparable to the probability of the unabridged dictionary resulting from an explosion in a printing shop." Edwin Conklin, biologist
Member of Ohio Chapter #6
"The probability of life originating from accident is comparable to the probability of the unabridged dictionary resulting from an explosion in a printing shop." Edwin Conklin, biologist
Member of Ohio Chapter #6
-
Glen

- 10+ Years
- Posts: 6152
- Joined: Mon Mar 19, 2012 7:33 pm
- Zip Code: 00000
- Tractors Owned: 1956 Farmall Cub with Fast Hitch, F-11 plow, Disc, Cultivator, Cub-22 mower
- Circle of Safety: Y
- Location: Wa.
Re: R.O.C.K Restoration Project
Hi,
Good you have it running again.
I think you would not need the sealer on the 2 air cleaner attaching bolts, if you have sealer on the head bolt threads there at the hole where the air cleaner bolts go into, and the sealer on the head bolt threads is holding. That would keep the coolant below the air cleaner bolts.
I have read on here that the air cleaner bolt holes go through into the head bolt hole in the head, so if coolant was leaking past the head bolt threads, and filling the bolt hole in the head, then it could run out the air cleaner attaching bolt threads.
It would be at head bolt hole number 11, in the torque sequence pic that Stanton posted on page 29 of this post.
-
k hutchins
- 10+ Years
- Posts: 687
- Joined: Tue Mar 27, 2012 5:48 pm
- Zip Code: 48843
- Tractors Owned: 1948 Farmall Cub
193 plow
1948 snow/grading blade
Woods 59 C3
Cub 144 cultivator
Cub 22 mower
Cub 172 one row planter
Original manuals for all the above - Circle of Safety: Y
Re: R.O.C.K Restoration Project
You put your heart and soul into this rebuild/restore. 
Job very well done
Job very well done
Why is there never enough time to do the job right, but always enough time to do it over. 
-
Bill Hudson
- Team Cub
- Posts: 9528
- Joined: Wed Jul 26, 2006 10:50 am
- Zip Code: 44057
- Tractors Owned: 57 F-Cub - Dad & Mom's Cub
77 F-Cub - Red Long Stripe - Circle of Safety: Y
- Location: OH, Madison
Re: R.O.C.K Restoration Project
Dale Finch wrote:How are you going to promote/advertise for the auction/drawing? With all that work and money spent, you really need someone to promote it like crazy.
Dale,
Take a look here https://rockride.org/events/. The 12th Annual ROCK Ride Barn Dance where Rocky will be auctioned off.
GIG 'EM AGGIES!
Bill
Bill
"The probability of life originating from accident is comparable to the probability of the unabridged dictionary resulting from an explosion in a printing shop." Edwin Conklin, biologist
Member of Ohio Chapter #6
"The probability of life originating from accident is comparable to the probability of the unabridged dictionary resulting from an explosion in a printing shop." Edwin Conklin, biologist
Member of Ohio Chapter #6
-
Dale Finch
- 10+ Years
- Posts: 6684
- Joined: Tue Apr 27, 2010 11:34 am
- Zip Code: 27517
- Tractors Owned: '51 Cub #140966 "Bruno" with Woods 59 mower
'55 Cub #187541 "Betty" with Fast Hitch
'55 Cub #190482 "Ben" with Woods 42 mower
'55 Cub #191739 "Bertha" with Woods 42 mower
'56 Cub #194370 "Boris" with Mott Flail mower - Circle of Safety: Y
- Location: NC, Chapel Hill
Re: R.O.C.K Restoration Project
That's quite an operation! But where is the tractor highlighted...or even mentioned??!! I didn't even see a picture of it. Did I miss it?
Dale Finch
-
rockfarmer
- 5+ Years
- Posts: 515
- Joined: Mon Apr 13, 2015 6:35 pm
- Zip Code: 78633
- Tractors Owned: 1947 Circle Cub
1948 Cub
1949 Cub (Rocky)
1950 Cub
1962 Cub - Circle of Safety: Y
Re: R.O.C.K Restoration Project
Dale Finch wrote:That's quite an operation! But where is the tractor highlighted...or even mentioned??!! I didn't even see a picture of it. Did I miss it?
That's a good point...will check into that tomorrow and make sure they are not waiting on me for anything. I hope not, busy right now trying to figure out why the PTO is spinning, while not engaged. The transmission shaft bushing is new, and greased. Do you think the PTO shaft is fitting tight and will wear itself loose, eventually not spinning?
-
Glen
- 10+ Years
- Posts: 6152
- Joined: Mon Mar 19, 2012 7:33 pm
- Zip Code: 00000
- Tractors Owned: 1956 Farmall Cub with Fast Hitch, F-11 plow, Disc, Cultivator, Cub-22 mower
- Circle of Safety: Y
- Location: Wa.
Re: R.O.C.K Restoration Project
Hi,
See if you can find out how much force is driving the PTO shaft with it disengaged.
With the engine stopped, move the PTO lever to the disengaged position, and turn the PTO shaft by hand.
If it is dragging a lot and it is tight in the PTO pilot bushing, you should take the PTO out and ream the bushing enough that the shaft quits turning when assembled, and disengaged.
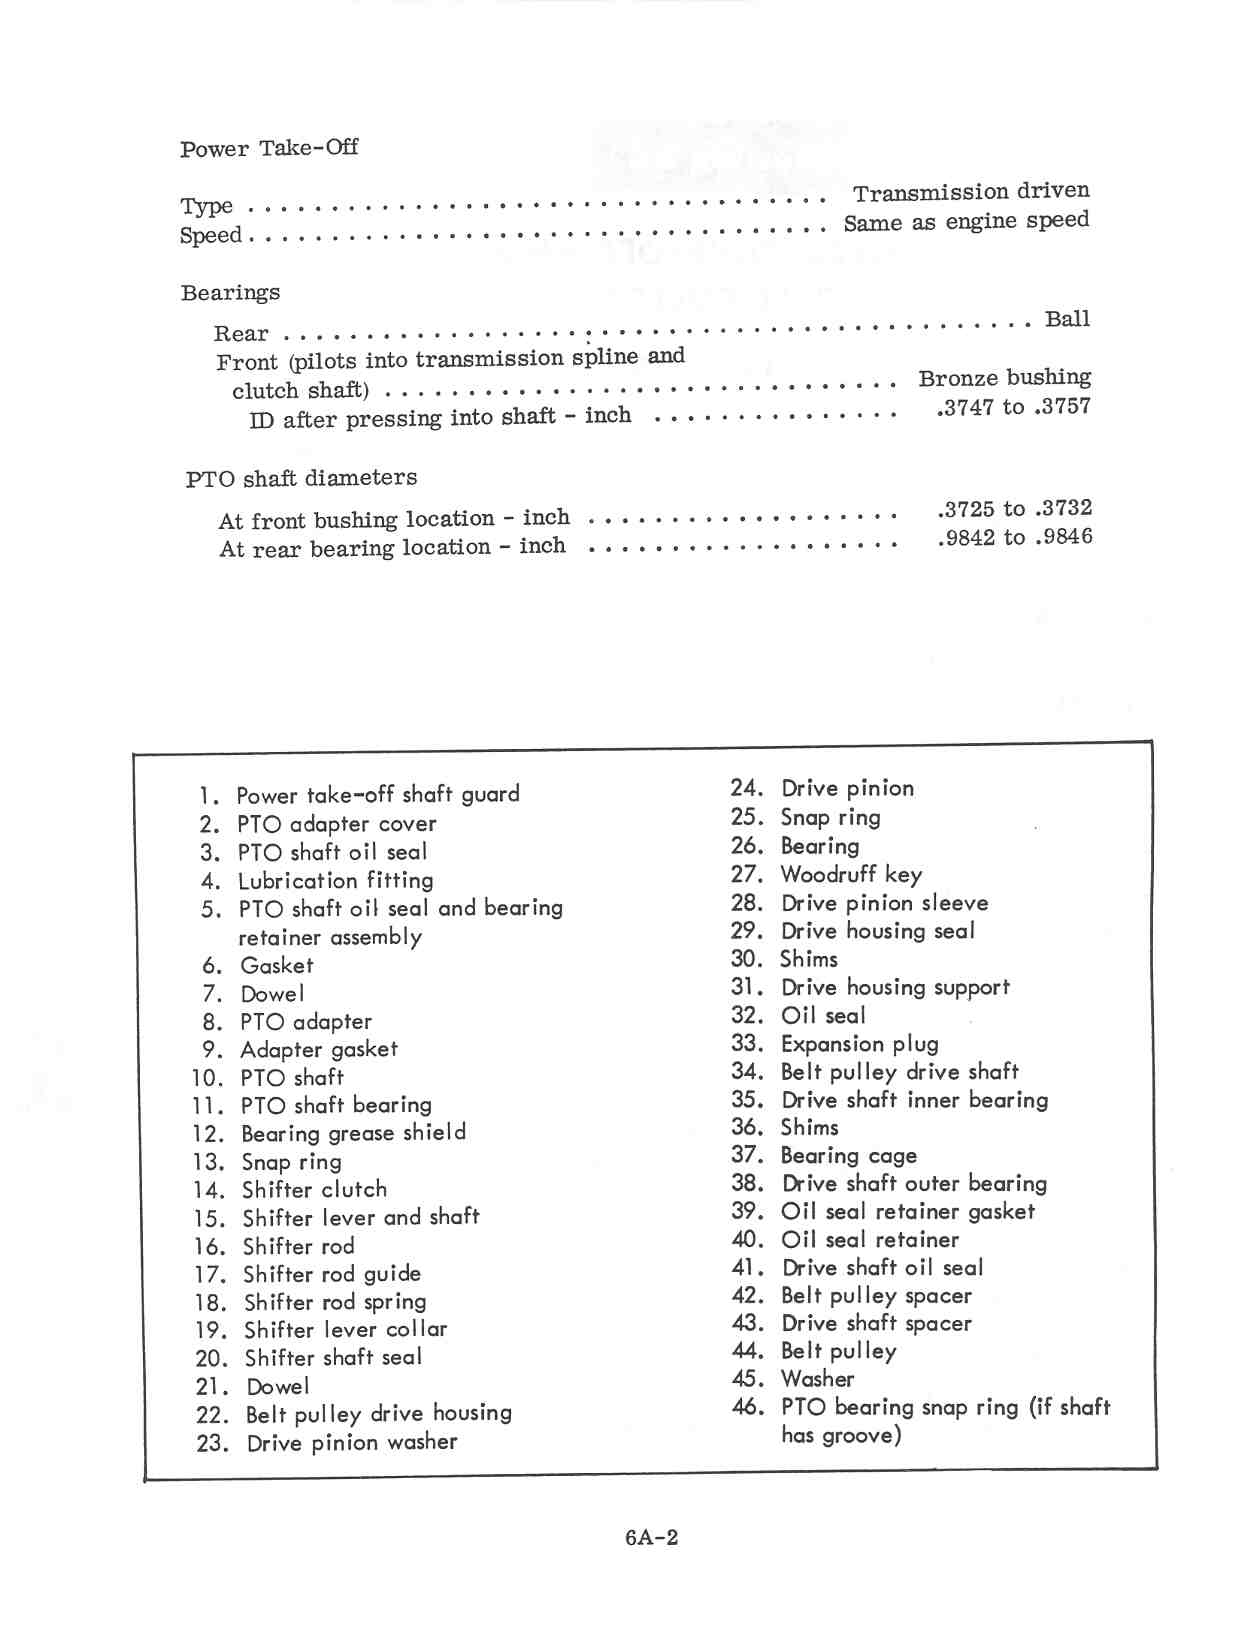
Below is a page from the Cub service manual, telling the ID of the PTO pilot bushing when installed. It is the 2nd page in the PTO section.
http://www.farmallcub.info/manuals/gss- ... 06A-02.jpg
See if you can find out how much force is driving the PTO shaft with it disengaged.
With the engine stopped, move the PTO lever to the disengaged position, and turn the PTO shaft by hand.
If it is dragging a lot and it is tight in the PTO pilot bushing, you should take the PTO out and ream the bushing enough that the shaft quits turning when assembled, and disengaged.
Below is a page from the Cub service manual, telling the ID of the PTO pilot bushing when installed. It is the 2nd page in the PTO section.
http://www.farmallcub.info/manuals/gss- ... 06A-02.jpg
Last edited by Glen on Wed Mar 28, 2018 6:51 pm, edited 1 time in total.
-
Dale Finch
- 10+ Years
- Posts: 6684
- Joined: Tue Apr 27, 2010 11:34 am
- Zip Code: 27517
- Tractors Owned: '51 Cub #140966 "Bruno" with Woods 59 mower
'55 Cub #187541 "Betty" with Fast Hitch
'55 Cub #190482 "Ben" with Woods 42 mower
'55 Cub #191739 "Bertha" with Woods 42 mower
'56 Cub #194370 "Boris" with Mott Flail mower - Circle of Safety: Y
- Location: NC, Chapel Hill
Re: R.O.C.K Restoration Project
I can't see how the PTO shaft could be turning, regardless of the bushing fit, IF THE PTO clutch is properly DISENGAGING. The 2 shafts are never touching each other...they are only linked together with that shifter clutch.
If you cannot disengage the PTO completely, I suspect the shifter lever pin is not installed into the shifter clutch correctly.
If you cannot disengage the PTO completely, I suspect the shifter lever pin is not installed into the shifter clutch correctly.
Last edited by Dale Finch on Wed Mar 28, 2018 9:28 am, edited 2 times in total.
Dale Finch
-
Dale Finch
- 10+ Years
- Posts: 6684
- Joined: Tue Apr 27, 2010 11:34 am
- Zip Code: 27517
- Tractors Owned: '51 Cub #140966 "Bruno" with Woods 59 mower
'55 Cub #187541 "Betty" with Fast Hitch
'55 Cub #190482 "Ben" with Woods 42 mower
'55 Cub #191739 "Bertha" with Woods 42 mower
'56 Cub #194370 "Boris" with Mott Flail mower - Circle of Safety: Y
- Location: NC, Chapel Hill
Re: R.O.C.K Restoration Project
In this PTO Parts diagram, the SHIFTER CLUTCH is #14 and the SHIFTER LEVER is #15. I suspect something there is incorrect.
http://farmallcub.com/rudi_cub/www.cleancomputes.com/Cub/Cub%20Parts%20Manuals/TC-37F%20Revision%206%20(08-79)/Group%20-%2007%20-%20Drive%20Train/Page-13.jpg
http://farmallcub.com/rudi_cub/www.cleancomputes.com/Cub/Cub%20Parts%20Manuals/TC-37F%20Revision%206%20(08-79)/Group%20-%2007%20-%20Drive%20Train/Page-13.jpg
/Group%20-%2007%20-%20Drive%20Train/Page-13.jpg)
Dale Finch
-
- Similar Topics
- Replies
- Views
- Last post
-
- 4
- 215
-
by electricjake
Sun Jan 02, 2022 3:14 pm
-
- 7
- 284
-
by Dale Finch
Thu Jun 22, 2023 8:44 am
-
- 1
- 160
-
by Magnum
Tue Feb 21, 2023 8:59 pm
-
- 13
- 643
-
by Glen
Sat Aug 28, 2021 1:25 am
-
-
Cub demonstrator restoration Attachment(s)
by lgt_hunter » Sat Oct 29, 2022 2:56 pm » in Farmall Cub - 6
- 315
-
by lgt_hunter
Sun Oct 30, 2022 10:22 am
-
Who is online
Users browsing this forum: No registered users and 4 guests


