This site uses cookies to maintain login information on FarmallCub.Com. Click the X in the banner upper right corner to close this notice. For more information on our privacy policy, visit this link: Privacy Policy
NEW REGISTERED MEMBERS: Be sure to check your SPAM/JUNK folders for the activation email.
Clutch Inspection
Forum rules
Notice: For sale and wanted posts are not allowed in this forum. Please use our free classifieds or one of our site sponsors for your tractor and parts needs.
Notice: For sale and wanted posts are not allowed in this forum. Please use our free classifieds or one of our site sponsors for your tractor and parts needs.
-
DonMountain
- 10+ Years

- Posts: 347
- Joined: Tue May 05, 2009 9:54 am
- Zip Code: 65101
- Location: Jefferson City, MO
Clutch Inspection
After much toil, I finally got my 1959 Cub Lo-Boy apart due to a bad clutch. I don't really see what is wrong with it, so I guess I will just replace all the parts? And I see there were two makes of clutches on these tractors. Do either one fit? So, my major question is, what and how do I inspect the old parts to see what I need?
1959 International Cub Lo-Boy W/Fast hitch, 59 Woods, dozer blade, plow
1954 Farmall Super C W/Fast hitch, belly dozer blade
1950 Farmall M
1954 Farmall Super C W/Fast hitch, belly dozer blade
1950 Farmall M
-
Glen

- 10+ Years
- Posts: 6154
- Joined: Mon Mar 19, 2012 7:33 pm
- Zip Code: 00000
- Tractors Owned: 1956 Farmall Cub with Fast Hitch, F-11 plow, Disc, Cultivator, Cub-22 mower
- Circle of Safety: Y
- Location: Wa.
Re: Clutch Inspection
Hi,
Yes, either of the 2 brands of clutches fits the flywheel. The Rockford pressure plate has 6 coil springs, and is the more common one, I think.
Posting some pics of the parts would be helpful, so we can see them.
There is some reason the finger height kept changing, I think you said it kept changing. Look at the adjustment screws and lock nuts. The lock nuts should be tight.
The clutch parts should look in about the same condition as new parts to reuse them.
-
DonMountain
- 10+ Years
- Posts: 347
- Joined: Tue May 05, 2009 9:54 am
- Zip Code: 65101
- Location: Jefferson City, MO
Re: Clutch Inspection
Ok, I took a close look at all the parts, and it seems like there is a combination of worn things. The release bearing is worn down to a little under 1/4". The clutch release yoke holes are all elongated where they hold the release bearing and at the pivot pin at the top. And I would guess the clutch disk itself is probably worn too. So, I had adjusted the clutch fingers several times trying to take up all of this slack and play in all the parts. So, for the $200 I am just going to replace all the parts. The next question is, how to take off and bolt the new pressure plate/clutch disk in? I am also going to order the plastic clutch alignment tool because I can't seem to find my old tool set I bought 50 years ago. Funny how that stuff seems to disappear just when you need it. So, can I just loosen up the pressure plate bolts until it releases? Or do I need to take every other bolt out and thread in maybe a half inch longer bolt to release it completely?
1959 International Cub Lo-Boy W/Fast hitch, 59 Woods, dozer blade, plow
1954 Farmall Super C W/Fast hitch, belly dozer blade
1950 Farmall M
1954 Farmall Super C W/Fast hitch, belly dozer blade
1950 Farmall M
-
Glen
- 10+ Years
- Posts: 6154
- Joined: Mon Mar 19, 2012 7:33 pm
- Zip Code: 00000
- Tractors Owned: 1956 Farmall Cub with Fast Hitch, F-11 plow, Disc, Cultivator, Cub-22 mower
- Circle of Safety: Y
- Location: Wa.
Re: Clutch Inspection
Hi,
Just unscrew the 6 bolts that hold the pressure plate on the flywheel. The tension will go off the springs as the bolts are unscrewed.
You could unscrew them sort of evenly, but not important with one you aren't going to use again.
Tighten the bolts evenly when putting the new pressure plate on, it loads the springs as you tighten the bolts.
The longer side of the spline hole in the clutch disc goes to the rear.
Check the lining on the disc for wear, they have rivets, the lining is only a little above the rivet heads on a new disc. You can see the pics at TM Tractor's listing for a new disc.
The throwout bearing holder, and long pin at the top of it, should not be worn, or have loose fitting holes. The bearing needs to be held so it can't move around side to side.
If the rear engine seal is leaking, this is a good time to repair it. I think I wrote that before. The tractor has to be split to replace it.
Read my posts from your other post for info, before putting the clutch together, if needed.
-
DonMountain
- 10+ Years
- Posts: 347
- Joined: Tue May 05, 2009 9:54 am
- Zip Code: 65101
- Location: Jefferson City, MO
Re: Clutch Inspection
I checked the clutch disk and the rivets are only 0.005" or so off of the rivets. So, I think it needs to be replaced also. Another question is, are the pressure plate fingers adjusted properly to receive the new disk at the correct dimension? Or do I need to adjust them after installation of the new pressure plate/disk?
1959 International Cub Lo-Boy W/Fast hitch, 59 Woods, dozer blade, plow
1954 Farmall Super C W/Fast hitch, belly dozer blade
1950 Farmall M
1954 Farmall Super C W/Fast hitch, belly dozer blade
1950 Farmall M
-
DonMountain
- 10+ Years
- Posts: 347
- Joined: Tue May 05, 2009 9:54 am
- Zip Code: 65101
- Location: Jefferson City, MO
Re: Clutch Inspection
I also measured the transmission shaft end that fits into the bushing on the end of the crankshaft, and it measures 0.621" with a micrometer. The book value is 0.621"=0.622", so I am good there. The inside of the bushing measures 0.628", with the allowable clearance of 0.006" between the two, that puts the bushing at only 0.001" away from acceptable. Of course that number is probably a ream-to clearance for a new tractor. So, should I leave the old one in there or try to replace it?
1959 International Cub Lo-Boy W/Fast hitch, 59 Woods, dozer blade, plow
1954 Farmall Super C W/Fast hitch, belly dozer blade
1950 Farmall M
1954 Farmall Super C W/Fast hitch, belly dozer blade
1950 Farmall M
-
DonMountain
- 10+ Years
- Posts: 347
- Joined: Tue May 05, 2009 9:54 am
- Zip Code: 65101
- Location: Jefferson City, MO
Re: Clutch Inspection
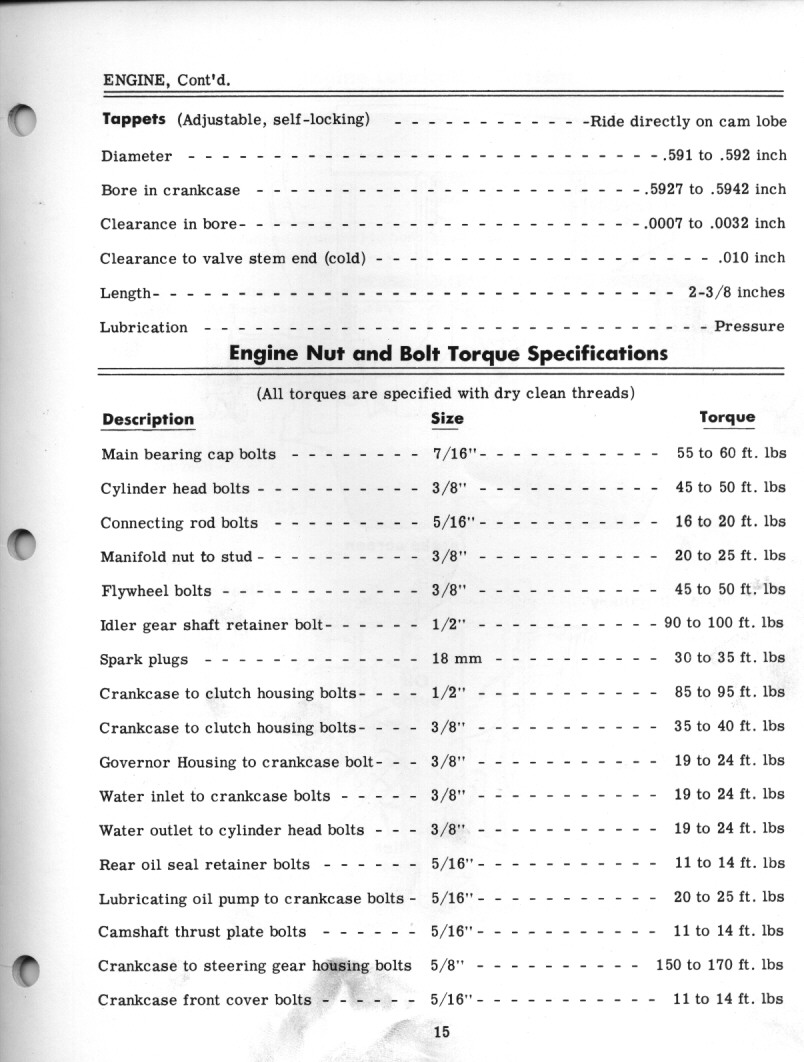
I ordered a bunch of parts for the clutch and supporting stuff from TM Tractor. I wonder how long it takes for orders to get to Mid-Missouri from them? Now I need to find all of the torque specs to put it back together. Clutch pressure plate hold-down bolts, bell-housing to engine bolts, hydraulic line bolts, and etc.
1959 International Cub Lo-Boy W/Fast hitch, 59 Woods, dozer blade, plow
1954 Farmall Super C W/Fast hitch, belly dozer blade
1950 Farmall M
1954 Farmall Super C W/Fast hitch, belly dozer blade
1950 Farmall M
-
Dale Finch

- 10+ Years
- Posts: 6686
- Joined: Tue Apr 27, 2010 11:34 am
- Zip Code: 27517
- Tractors Owned: '51 Cub #140966 "Bruno" with Woods 59 mower
'55 Cub #187541 "Betty" with Fast Hitch
'55 Cub #190482 "Ben" with Woods 42 mower
'55 Cub #191739 "Bertha" with Woods 42 mower
'56 Cub #194370 "Boris" with Mott Flail mower - Circle of Safety: Y
- Location: NC, Chapel Hill
Re: Clutch Inspection
Here are some specs from the Blue Ribbon Manual GS 1008:
http://farmallcub.com/rudi_cub/www.cleancomputes.com/Cub/Blue%20Ribbon%20Service%20Manuals/GSS-1008%20Specifications/Page%2015.jpg
And here is the GSS-1411 Service Manual, with torque specs in the relative sections:
http://farmallcub.com/rudi_cub/www.cleancomputes.com/Cub/Blue%20Ribbon%20Service%20Manuals/GSS-1411%20Service%20Manual%20for%20Cubs%20and%20Lo-boy%20Tractors/index.html
Here's the section for the CLUTCH:
http://farmallcub.com/rudi_cub/www.cleancomputes.com/Cub/Blue%20Ribbon%20Service%20Manuals/GSS-1411%20Service%20Manual%20for%20Cubs%20and%20Lo-boy%20Tractors/Section%205%20-%20Engine%20Clutch/Section%205%20-%20Engine%20Clutch.htm
Dale Finch


-
Glen
- 10+ Years
- Posts: 6154
- Joined: Mon Mar 19, 2012 7:33 pm
- Zip Code: 00000
- Tractors Owned: 1956 Farmall Cub with Fast Hitch, F-11 plow, Disc, Cultivator, Cub-22 mower
- Circle of Safety: Y
- Location: Wa.
Re: Clutch Inspection
Hi,
They have said on here before that a new pressure plate needs the finger height set, after you assemble it on the flywheel, before putting the clutch housing on.
Set them to 1 1/4" high from the surface below, you probably know.
You could phone them and ask how long it takes parts to get to you.
It sounds like the pilot bushing is getting worn to the upper specs. If you don't feel comfortable with replacing it, you could leave it there, it won't wear much probably for a while if you grease it, before putting the clutch on.
It would be better to replace it, but you may need to ream it after installation. Don't leave it too small an ID, it won't work. You've probably read about it before.
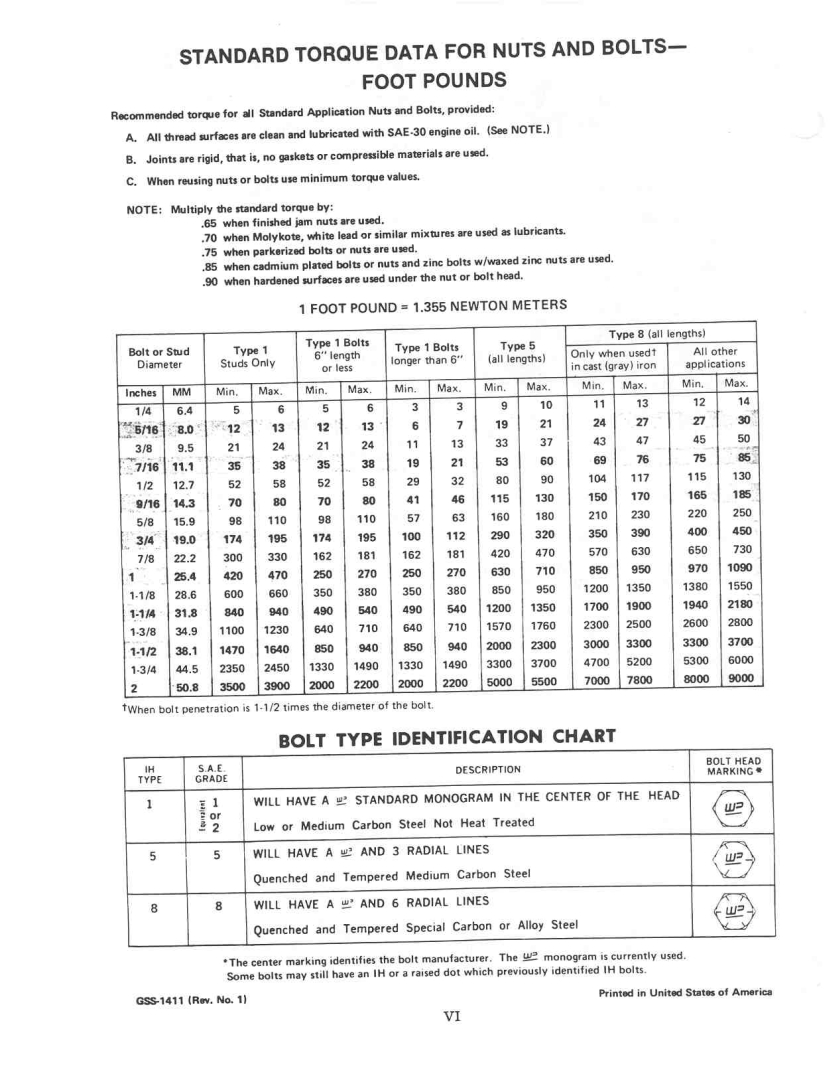
The torque table for bolts is in the Cub service manual, GSS-1411, on page 6, at the front of the manual.
I posted the manual before, Dale posted it above.
There are bolts that are not listed specifically in the manual. For those, use the table. The table is for modern bolts, with modern markings on the heads. It is shown at the lower right of the page. The clutch pressure plate bolts are probably grade 5. Don't overtighten them. They are 5/16" bolts, the table say about 20 ft lbs.
The Touch Control tubes upper end, 3 bolts would be 20 ft lbs.
The lower end, 2 bolts are 3/8", they go into the aluminum pump, so not as tight as the table says, maybe 25 ft lbs.
http://farmallcub.com/rudi_cub/www.clea ... age-06.jpg
Check the 4 flywheel bolts, be sure they are tight, while you can get to them.
They have said on here before that a new pressure plate needs the finger height set, after you assemble it on the flywheel, before putting the clutch housing on.
Set them to 1 1/4" high from the surface below, you probably know.
You could phone them and ask how long it takes parts to get to you.
It sounds like the pilot bushing is getting worn to the upper specs. If you don't feel comfortable with replacing it, you could leave it there, it won't wear much probably for a while if you grease it, before putting the clutch on.
It would be better to replace it, but you may need to ream it after installation. Don't leave it too small an ID, it won't work. You've probably read about it before.
The torque table for bolts is in the Cub service manual, GSS-1411, on page 6, at the front of the manual.
I posted the manual before, Dale posted it above.
There are bolts that are not listed specifically in the manual. For those, use the table. The table is for modern bolts, with modern markings on the heads. It is shown at the lower right of the page. The clutch pressure plate bolts are probably grade 5. Don't overtighten them. They are 5/16" bolts, the table say about 20 ft lbs.
The Touch Control tubes upper end, 3 bolts would be 20 ft lbs.
The lower end, 2 bolts are 3/8", they go into the aluminum pump, so not as tight as the table says, maybe 25 ft lbs.
http://farmallcub.com/rudi_cub/www.clea ... age-06.jpg
Check the 4 flywheel bolts, be sure they are tight, while you can get to them.
-
DonMountain
- 10+ Years
- Posts: 347
- Joined: Tue May 05, 2009 9:54 am
- Zip Code: 65101
- Location: Jefferson City, MO
Re: Clutch Inspection
Thanks for all of this bolt information. On taking the pressure plate hold-down bolts off I kind of rounded the corners on a couple until I figured out that my half inch drive socket didn't fit down square on the heads of some of them. But they are original IH bolts and I would like to save them if I can by touching up the heads with a file. If not, now I can purchase the proper strength bolts from the machine shop.
1959 International Cub Lo-Boy W/Fast hitch, 59 Woods, dozer blade, plow
1954 Farmall Super C W/Fast hitch, belly dozer blade
1950 Farmall M
1954 Farmall Super C W/Fast hitch, belly dozer blade
1950 Farmall M
-
Cubfriend
- 10+ Years
- Posts: 1178
- Joined: Sat Jan 28, 2012 3:13 pm
- Zip Code: 68803
- Tractors Owned: 1948 Cub, Kittie; 1948 Cub, Harold; 1949 Cub, 49er; 1951 Cub, Tucker; 1951 Cub, Homely; 1956 Cub High Crop; 1957 Cub Loboy; 57 Cub Loboy w/fasthitch + 194 plow; 1958 Cub LoBoy w/FH, Popeye; 1961 Cub, Beater; #1-1962 Cub Loboy Dually (Originally Orange) w/Foot Throttle; #2-1962 Cub Loboy Dually (Originally Orange) w/Foot throttle; Yellow 1963 Cub Loboy and blade; 1970 Cub, Cubbie; and 5 other Cubs in various stages of disaasembly and disrepair; 1962 Cub Cadet Original; 2 other Cub Cadet Originals; Cub Cadet 100; Cub Cadet 124 w/Creeper; Cub Cadet 147; 2 Cub Cadet 129's; Cub Cadet 149; 1948 Allis Chalmers C w/single frontwheel; 1944 Farmall H w/Tokhiem Cab; 2 One Point Fasthitch Carriers; 2-#100 Fasthitch Rear Blade; 2 Sets Cub 144 Cultivators; 2 Sets Cub #252 Cultivators; 3 Cub #193 Mouldboard Plows; 1 Cub #193 Slatted Plow; 1 1948 Cub-54 Snow Plow; 3 Cub-54 49-5 Snow Plows; Cub #6 Tool Bar w/Disc Blades & Middlebuster. 2-#105 sickle mowers, #152 disc plow
- Circle of Safety: Y
- Location: Grand Island, Nebraska
Re: Clutch Inspection
If for some reason you take out the flywheel bolts reseal the threads on the bolts as they go into the crankcase and oil can follow the threads out and get on the clutch.
Frank
-
Cubfriend
- 10+ Years
- Posts: 1178
- Joined: Sat Jan 28, 2012 3:13 pm
- Zip Code: 68803
- Tractors Owned: 1948 Cub, Kittie; 1948 Cub, Harold; 1949 Cub, 49er; 1951 Cub, Tucker; 1951 Cub, Homely; 1956 Cub High Crop; 1957 Cub Loboy; 57 Cub Loboy w/fasthitch + 194 plow; 1958 Cub LoBoy w/FH, Popeye; 1961 Cub, Beater; #1-1962 Cub Loboy Dually (Originally Orange) w/Foot Throttle; #2-1962 Cub Loboy Dually (Originally Orange) w/Foot throttle; Yellow 1963 Cub Loboy and blade; 1970 Cub, Cubbie; and 5 other Cubs in various stages of disaasembly and disrepair; 1962 Cub Cadet Original; 2 other Cub Cadet Originals; Cub Cadet 100; Cub Cadet 124 w/Creeper; Cub Cadet 147; 2 Cub Cadet 129's; Cub Cadet 149; 1948 Allis Chalmers C w/single frontwheel; 1944 Farmall H w/Tokhiem Cab; 2 One Point Fasthitch Carriers; 2-#100 Fasthitch Rear Blade; 2 Sets Cub 144 Cultivators; 2 Sets Cub #252 Cultivators; 3 Cub #193 Mouldboard Plows; 1 Cub #193 Slatted Plow; 1 1948 Cub-54 Snow Plow; 3 Cub-54 49-5 Snow Plows; Cub #6 Tool Bar w/Disc Blades & Middlebuster. 2-#105 sickle mowers, #152 disc plow
- Circle of Safety: Y
- Location: Grand Island, Nebraska
Re: Clutch Inspection
I would have no problem leaving that original pilot bushing in the crankshaft at .001 out of tolerance. Noting all I have read about trouble with gears grinding after installing a new bushing. (Too tight of tolerance) If you are equipped to handle reaming the bushing to the correct specs go for it if you want. This is only my opinion. Take it for what it’s worth.
Frank
-
DonMountain
- 10+ Years
- Posts: 347
- Joined: Tue May 05, 2009 9:54 am
- Zip Code: 65101
- Location: Jefferson City, MO
Re: Clutch Inspection
I decided to leave that pilot bushing in the flywheel instead of purchasing the reamer to install a new one. Another question I have is, since I had to disconnect all the wiring harness when splitting the tractor, will I need to polarize the generator when I put it all back together?
1959 International Cub Lo-Boy W/Fast hitch, 59 Woods, dozer blade, plow
1954 Farmall Super C W/Fast hitch, belly dozer blade
1950 Farmall M
1954 Farmall Super C W/Fast hitch, belly dozer blade
1950 Farmall M
-
Glen
- 10+ Years
- Posts: 6154
- Joined: Mon Mar 19, 2012 7:33 pm
- Zip Code: 00000
- Tractors Owned: 1956 Farmall Cub with Fast Hitch, F-11 plow, Disc, Cultivator, Cub-22 mower
- Circle of Safety: Y
- Location: Wa.
Re: Clutch Inspection
Hi,
Yes, good idea to polarize the system when it is together again, before starting the engine.
You probably know how.
For the original 6 volt, positive ground system, it can be done at the voltage regulator, with a short piece of electrical wire, touch the Bat and Gen posts for 1 second, there should be a small spark.
Below is a page from the 1957 LoBoy owner's manual telling how, the info begins at the lower left of the page.
http://farmallcub.com/rudi_cub/www.clea ... e%2052.jpg
-
DonMountain
- 10+ Years
- Posts: 347
- Joined: Tue May 05, 2009 9:54 am
- Zip Code: 65101
- Location: Jefferson City, MO
Re: Clutch Inspection
I received all of my clutch and tune up parts from TM Tractor today (Monday) after just ordering them this last Friday. So, they are very quick on delivery. And I was amazed after comparing the old clutch disk and throw-out bearing to the new ones. No wonder I was having clutch troubles. Now I need to study all the book information given above for the clean-up and reassembly.
1959 International Cub Lo-Boy W/Fast hitch, 59 Woods, dozer blade, plow
1954 Farmall Super C W/Fast hitch, belly dozer blade
1950 Farmall M
1954 Farmall Super C W/Fast hitch, belly dozer blade
1950 Farmall M
-
- Similar Topics
- Replies
- Views
- Last post
-
- 24
- 418
-
by Glen
Sun Apr 28, 2024 10:10 pm
-
- 7
- 373
-
by kully560
Sun Jan 22, 2023 2:24 pm
-
- 1
- 136
-
by Jim Becker
Thu Jan 19, 2023 9:59 pm
-
- 1
- 303
-
by Dale Finch
Fri Jan 28, 2022 8:35 am
-
- 18
- 328
-
by inairam
Mon Aug 01, 2022 12:01 pm
Who is online
Users browsing this forum: Majestic-12 [Bot] and 3 guests


