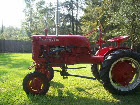
I bought a 3-point hitch kit from Red Land Hill, and asked before hand if it would fit my Super A. The reply was "Yes, it is a Category 1, and would you like to buy our super-de-duper expensive special Super A retrofit kit for $500+", but I just bought the components and am fabricating the rest myself. As always, I think I'm saving money until I get around to having to fill in the rest.
So, I have the original 2-point hitch mounted on the tractor just fine, and I've put on the lower lift arms (I fabricated some really nice pins on my lathe that thread into the final drives) but I notice that the lower lift arms are *really long*.
They are attached at the same point as the original drawbar (the pins replaced the lower bolts at the rear of the final drives), and the two adjustable links go straight up from the lower lift arms to the tips of the 2-point hitch's upper lift arms , but then the lower lift arms keep going 18" or more after that!
It seems like the lower lift arms should only go a few more inches past the adjustable links. Merlin sent me a drawing that showed something like 21" lower lift arms, but these ones are a good 30" probably, I'll have to measure them when it stops pouring down rain, and if my house doesn't get washed away. The river out back is *raging*.
This site uses cookies to maintain login information on FarmallCub.Com. Click the X in the banner upper right corner to close this notice. For more information on our privacy policy, visit this link: Privacy Policy
NEW REGISTERED MEMBERS: Be sure to check your SPAM/JUNK folders for the activation email.
Am I in 3-Point Trouble?
Forum rules
Notice: For sale and wanted posts are not allowed in this forum. Please use our free classifieds or one of our site sponsors for your tractor and parts needs.
Notice: For sale and wanted posts are not allowed in this forum. Please use our free classifieds or one of our site sponsors for your tractor and parts needs.
-
allenlook

- Cub Pro

- Posts: 1795
- Joined: Sat Jul 31, 2004 10:37 pm
- Zip Code: 12020
- Location: NY, Saratoga Springs
Am I in 3-Point Trouble?
Searchable Cub Parts Database and Manual Galleries at www.farmallcub.info - Computerized Carving at www.bitcarving.com
-
Matt Kirsch
- 10+ Years

- Posts: 4953
- Joined: Tue Jun 08, 2004 3:04 pm
- Zip Code: 14559
- Circle of Safety: Y
- Location: Rochester, NY
Allen,
The A never had a "two point" lift of any sort. I think you're talking about the rear rockshaft, which has two lift arms.
Whatever you have, it doesn't sound right. Are you sure that's how it's supposed to be installed? Maybe you have the arms turned around backwards? Are you sure it's not supposed to be bolted to the front mount points on the casting? Are you sure you're not missing a bracket or something?
It sounds like they sold you a pair of generic Category 1 arms and pins.
-
allenlook
- Cub Pro
- Posts: 1795
- Joined: Sat Jul 31, 2004 10:37 pm
- Zip Code: 12020
- Location: NY, Saratoga Springs
Well, I did get a generic set, but that's my own fault, because that's what I ordered.
As the lift arms are supported from the rear rockshaft by adjustable links that are hanging nicely straight-up-and-down, I don't think I have mounted the lift arms incorrectly, I just think there needs to be about 6 inches removed from the back half of the lower lift arms! They are way longer than 21"...
Well, I'm going to continue to fabricate the top link mount, and then I'll also try to post some pics. What a booger-up
Searchable Cub Parts Database and Manual Galleries at www.farmallcub.info - Computerized Carving at www.bitcarving.com
-
Matt Kirsch
- 10+ Years
- Posts: 4953
- Joined: Tue Jun 08, 2004 3:04 pm
- Zip Code: 14559
- Circle of Safety: Y
- Location: Rochester, NY
-
allenlook
- Cub Pro
- Posts: 1795
- Joined: Sat Jul 31, 2004 10:37 pm
- Zip Code: 12020
- Location: NY, Saratoga Springs
I wish 
I can bolt and weld the top link together safe enough, but I don't think my Mig or my oxy-acetylene kit are big enough to weld together that much steel on the lower lift arms
I can bolt and weld the top link together safe enough, but I don't think my Mig or my oxy-acetylene kit are big enough to weld together that much steel on the lower lift arms
Searchable Cub Parts Database and Manual Galleries at www.farmallcub.info - Computerized Carving at www.bitcarving.com
-
400lbsonacubseatspring
- 10+ Years
-
allenlook
- Cub Pro
- Posts: 1795
- Joined: Sat Jul 31, 2004 10:37 pm
- Zip Code: 12020
- Location: NY, Saratoga Springs
I figured having the adjustable links straight up and down would put the least strain on the pins on the final drives. If I move the lower lift arms way forward to the bolts on the front of the final drives, I could drill holes much closer to their rear mounting holes!
I'll give that a look-see the next time I'm out there
I'll give that a look-see the next time I'm out there
Searchable Cub Parts Database and Manual Galleries at www.farmallcub.info - Computerized Carving at www.bitcarving.com
-
Rick Prentice

- Team Cub Guide

- Posts: 5636
- Joined: Mon Nov 01, 2004 7:24 am
- Zip Code: 43528
- Tractors Owned: 47(circle cub),48(Floyd backhoe),49,,51,54 and another 55
- Circle of Safety: Y
- Location: OH, Holland
Hey Allen. If it was me, I'd leave them that long for now, get you a top link that will reach out to match the lower lift arm length,and check things out first. The main thing you'll run into if you shorten the arms, is when you finally buy a rear scraper blade and want to pull the pin to spin the blade around in reverse position, it will hit your tires because you cut the dumb arms off an 1" too short (don't ask).The power from the A should work just fine with your adjusters straight up and down, plus it probably looks more professional When I built some 3 points, I just bought the weld on ends and made my own arms, was cheaper that way. You probably paid over $40.00 a piece for the ones you bought. Usually the Ford's(9n,2n,8n) are the normal ones sold. Also, make sure you install some criss-cross chains to keep your arms from swinging side to side and getting into the tires when turning. Just my .02, Rick
When I told my dad I've been misplacing things and doing stupid stuff----His reply---"It only gets better"
-
allenlook
- Cub Pro
- Posts: 1795
- Joined: Sat Jul 31, 2004 10:37 pm
- Zip Code: 12020
- Location: NY, Saratoga Springs
Thanks Rick, I bought the hooks for the chains and put them on the lift arms, but I can't figure out where to hook them up on the tractor.
I finished fabricating the top link mount tonight and put everything together, including a couple vertical A bars for my drawbar. The're a little too long for the moment, but it sure looks cool!!!
I finished fabricating the top link mount tonight and put everything together, including a couple vertical A bars for my drawbar. The're a little too long for the moment, but it sure looks cool!!!
Searchable Cub Parts Database and Manual Galleries at www.farmallcub.info - Computerized Carving at www.bitcarving.com
-
Rick Prentice
- Team Cub Guide
- Posts: 5636
- Joined: Mon Nov 01, 2004 7:24 am
- Zip Code: 43528
- Tractors Owned: 47(circle cub),48(Floyd backhoe),49,,51,54 and another 55
- Circle of Safety: Y
- Location: OH, Holland
Hi allen. A real simple and effective way to mount the chains, and also fast for adjusting them is like the pic below. Just find some 1/8 inch by about 2" wide flatstock, drill your 7/8 link pin hole, and cut your slot for whatever size chain you bought, and your ready to go, after a slight bend. Have fun, Rick

When I told my dad I've been misplacing things and doing stupid stuff----His reply---"It only gets better"
-
Merlin
- Cub Pro
- Posts: 940
- Joined: Mon Feb 03, 2003 8:06 am
- Zip Code: 00000
- Location: Ponchatoula, La.

-
Rudi

- Cub Pro
- Posts: 28706
- Joined: Sun Feb 02, 2003 8:37 pm
- Zip Code: E1A7J3
- Skype Name: R.H. "Rudi" Saueracker, SSM
- Tractors Owned: 1947 Cub "Granny"
1948 Cub "Ellie-Mae"
1968 Cub Lo-Boy
Dad's Putt-Putt
IH 129 CC
McCormick 100 Manure Spreader
McCormick 100-H Manure Spreader
Post Hole Digger
M-H #1 Potato Digger - Circle of Safety: Y
- Twitter ID: Rudi Saueracker, SSM
- Location: NB Dieppe, Canada
-
Rick Prentice
- Team Cub Guide
- Posts: 5636
- Joined: Mon Nov 01, 2004 7:24 am
- Zip Code: 43528
- Tractors Owned: 47(circle cub),48(Floyd backhoe),49,,51,54 and another 55
- Circle of Safety: Y
- Location: OH, Holland
Yep Merlin, I'm with Rudi. Let's see some close-up pics with different angles. I'm up for some new ideas. And, what else do you have back there? Why does your pto shaft look so low, another invention of yours
Everything looks nice and neat to me. Nice job, Rick
Everything looks nice and neat to me. Nice job, Rick
When I told my dad I've been misplacing things and doing stupid stuff----His reply---"It only gets better"
-
Jim Becker
- Team Cub

- Posts: 17291
- Joined: Sun Feb 02, 2003 2:59 pm
- Zip Code: 55319
- Circle of Safety: Y
- Location: MN
-
slingblade
- 10+ Years
- Posts: 24
- Joined: Wed Apr 26, 2006 3:07 pm
- Location: N.C. Lincolnton
-
- Similar Topics
- Replies
- Views
- Last post
-
-
One point lift height Attachment(s)
by Saucymynx » Tue Jan 11, 2022 10:12 pm » in Farmall A, Super A, AV, 100, 130 & 140 - 33
- 1299
-
by SONNY
Sat Jan 15, 2022 5:42 pm
-
-
-
Point Gap For Super A With Distributor
by ricky racer » Sun Dec 31, 2023 4:15 pm » in Farmall A, Super A, AV, 100, 130 & 140 - 6
- 761
-
by AL Farmall Boy
Mon Jan 08, 2024 10:33 pm
-
Return to “Farmall A, Super A, AV, 100, 130 & 140”
Who is online
Users browsing this forum: No registered users and 2 guests


